Adding Dynamic Rows in ASP.NET GridView Control with TextBoxes and with Delete functionality

 
      <asp:gridview ID="Gridview1" runat="server" ShowFooter="true"
            AutoGenerateColumns="false" onrowcreated="Gridview1_RowCreated">
            <Columns>
            <asp:BoundField DataField="RowNumber" HeaderText="Row Number" />
            <asp:TemplateField HeaderText="Header 1">
                <ItemTemplate>
                    <asp:TextBox ID="TextBox1" runat="server"></asp:TextBox>
                </ItemTemplate>
            </asp:TemplateField>
            <asp:TemplateField HeaderText="Header 2">
                <ItemTemplate>
                    <asp:TextBox ID="TextBox2" runat="server"></asp:TextBox>
                </ItemTemplate>
            </asp:TemplateField>
            <asp:TemplateField HeaderText="Header 3">
                <ItemTemplate>
                     <asp:TextBox ID="TextBox3" runat="server"></asp:TextBox>
                </ItemTemplate>
                <FooterStyle HorizontalAlign="Right" />
                <FooterTemplate>
                 <asp:Button ID="ButtonAdd" runat="server" Text="Add New Row"
                        onclick="ButtonAdd_Click" />
                </FooterTemplate>
            </asp:TemplateField>
                 <asp:TemplateField>
                <ItemTemplate>
                    <asp:LinkButton ID="LinkButton1" runat="server" onclick="LinkButton1_Click">Remove</asp:LinkButton>
                </ItemTemplate>
            </asp:TemplateField>
            </Columns>
        </asp:gridview>
 
As you noticed, we have added a LinkButton at the very last column of the GridView wherein a user can delete a row when he invokes it.
 
CODES FOR DELETE:
 
// Hide the Remove Button at the last row of the GridView
    protected void Gridview1_RowCreated(object sender, GridViewRowEventArgs e)
    {
        if (e.Row.RowType == DataControlRowType.DataRow)
        {
              DataTable  dt = (DataTable)ViewState["CurrentTable"];
              LinkButton lb = (LinkButton)e.Row.FindControl("LinkButton1");
              if (lb != null)
              {
                  if (dt.Rows.Count > 1)
                  {
                      if (e.Row.RowIndex == dt.Rows.Count - 1)
                      {
                          lb.Visible = false;
                      }
                  }
                  else
                  {
                      lb.Visible = false;
                  }
              }
        }
    }
 
    protected void LinkButton1_Click(object sender, EventArgs e)
    {
        LinkButton lb = (LinkButton)sender;
        GridViewRow gvRow = (GridViewRow) lb.NamingContainer;
        int rowID = gvRow.RowIndex + 1;
        if (ViewState["CurrentTable"] != null)
        {
          DataTable  dt = (DataTable)ViewState["CurrentTable"];
          if (dt.Rows.Count > 1)
          {
              if (gvRow.RowIndex < dt.Rows.Count -1)
              {
                  //Remove the Selected Row data
                  dt.Rows.Remove(dt.Rows[rowID]);
              }
          }
            //Store the current data in ViewState for future reference
            ViewState["CurrentTable"] = dt;
            //Re bind the GridView for the updated data
            Gridview1.DataSource = dt;
            Gridview1.DataBind();
        }
 
        //Set Previous Data on Postbacks
        SetPreviousData();
    }
 
 
As you can see, the code above was pretty straight forward. The output would look something like these below:
 
On Initial Load:

GridView With Dynamic TextBoxes ASP.Net

Adding Rows to GridView

Adding Dynamic Rows to ASP.Net GridView Control

After Removing a Row in a GridView

Removing or Deleting Dynamic Rows with Textboxes from ASP.Net GridView Control

Adding Dynamic Rows in GridView with TextBoxes

<asp:gridview ID="Gridview1" runat="server" ShowFooter="true" AutoGenerateColumns="false">
<Columns>
<asp:BoundField DataField="RowNumber" HeaderText="Row Number" />
<asp:TemplateField HeaderText="Header 1">
<ItemTemplate>
<asp:TextBox ID="TextBox1" runat="server"></asp:TextBox>
</ItemTemplate>
</asp:TemplateField>
<asp:TemplateField HeaderText="Header 2">
<ItemTemplate>
<asp:TextBox ID="TextBox2" runat="server"></asp:TextBox>
</ItemTemplate>
</asp:TemplateField>
<asp:TemplateField HeaderText="Header 3">
<ItemTemplate>
<asp:TextBox ID="TextBox3" runat="server"></asp:TextBox>
</ItemTemplate>
<FooterStyle HorizontalAlign="Right" />
<FooterTemplate>
<asp:Button ID="ButtonAdd" runat="server" Text="Add New Row" />
</FooterTemplate>
</asp:TemplateField>
</Columns>
</asp:gridview>

Since this demo is intended to generate rows of TextBoxes in GridView, then we set up some TemplateFields columns so that GridView will automatically generates TextBoxes when a new row is being added.
As you can see I have set up a BoundField Column for displaying the RowNumber and sep up three TemplateField Columns in the Grid and added each columns a TextBox Control. You would also noticed that I have added a Button Control under the FooterTemplate at the last column in the GridView.
Note: Since we are added a Control in the GridView footer, then be sure to set ShowFooter to TRUE in the GridView.
Now let’s switch to the Code behind part of the webform.
As you may know, the GridView control will not show in the page once there is no data associated on it. So the first thing we need here is to set an initial data in the GridView Control. To do this, we can use a DataTable for binding our GridView.
Here’s the code block below:

private void SetInitialRow()
{
DataTable dt = new DataTable();
DataRow dr = null;
dt.Columns.Add(new DataColumn("RowNumber", typeof(string)));
dt.Columns.Add(new DataColumn("Column1", typeof(string)));
dt.Columns.Add(new DataColumn("Column2", typeof(string)));
dt.Columns.Add(new DataColumn("Column3", typeof(string)));
dr = dt.NewRow();
dr["RowNumber"] = 1;
dr["Column1"] = string.Empty;
dr["Column2"] = string.Empty;
dr["Column3"] = string.Empty;
dt.Rows.Add(dr);
//dr = dt.NewRow();
//Store the DataTable in ViewState
ViewState["CurrentTable"] = dt;
Gridview1.DataSource = dt;
Gridview1.DataBind();
}

As you can see, we defined four Columns in the DataTable called RowNumber, Column1, Column2 and Column3. The RowNumber column will serve as the key for generating the rows in the GridView. Noticed that for Columns 1,2 and 3, I assigned an empty value for that columns since the GridView will be generated for the first time. You also noticed that I store the DataTable in ViewState so that we can reference the current data associated within the DataTable when it postbacks.
Now lets call the method above in Page_Load event:

protected void Page_Load(object sender, EventArgs e)
{
if (!Page.IsPostBack)
{
SetInitialRow();
}
}

Running the codes above will give us this output below:
Now let’s create the method for generating the rows when clicking the Button. Here are the code blocks below:

private void AddNewRowToGrid()
{
int rowIndex =0;
if (ViewState["CurrentTable"] != null)
{
DataTable dtCurrentTable = (DataTable)ViewState["CurrentTable"];
DataRow drCurrentRow = null;
if (dtCurrentTable.Rows.Count > 0)
{
for (int i = 1; i <= dtCurrentTable.Rows.Count; i++)
{
//extract the TextBox values
TextBox box1 = (TextBox)Gridview1.Rows[rowIndex].Cells[1].FindControl("TextBox1");
TextBox box2 = (TextBox)Gridview1.Rows[rowIndex].Cells[2].FindControl("TextBox2");
TextBox box3 = (TextBox)Gridview1.Rows[rowIndex].Cells[3].FindControl("TextBox3");
drCurrentRow = dtCurrentTable.NewRow();
drCurrentRow["RowNumber"] = i + 1;
drCurrentRow["Column1"] = box1.Text;
drCurrentRow["Column2"] = box2.Text;
drCurrentRow["Column3"] = box3.Text;
rowIndex++;
}
//add new row to DataTable
dtCurrentTable.Rows.Add(drCurrentRow);
//Store the current data to ViewState
ViewState["CurrentTable"] = dtCurrentTable;
//Rebind the Grid with the current data
Gridview1.DataSource = dtCurrentTable;
Gridview1.DataBind();
}
}
else
{
Response.Write("ViewState is null");
}
//Set Previous Data on Postbacks
SetPreviousData();
}

As a summary, the code above gets the previous data stored from the viewstate and set the data stored from it into a DataTable so that we can add a new row based from the value entered from the TextBox.
You will also noticed that we call the method SetPreviousData() at the bottom part of the codes above. Now where is that method? Below are the code blocks for that method:

private void SetPreviousData()
{
int rowIndex = 0;
if (ViewState["CurrentTable"] != null)
{
DataTable dt = (DataTable)ViewState["CurrentTable"];
if (dt.Rows.Count > 0)
{
for (int i = 1; i < dt.Rows.Count; i++)
{
TextBox box1 = (TextBox)Gridview1.Rows[rowIndex].Cells[1].FindControl("TextBox1");
TextBox box2 = (TextBox)Gridview1.Rows[rowIndex].Cells[2].FindControl("TextBox2");
TextBox box3 = (TextBox)Gridview1.Rows[rowIndex].Cells[3].FindControl("TextBox3");
box1.Text = dt.Rows[i]["Column1"].ToString();
box2.Text = dt.Rows[i]["Column2"].ToString();
box3.Text = dt.Rows[i]["Column3"].ToString();
rowIndex++;
}
}
}
}

Now, since the methods are all set then we can call this at Button Click event of the Button.

protected void ButtonAdd_Click(object sender, EventArgs e)
{
AddNewRowToGrid();
}


As you can see the code above is very straight forward and self explanatory. Running the code above will give us this output below:

Create an EXE or Setup File in .NET Windows Application

Visual Studio Setup and deployment Projects provides to make an executable or installer file in .NET windows application is easy and rapidly.
Visual Studio provides templates for four types of deployment projects: Merge Module Project, Setup Project, Web Setup Project, and Cab Project. In addition, a Setup wizard is provided to help step you through the process of creating deployment projects. You can see the templates and the wizard in the New Project dialog box under the Setup and Deployment Projects node.
The following are guidelines for choosing the right type of deployment project for your project.
1)Merge Module Project : Packages components that might be shared by multiple applications.
2)Setup Project : Builds an installer for a Windows-based application.
3)Web Setup Project : Builds an installer for a Web application.
4)Cab Project : Creates a cabinet file for downloading to a legacy Web browser.
5)Smart Device Cab Project : Creates a Cab project to deploy device applications.
This topic demonstrates deployment using a Setup and Deployment Project.
Setup Projects
Setup projects allow you to create installers in order to distribute an application. The resulting Windows Installer (.msi) file contains the application, any dependent files, information about the application such as registry entries, and instructions for installation. When the .msi file is distributed and run on another computer, you can be assured that everything necessary for installation is included; if for any reason the installation fails (for example, the target computer does not have the required operating system version), the installation will be rolled back and the computer returned to its pre installation state.

I. Create Setup Project

The following steps will gives the elegant guidance to create an executable or installer file.
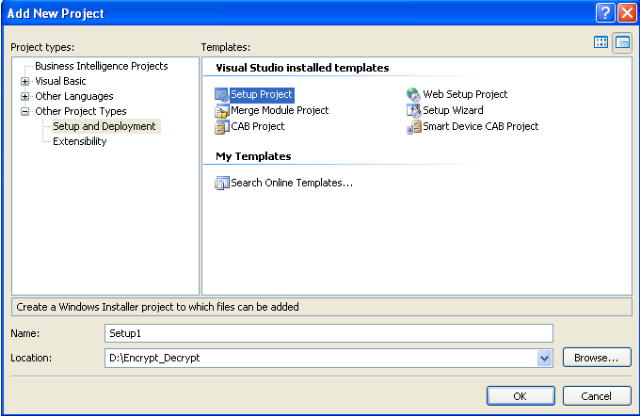
1. Go to file menu > click Add > new project >now “Add New Project” dialog will appear.

2. Select the “Other Project Types” and click “Setup and Deployment” projects,Choose “Setup Project” give name project name in name text box finally click OK.

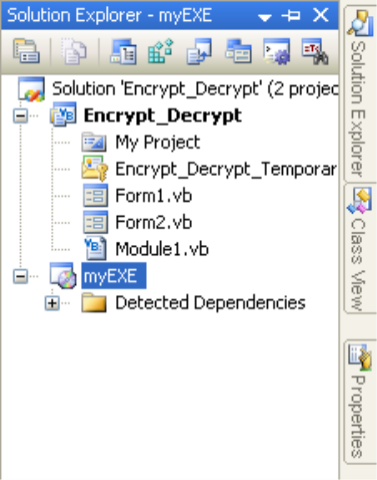
3. New project appear in solution explorer,for eg., you have give the name “MyEXE” file will be displays with given name.

4.Right click the MyEXE > go View > click “File System”

5.You can see the “File System on TargetMachine”under  three folders
Application Folder
User’s Desktop
User’s Program Menu

6.Select Application Folder and right click Add>Project Output>select Primary output

7. Select User’s Desktop right click on the right side pane>click create new shortcut>select output file from Application folder>change the file name from  primary output name to MyEXE

next >>

Same procedure follows the user’s program menu also
8.If you want to change the Manufactures name, just right click the project go to properties

change the properties as per you requirement
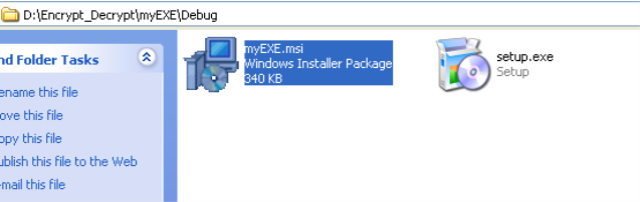
9.Finally Build the new project After successfully Build the project myEXE(Setup) will be appear in Application Debug or Release folder(depend upon the properties settings)

EXE or installer will be available on his physical path…

When you want to install  the EXE on the client machine, before you should be installed .NET Framework on that machine because, Applications and controls written for the .NET Framework v2.0 requires the .NET Framework Redistributable Package version 2.0 to be installed on the computer where the application or control runs.
you can get it from here

II. Create shortcut icon  in User’s Desktop and User’s Program Menu

Step1: Select ‘User’s Desktop’ or ‘User’s Program Menu’  and right click on right side pane
Create short cut on user's desktop
Step 2: Add primary output of actual application and click ‘OK’ to select

Step 3: Rename the actual name to your desired project/product name

Step 4: Here the sample product name is ‘Your Product Name’ for demo purpose

Step 5: If we want to add icon on shortcut, Click Properties Window

Step 6: Select Icon, next Browse icon file

Step 7:  Browse Icon File (Format should be .ico, other formats are not acceptable)

Step 8: Click  ‘Application Folder’

Step 9: Add File button will enable once you have clicked Application Folder

Step 10: Select your product icon from somewhere in system and Click ‘OK’
User should follow the same steps for shortcut added to User’s Program Menu.
Install your setup in target machine, You can view the shortcuts in Desktop and Start Menu.
Figure: Shortcut icon in Desktop

Figure: Shortcut icon in User’s Program Menu

III. Add Prerequisites

Prerequisites are provide support resources to run the installed process on your target machine.
Visual Setup and Deployment projects are automatically detect the required prerequisites need to install the system. But the question is what is the source for install the prerequisites?  No need to worry, Visual Studio IDE provides three options to install the prerequisites on your system.
  • Download prerequisites from component vendor’s website (default option)
  • Download prerequisites from the same location as my application
  • Download prerequisites from the following location
How to add prerequisites in Visual Studio?
1. Select Project in Solution Explorer, Right click

2. Click the Prerequisites button in Property Pages

3. Select the required prerequisites from the window

Click ‘Ok’, prerequisites will associate based on your install location selection.

How to stop ModalPopupExtender flickering on pageload in .NET


 If we use the ModalPopupExtender of  Ajax Control Toolkit we may run into flickering issue i.e. the content of ModalPopupExtender shows up for a moment during the page load and then disappears, while it should not be displayed on the page load.

To solve this problem we have to set up display property 'none' on the pop-up control.As the content of the panel will be shown as popup we have to set the required style there.
<asp:Panel ID="pnlPicture" runat="server" CssClass="modalPopup"  Style="display:none;"/>
   Now ModalPopupExtender will work perfect for IE but may not work for Firefox. In page load the Modal Popup will not flicker but on a postback or if the page being redirected by a Response.Redirect the Modal Popup will flash. For that we have to set up the style with javascript.

function getFlickerSolved()
{
    document.getElementById('<%=pnlPicture.ClientID%>').style.display = 'none';
}

And we have to call this javascript function on onOkScript/onCancelScript of modalpopupextender or just before the page load.
Code:
 
<asp:LinkButton ID="lbtnChangePhoto" runat="server" Text="Edit" ToolTip="Edit Picture">
</asp:LinkButton>    <!-- Clicking on this button The Modalpopup will open -->

<asp:Panel ID="pnlPicture" runat="server" CssClass="modalPopup" Style="display:none;">
    <p>
        <asp:FileUpload ID="photoUpload" runat="server" />
    </p>
    <p>
        <asp:Button ID="btnUpload" runat="server" Text="Upload" OnClick="btnUpload_Click" onClientClick="getFlickerSolved();/>"
        <asp:Button ID="btnHidePopup" runat="server" Text="Cancel" />
    </p>
</asp:Panel> <!-- The content of this panel will appear as popup -->

 <cc1:ModalPopupExtender ID="modalPopupChangePicture" TargetControlID="lbtnChangePhoto"PopupControlID="pnlUploadPicture" runat="server"
BackgroundCssClass="modalPopupBackgroundStyle" CancelControlID="btnHidePopup"onCancelScript="getFlickerSolved();">
</cc1:ModalPopupExtender>


 Note: It may not work when "display:none" is in an external stylesheet .It should be in the  Tag.