| DEMO : Button | Show Source Code | |||||||||||||||||||||||||||||||||||||||||||||||||||||||||||||||||||||||||||||||||||||||||||||||||||||||||||||||||||||||||||||||||||||||||
|
| |||||||||||||||||||||||||||||||||||||||||||||||||||||||||||||||||||||||||||||||||||||||||||||||||||||||||||||||||||||||||||||||||||||||||
// 1st GridView /////////////////////////
<asp:GridView ID="GridView1" runat="server" DataSourceID="SqlDataSource1" Caption="1st Grid: Simple GridView with SqlDataSource"
     AllowPaging="True" AllowSorting="True" AutoGenerateEditButton="true"
      DataKeyNames="AutoID" PageSize="8">
      <Columns>
        <asp:TemplateField HeaderText="Delete?">
            <ItemTemplate>
                <asp:LinkButton ID="lnk1" runat="server" Text="Delete" OnClientClick="return confirm('Are you sure to Delete?')" CommandName="Delete"></asp:LinkButton>
            </ItemTemplate>
        </asp:TemplateField>
      </Columns>
    </asp:GridView>
    <asp:SqlDataSource ID="SqlDataSource1" runat="server" ConnectionString='<%$ ConnectionStrings:ConnStr %>'
     SelectCommand="Select * FROM SampleForTutorials ORDER BY [Name]"
     DeleteCommand="Delete FROM SampleForTutorials WHERE AutoID = @AutoID"
     UpdateCommand="UPDATE SampleForTutorials SET Name = @Name, Address = @Address, Phone = @Phone, City = @City WHERE AutoID = @AutoID">
        <DeleteParameters>
            <asp:Parameter Name="AutoID" />
        </DeleteParameters>
        <UpdateParameters>
            <asp:Parameter Name="AutoID" Type="Int32" />
            <asp:Parameter Name="Name" Type="string" Size="50" />
            <asp:Parameter Name="Address" Type="string" Size="200" />
            <asp:Parameter Name="Phone" Type="int32" />
            <asp:Parameter Name="City" Type="string" Size="20" />
        </UpdateParameters>
     </asp:SqlDataSource>


     // 2nd GridView /////////////////////////
<asp:GridView ID="GridView2" runat="server" BackColor="LightGoldenrodYellow" BorderColor="Tan"
 Caption="2nd Grid: GridView with CodeBehind Data Bound" AllowPaging="False" AllowSorting="False"
    BorderWidth="1px" CellPadding="2" ForeColor="Black" GridLines="None">
    <FooterStyle BackColor="Tan" />
    <SelectedRowStyle BackColor="DarkSlateBlue" ForeColor="GhostWhite" />
    <PagerStyle BackColor="PaleGoldenrod" ForeColor="DarkSlateBlue" HorizontalAlign="Center" Font-Bold="True" />
    <HeaderStyle BackColor="Tan" Font-Bold="True" />
    <AlternatingRowStyle BackColor="PaleGoldenrod" />
</asp:GridView>


 // CODE BEHIND

// Bind the GridView /////////////////////////
private void BindGridView()
{
    string connStr = ConfigurationManager.ConnectionStrings["ConnStr"].ToString();
    SqlConnection conn = new SqlConnection(connStr);
    conn.Open();
    SqlDataAdapter dAd = null;
    DataSet dSet = new DataSet();
    try
    {
        string strSql = "Select * FROM SampleForTutorials ORDER BY [Name]";
        dAd = new SqlDataAdapter(strSql, conn);
        dAd.Fill(dSet, "SampleTable");

        GridView2.DataSource = dSet.Tables["SampleTable"].DefaultView;
        GridView2.DataBind();

    }
    catch (Exception ee)
    {
        lblError.Text = "Error occured. <br>+" + ee.Message.ToString();
    }
    finally
    {
        dSet.Dispose();
        dAd.Dispose();
        conn.Close();
        conn.Dispose();
    }
}
| ||||||||||||||||||||||||||||||||||||||||||||||||||||||||||||||||||||||||||||||||||||||||||||||||||||||||||||||||||||||||||||||||||||||||||
Introduction
The idea behind writing this article is to overcome the problem related to sorting of collection having null values in it. Recently I was working with GridView control and I was using generic collection list as a data source to it. While resolving this problem alone I developed a good piece of functionality which I do feel will help most of you in your development activity.Features Available
The feature incorporated in the GridView are as follows:Problem Statement
I had nullable value field data type in my database table. So I used nullable datatype of C# in my asp.net code. Doing so I encountered sorting failure problem with IComparer. After some research and development I came up with the solution. I used GetValueOrDefault() to resolve this. How I applied this to my solution is demonstrated below.Consider Database table schema as:
| Column | DataType | Nullable Values |
| CountryID | Int | No |
| CountryName | String | No |
| CountryTradeCode | Int | Yes |
Implement IComparer:Business Entity Class Country
In below class we have three field as discussed. In this we have m_CountryTradeCode as nullable data type. I was facing problem sorting nullable data type. So I got a workaround for this as shown here.case CountryComparer.CountryComparisonType.CountryTradeCode: return this.m_CountryTradeCode.GetValueOrDefault().CompareTo(rhs.m_CountryTradeCode.GetValueOrDefault());An important aspect to know about IComparer is that it operates on a complete Class Object and it knows about the object elements while IComparable operates only on elements of the object. The complete class is given below.
public class Country
    {
        private int m_CountryID = int.MinValue;
        private string m_CountryName = string.Empty;
        private int? m_CountryTradeCode = null;

        public Country()
        {

        }
        public Country(int countryID)
        {
            m_CountryID = countryID;

        }
        public Country(int countryID, string countryName, int? countryTradeCode)
            : this(countryID)
        {
            m_CountryName = countryName;
            m_CountryTradeCode = countryTradeCode;
        }
        public int CountryID
        {
            get { return m_CountryID; }
            set { m_CountryID = value; }
        }
        public int? CountryTradeCode
        {
            get { return m_CountryTradeCode; }
            set { m_CountryTradeCode = value; }
        }
        public string CountryName
        {
            get { return m_CountryName; }
            set { m_CountryName = value; }
        }
        public int CompareTo(Country rhs, Country.CountryComparer.CountryComparisonType which)
        {
            switch (which)
            {
                case CountryComparer.CountryComparisonType.CountryID:
                    return this.m_CountryID.CompareTo(rhs.m_CountryID);
                case CountryComparer.CountryComparisonType.CountryName:
                    return this.m_CountryName.CompareTo(rhs.m_CountryName);
                case CountryComparer.CountryComparisonType.CountryTradeCode:
                    return this.m_CountryTradeCode.
GetValueOrDefault().CompareTo(rhs.m_CountryTradeCode.GetValueOrDefault());

            }
            return 0;
        }
        public class CountryComparer : IComparer< Country >
        {
            public enum CountryComparisonType
            {
                CountryID,
                CountryName,
                CountryTradeCode,
                NULL
            }
            private CountryComparisonType _whichComparison;
            private Utility.SortOrder _sortDirection;
            public CountryComparisonType WhichComparison
            {
                get { return _whichComparison; }
                set { _whichComparison = value; }
            }
            public int Compare(Country lhs, Country rhs)
            {
                if (SortDirection == Utility.SortOrder.Asc)
                    return lhs.CompareTo(rhs, WhichComparison);
                else
                    return rhs.CompareTo(lhs, WhichComparison);
            }
            public bool Equals(Country lhs, Country rhs)
            {
                return this.Compare(lhs, rhs) == 0;
            }
            public int GetHashCode(Country e)
            {
                return e.GetHashCode();
            }
            public Utility.SortOrder SortDirection
            {
                get { return _sortDirection; }
                set { _sortDirection = value; }
            }
        }
    }
Populate Collection List With Country Object
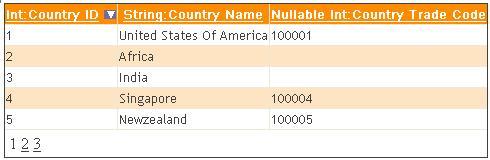
One can get this data from database using datareader and can populate this collection list as given below.For ready to go solution I have not used database and have hardcoded the values for understanding purpose. If you notice there is null fields in the objects that is been added as record in Collection List.The important challenge here is to sort this collection list having null value field. The nullable type is only applied to value type. As null reference is not assigned to value type,C# nullable datatype provide this feature.For eg. int a=null; is not allowed in C#. This is overcome by nullable datatype and the above example can be re written for nullable type as int? a = null;private IList GetCountryList()
{
IList < Country > countryList = new List < Country >();
countryList.Add(new Country(1, "United States Of America", 100001));
countryList.Add(new Country(2, "Africa", null));
countryList.Add(new Country(3, "India", null));
countryList.Add(new Country(4, "Singapore", 100004));
countryList.Add(new Country(5, "Newzealand", 100005));
countryList.Add(new Country(6, "United Kingdom", 100006));
countryList.Add(new Country(7, "Australia", 100007));
countryList.Add(new Country(8, "China", 100008));
countryList.Add(new Country(9, "Malaysia", null));
countryList.Add(new Country(10, "Germany", 100011));
countryList.Add(new Country(11, "France", 100009));
countryList.Add(new Country(12, "United States Of Soviet Russia", null));
return countryList;
}
C# Generics Method:Bind GridView Control
private void BindGrid < T >(T list)
        {
            gridCountry.DataSource = list;
            gridCountry.DataBind();
        }
Sort Event Logic
private void SortCountryList(Country.CountryComparer.CountryComparisonType sortExpression)
        {
            List < Country > countryList = (List < Country >)GetCountryList();
            Country.CountryComparer countryComparer = new Country.CountryComparer();
            if (Country.CountryComparer.CountryComparisonType.NULL != sortExpression)
            {
                if (sortExpression == SortColumn)
                {
                    if (SortDirection == Utility.SortOrder.Asc)
                    {
                        SortDirection = Utility.SortOrder.Desc;
                    }
                    else
                    {
                        SortDirection = Utility.SortOrder.Asc;
                    }
                }
                else
                {
                    SortDirection = Utility.SortOrder.Asc;
                }
                SortColumn = sortExpression;
            }
            countryComparer.WhichComparison = SortColumn;
            countryComparer.SortDirection = SortDirection;
            countryList.Sort(countryComparer);
            CountryDataSource = countryList;
        }
Concurrent paging And Sorting Operation On Grid
Contrary to what the title suggests,paging and sort operation here is not happening at the same time.The flow of the program suggests that the sorted order of a given column in a grid has to be maintained when paging operation is done.That means paging is carried out on sorted List.For this I used Viewstate to maintain the current operation.private Country.CountryComparer.CountryComparisonType SortColumn
{
get { return (Country.CountryComparer.CountryComparisonType)ViewState["SORT_EXP"]; }
set { ViewState["SORT_EXP"] = value; }
}
private Utility.SortOrder SortDirection
{
get { return (Utility.SortOrder)ViewState["SORT_ORDER"]; }
set { ViewState["SORT_ORDER"] = value; }
}
Initially the list is loaded with current sort order and sort direction.protected void Page_Load(object sender, EventArgs e)
{
try
{
if (IsPostBack == false)
{
SortColumn = Country.CountryComparer.CountryComparisonType.CountryID;
SortDirection = Utility.SortOrder.Asc;
LoadCountryList();
}
}
catch (Exception ex)
{
throw ex;
}
}
private void LoadCountryList()
{
SortCountryList(Country.CountryComparer.CountryComparisonType.NULL);
}
This is called on page change event on sorted List.private void PagingCountryList()
{
SortCountryList(Country.CountryComparer.CountryComparisonType.NULL);
}One can download the code and can check the code for more understanding and usage purpose. Conclusion
Hope I met the expectations of the reader and also please vote for this article ,this will help me to understand the quality I put in. Any suggestion and advice are most welcome. Looking forward for your feedback.SQL SERVER – 2005 – Explanation of TRY…CATCH and ERROR Handling With RAISEERROR Function
One of the developer at my company thought that we can not use RAISEERROR function in new feature of SQL Server 2005 TRY…CATCH. When asked for explanation he suggested SQL SERVER – 2005 Explanation of TRY…CATCH and ERROR Handling article as excuse suggesting that I did not give example of RAISEERROR with TRY…CATCH. We all thought it was funny. Just to keep record straight, TRY…CATCH can sure use RAISEERROR function.
First read original article for additional information about how TRY…CATCH works with ERROR codes. SQL SERVER – 2005 Explanation of TRY…CATCH and ERROR Handling
Example 1 : Simple TRY…CATCH without RAISEERROR function
ResultSet:
ErrorMessage
———————————
Divide by zero error encountered.
BEGIN TRY

DECLARE @MyInt INT;

-- Following statement will create Devide by Zero Error

SET @MyInt = 1/0;

END TRY

BEGIN CATCH

SELECT 'Divide by zero error encountered.' ErrorMessage

END CATCH;

GO
ResultSet:
ErrorMessage
———————————
Divide by zero error encountered.
Example 2 : Simple TRY…CATCH with RAISEERROR function
ResultSet:
Msg 50000, Level 16, State 1, Line 9
Divide by zero error encountered.
BEGIN TRY

DECLARE @MyInt INT;

-- Following statement will create Devide by Zero Error

SET @MyInt = 1/0;

END TRY

BEGIN CATCH

DECLARE @ErrorMessage NVARCHAR(4000);

SELECT @ErrorMessage = ERROR_MESSAGE();

RAISERROR (@ErrorMessage, 16, 1);

END CATCH;

GO
ResultSet:
Msg 50000, Level 16, State 1, Line 9
Divide by zero error encountered.
1) General Questions of SQL SERVER
What is RDBMS?
Relational Data Base Management Systems (RDBMS) are database management systems that maintain data records and indices in tables. Relationships may be created and maintained across and among the data and tables. In a relational database, relationships between data items are expressed by means of tables. Interdependencies among these tables are expressed by data values rather than by pointers. This allows a high degree of data independence. An RDBMS has the capability to recombine the data items from different files, providing powerful tools for data usage. (Read More Here)
What are the properties of the Relational tables?
Relational tables have six properties:
- Values are atomic.
- Column values are of the same kind.
- Each row is unique.
- The sequence of columns is insignificant.
- The sequence of rows is insignificant.
- Each column must have a unique name.
What is Normalization?
Database normalization is a data design and organization process applied to data structures based on rules that help building relational databases. In relational database design, the process of organizing data to minimize redundancy is called normalization. Normalization usually involves dividing a database into two or more tables and defining relationships between the tables. The objective is to isolate data so that additions, deletions, and modifications of a field can be made in just one table and then propagated through the rest of the database via the defined relationships.
What are different normalization forms?
1NF: Eliminate Repeating Groups
Make a separate table for each set of related attributes, and give each table a primary key. Each field contains at most one value from its attribute domain.
2NF: Eliminate Redundant Data
If an attribute depends on only part of a multi-valued key, remove it to a separate table.
3NF: Eliminate Columns Not Dependent On Key
If attributes do not contribute to a description of the key, remove them to a separate table. All attributes must be directly dependent on the primary key. (Read More Here)
BCNF: Boyce-Codd Normal Form
If there are non-trivial dependencies between candidate key attributes, separate them out into distinct tables.
4NF: Isolate Independent Multiple Relationships
No table may contain two or more 1:n or n:m relationships that are not directly related.
5NF: Isolate Semantically Related Multiple Relationships
There may be practical constrains on information that justify separating logically related many-to-many relationships.
ONF: Optimal Normal Form
A model limited to only simple (elemental) facts, as expressed in Object Role Model notation.
DKNF: Domain-Key Normal Form
A model free from all modification anomalies is said to be in DKNF.
Remember, these normalization guidelines are cumulative. For a database to be in 3NF, it must first fulfill all the criteria of a 2NF and 1NF database.
What is De-normalization?
De-normalization is the process of attempting to optimize the performance of a database by adding redundant data. It is sometimes necessary because current DBMSs implement the relational model poorly. A true relational DBMS would allow for a fully normalized database at the logical level, while providing physical storage of data that is tuned for high performance. De-normalization is a technique to move from higher to lower normal forms of database modeling in order to speed up database access.
What is Stored Procedure?
A stored procedure is a named group of SQL statements that have been previously created and stored in the server database. Stored procedures accept input parameters so that a single procedure can be used over the network by several clients using different input data. And when the procedure is modified, all clients automatically get the new version. Stored procedures reduce network traffic and improve performance. Stored procedures can be used to help ensure the integrity of the database.
e.g.
sp_helpdb, sp_renamedb, sp_depends etc.What is Trigger?
A trigger is a SQL procedure that initiates an action when an event (INSERT, DELETE or UPDATE) occurs. Triggers are stored in and managed by the DBMS. Triggers are used to maintain the referential integrity of data by changing the data in a systematic fashion. A trigger cannot be called or executed; DBMS automatically fires the trigger as a result of a data modification to the associated table. Triggers can be viewed as similar to stored procedures in that both consist of procedural logic that is stored at the database level. Stored procedures, however, are not event-drive and are not attached to a specific table as triggers are. Stored procedures are explicitly executed by invoking a CALL to the procedure while triggers are implicitly executed. In addition, triggers can also execute stored procedures.
Nested Trigger: A trigger can also contain INSERT, UPDATE and DELETE logic within itself, so when the trigger is fired because of data modification it can also cause another data modification, thereby firing another trigger. A trigger that contains data modification logic within itself is called a nested trigger. (Read More Here)
What is View?
A simple view can be thought of as a subset of a table. It can be used for retrieving data, as well as updating or deleting rows. Rows updated or deleted in the view are updated or deleted in the table the view was created with. It should also be noted that as data in the original table changes, so does data in the view, as views are the way to look at part of the original table. The results of using a view are not permanently stored in the database. The data accessed through a view is actually constructed using standard T-SQL select command and can come from one to many different base tables or even other views.
What is Index?
An index is a physical structure containing pointers to the data. Indices are created in an existing table to locate rows more quickly and efficiently. It is possible to create an index on one or more columns of a table, and each index is given a name. The users cannot see the indexes; they are just used to speed up queries. Effective indexes are one of the best ways to improve performance in a database application. A table scan happens when there is no index available to help a query. In a table scan SQL Server examines every row in the table to satisfy the query results. Table scans are sometimes unavoidable, but on large tables, scans have a terrific impact on performance.
What is a Linked Server?
Linked Servers is a concept in SQL Server by which we can add other SQL Server to a Group and query both the SQL Server dbs using T-SQL Statements. With a linked server, you can create very clean, easy to follow, SQL statements that allow remote data to be retrieved, joined and combined with local data. Stored Procedure
sp_addlinkedserver, sp_addlinkedsrvlogin will be used add new Linked Server. (Read More Here)
We know about the ultimate Visual Interface Microsoft’s SQL
Server has and today I will discus about using this Visual Interface to
create Views an easy way. Views are the virtual tables, and data in them
is not actually reside in your hard drive corresponding to your View.
The data is just a mirror image from one or more Table which may even
belong to different database. You can select all or less columns from
the selected tables, to show all the content from all the selected
columns as a data from single View. Your tables should be Normalised if
you want to taste the best use of Views. If your database is not
normalised, then your View will be having a lot of repeated data, of no
use.
To illustrate the steps I will be using SQL Server 2008 R2 and AdventureWorks database.
Instructions:
To illustrate the steps I will be using SQL Server 2008 R2 and AdventureWorks database.
Instructions:
- Expand your database in SQL Server Object Explorer.
- Right click on Views and select New View.

- In the New View dialogue, you can select the table you want to include for your view and then click Add button to add that table. Even you can select already existing Views to with table to get data from tables and Views in a single View.
- After adding all the required tables, close the dialogue and you will see all the selected tables appeared on the screen showing all the tables and relation between all the tables.
- SQL Server will create all the Joins required to filter the data in proper way according to the relations your tables have.
- Now just check all the columns you want to have in your View.

- In the 2nd panel where all the selected columns got listed, you can
create additional filters to get filtered data. You can specify the
sorting order for a column either Ascending or Descending, you can
specify the limit on a column to get some portion of data not all by
specifying the Filters with ‘>’, ‘<’, ‘=’ signs followed by the filter. Just have a look at the following image for clear view.

- When done, just press Ctrl + S to save the view with a specified name.

- After this you can select data from this view the same way you select data from a normal tabl


Introduction
Hi all, In this article I am trying to explain “How to define indexes in SQL Server”. For this article am going to use Products table of Northwind database.This article deals with -
- Query Optimizer
- Creating an Index
- Creating Unique Index
- Creating Clustered Index
- Creating Full-Text Index
- Changing properties of Index
- Renaming an Index
- Deleting an Index
- Specifying Fill factor of Index
- Create XML Index
- Delete XML Index
- Advantages of Indexing
- Disadvantages of Indexing
- Guidelines for Indexing
Explanation
Every organization has its database and each and every day with the increase in the data volume these organizations has to deal with the problems relating to data retrieval and accessing of data. There is need of system which will results into increase in the data access speed. An index (in simple words it like index of any book eg. While searching a word in Book we use index back of book to find the occurance of that word and its relevant page numbers), which makes it easier for us to retrieval and presentation of the data. An Index is a system which provides faster access to rows and for enforcing constraints.If we don't create any indexes then the SQL engine searches every row in table (also called as table scan). As the table data grows to thousand, millons of rows and further then searching without indexing becomes much slower and becomes expensive.
eg. Following query retrieves Customer information where country is USA from Customers table of the Northwind database.
SELECT CustomerID,ContactName,CompanyName,City
FROM Customers
WHERE Country ='USA'
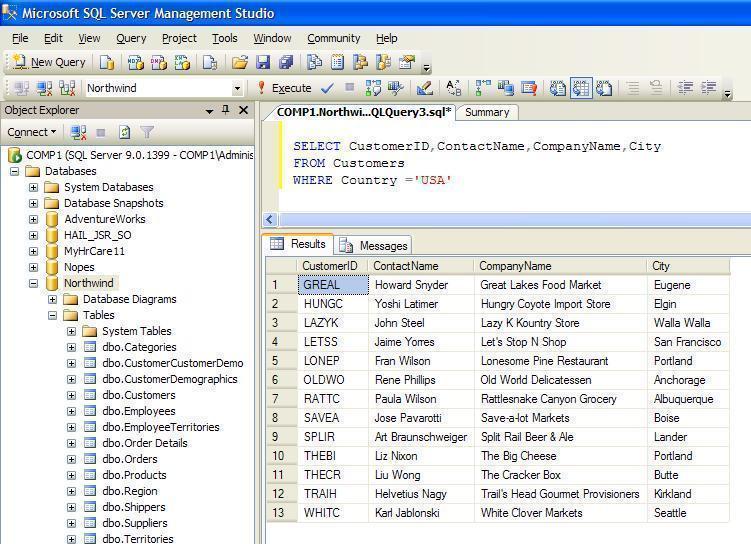
As there is no Index on this table, database engine performs table scan and reads every row to check if Country is "USA". The query result is shown below. Database engine scans 91 rows and find 13 rows.
Indexes supports to the database Engine. Proper indexing always results in considerable increase in performance and savings in time of an application and vice-versa. When SQL Server process a query then it uses Indexes to find the data. Indexes cane created on one or more columns as well as on XML columns also. We can create Index by selecting one or more columns of a table being searched. Index creates model related with the table/view and constraints created using one or more columns. It is more likely a Balanced Tree. This helps the SQL Server to find out rows with the keys specified.
Indexes may be either Clustered or Non-Clustered.
Clustered Index
Every table can have one and only Clustered Index because index is built on unique key columns and the key values in data rows is unique. It stores the data rows in table based on its key values. Table having clustered index also called as clustered table.Non-Clustered Index
It has structure different from the data rows. Key value of non clustered index is used for pointing data rows containing key values. This value is known as row locator. Type of storage of data pages determines the structure of this row Locator. Row locator becomes pointer if these data pages stored as a heap. As well as row locator becomes a clustered index key if data page is stored in clustered table.Both of these may be unique. Wherever we make changes to the data table, managing of indexes is done automatically.
SQL Server allows us to add non-key column at the leaf node of the non clustered index by passing current index key limit and to execute fully covered index query.
Automatic index is created wherever we create primary key, unique key constraints to table.
The Query Optimizer
Query Optimizer indexes to reduce operations of disk input-output and using of system resources when we fire query on data. Data manipulation Query statements (like SELECT, DELETE OR UPDATE) need indexes for maximization of the performance. When Query fires the most efficient method for retrieval of the data is evaluated among available methods. It uses table scans or index scans.Table scans uses many Input-output operations, it also uses large number of resources as all rows from the table are scanned.
Index scan used for searching index key columns to find storage location.
The index containing fewer columns results in to faster query execution and vice-versa.
Creating an Index
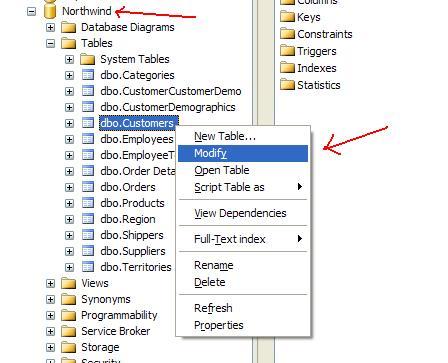
- Connect to Northwind database from Object Explorer, right click on the Customers table to create an index and click on modify.
- Click on Index/Keys from Table Desinger Menu on top or right click on any column and click on Index/Keys.

- Click on Add from Indexes/Keys dialog box.
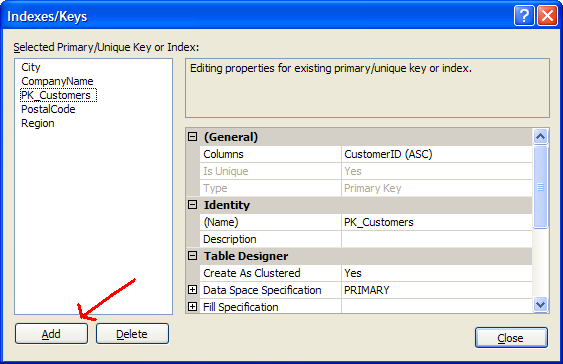
- From Selected Primary/Unique Key or Index list, select the new index and set properties for the index in the grid on right hand side.
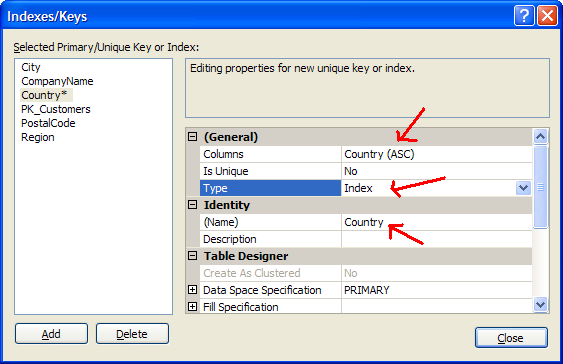
- Now just specify other settings if any for the index and click Close.
- When we save the table, the index is created in the database.
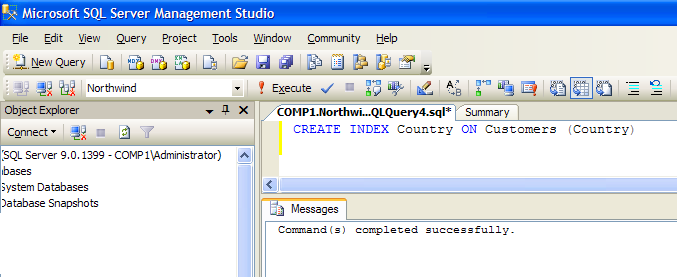
CREATE INDEX Country ON Customers (Country)
Creating Unique Index
SQL Server permits us to create Unique Indexes on columns which are unique to identify. (like employee’s Reference ID, Email-id etc.) We use set of columns to create unique index.- Right-click on the Customers and click Modify in Object Explorer.
- Now, click on Indexes/Keys from Table Designer menu and click on Click Add.
- The Selected Primary/Unique Key or Index list displays the automatically generated name of the new index.
- In the grid, click on Type, from the drop-down list, Choose Index.
- Under Column name,we can choose columns we want to index and click on OK. Maximum we can setup 16 columns. For optimum performance, it is recommended that we use one or two columns per index. For every column we values of these columns are arranged in ascending or descending order.
- In the grid, click Is Unique and select select Yes.
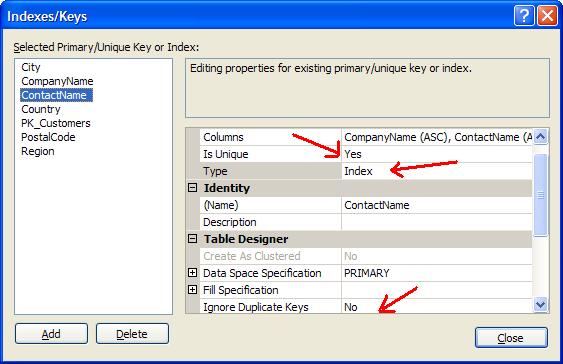
- Null is treated as duplicate values. So, it is not possible to create unique index on one column if it contains null in more than one row. Likewise index cannot be created on multiple columns if those columns contains null in same row.
- Now select Ignore duplicate keys option. If it is required to ignore new or updated data that will lead to creation of duplicate key in the index (with the INSERT or UPDATE statement).
- When we save the table, the index is created in the database.
CREATE UNIQUE INDEX ContactName ON Customers (CompanyName,ContactName)
Creating Clustered Index
table can have only one clustered index. In Clustered index logical order and physical order of the index key values is identical of rows in the table.- In the Object Explorer click on the Northwind database, right click on the Customres to create an index and click on modify.
- Now we have Table Designer for the table.
- From the Table Designer menu, click Indexes/Keys and from Indexes/Keys dialog box, click Add.
- Now from Selected Primary/Unique Key or Index list, Select the new index
- In the grid, select Create as Clustered, and choose Yes from the drop-down list to the right of the property.
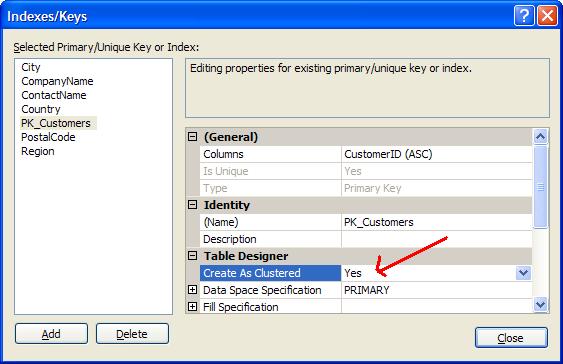
- When we save the table, the index is created in the database.
We also create this index by using query. This command mentions the name of index (PK_Customers) the table name (Customers), and the column to index (CustomerID).
CREATE CLUSTERED INDEX PK_Customers on Customers(CustomerID)
Creating Full Text Search
For text based columns, full text search is always required to be performed under several times. In such situations full text index is used. A regular index is required to be prepared before creating full text index as the later relies on the former. Regular index is created on single column having not null. It is recommended to create regular index on column having small values. For several occasions, SQL Server management Studio is also used to create catalog.- In the object explorer click on the Northwind database, right click on the customers to create an index and click on modify.
- Now, we have Table Designer for the customers table and then Click Fulltext Index from the Table Designer menu.
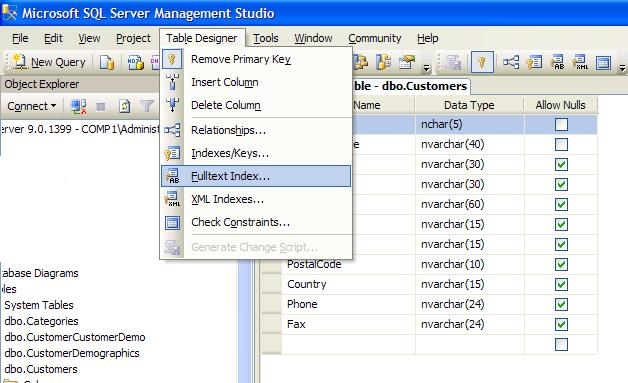
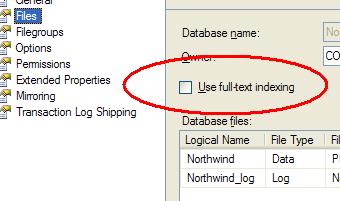
- Dialog box for full-text index opens. (Sometimes database is not enabled for full text indexing. In such situations add button disabled. To enable it check properties for database by right clicking on database. And check the full text indexing check box)
- Now we have to right click on storage>New Full-Text catalog to create a catalog. Enter some required information in dialog box.
- Now from Table Designer menu, open the Full Text Index property dialog and then click on Add.
- Now select new index from selected full-text index list and assign properties for index in the grid.
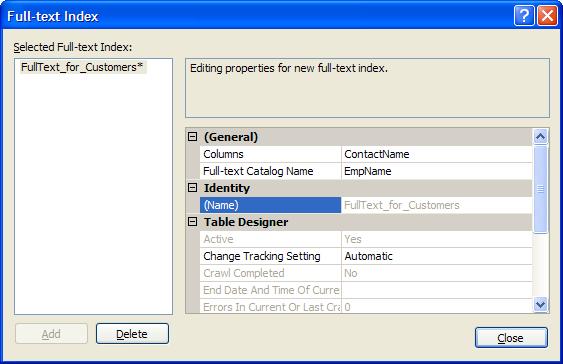
- When we save Table the index is automatically saved in database, and this index is available for modifications.
Changing index properties
- Connect to the SQL-Server 2005, In the object explorer click on the Northwind database.
- Click Indexes/Keys from the table designer menu.
- Now select index from the selected primary/unique key or index list. And Change the properties.
- When we save Table the index is automatically saved in database.
Renaming an Index
- Right-click the table with the index you want to rename and click Modify, in Object Explorer.
- Click Indexes/Keys from the Table Designer menu.
- Now from the Selected Primary/Unique Key or Index list, select the index.
- Click Name and type a new name into the text box in the grid.
- When we save Table the index is automatically saved in database.
We can also rename indexes with the sp_rename stored procedure. The sp_rename procedure takes, at a minimum, the current name of the object and the new name for the object. While renaming indexes, the current name must include the name of the table, a dot separator, and the name of the index, as shown below:
EXEC sp_rename 'Customers.Country', 'Countries'
Deleting an Index
- Right-click the table with indexes you want to delete and click Modify In Object Explorer.
- Click Indexes/Keys from the Table Designer menu.
- Select the index you want to delete from the Indexes/Keys dialog box and Click on Delete.
- When we save Table the index is deleted from the database.
It is very sensible to remove index from database if it is not much of worth. eg. For instance, if we know the queries are no longer searching for records on a speicific column, we can remove the index. Unneeded indexes only take up storage space and diminish SQL command is shown below.
DROP Index Customers.Country
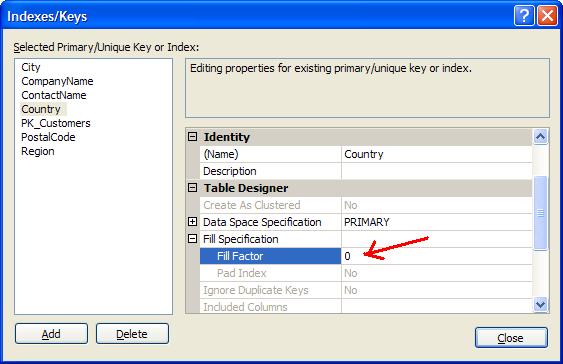
Specifying Fill Factor
Fill Factor Fill factor is used by SQL Server to specify how full each page index. The fill factor is the percentage of allotted free space to an index. We can specify the amount of space to be filled. It is very important as the improper selection my slow down the performance.- Right-click the table with an index for which we want to specify fill factor and click Modify in Object Explorer
- Click Indexes/Keys, from the Table Designer menu.
- From Selected Primary/Unique Key or Index list, select the index.
- Type a number from 0 to 100, in the Fill Factor box. Value 100 denotes that index will fully filled up and storage space requirement will be minimum, this is recommended in situations where there are minimum changes of change in data. data fill factor. If there is regular modification and addition to the data, then set this value to minimum. Storage space is proportionate to the value set.
Creating XML Index
There somewhat different way to create XML indexes, we cannot create XML using Index/Keys dialog box. We create XML index from xml data type columns those are based on primary XML index. When we delete the primary XML index, then all the XML index will be deleted.- In Object Explorer, right-click the customers table to create an XML index and click Modify.
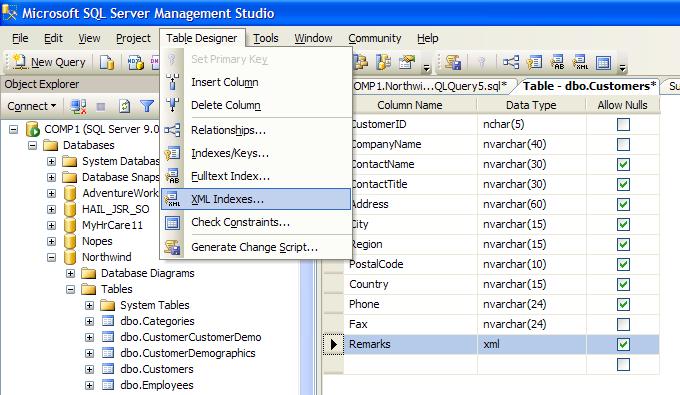
- Select the xml column for the index for the table opened in Table Designer.
- From the Table Designer menu, click XML Index,
- Click on add, in the XML Indexes dialog box

Deleting XML Indexes
- Right-click the customers table with the XML index you want to delete and click Modify in Object Explorer.
- click on XML Index, from the Table Designer menu.
- From selected XML Index column, Click the index you want to delete. And then Click on Delete.
Viewing Existing Indexes
We can view list of all indexes on a table in the dialog box we used to create an index. Just Click on the Selected index drop down control and scroll through the available indexes.We can use a stored procedure named sp_helpindex. This stored procedure gives all of the indexes for a table with its all relevant attributes. The only input parameter to the procedure is the name of the table, as shown below.
EXEC sp_helpindex Customers
How Index works
The columns specified in the CREATE INDEX COMMAND taken by the database engine and sorts the values in Balanced Tree(B-Tree) data structure. B-Tree structure supports faster search with minimum dist reads, and allows the database engine to find quick start and end point for the stated query.The database takes the columns specified in a CREATE INDEX command and sorts the values into a special data structure known as a B-tree. A B-tree structure supports fast searches with a minimum amount of disk reads, allowing the database engine to quickly find the starting and stopping points for the query we are using.
Conceptually, every index entry has the index key. Each entry also includes a references to the table rows which share that particular value and from which we can retrieve the required information.
It is much similar to the back of a book helps us to find keywords quickly, so the database is able to quickly narrow the number of records it must examine to a minimum by using the sorted list of Key values stored in the index. Thus we avoid a table scan to fetch the query results. Following some of the scenarios where indexes offer a benefit. Advantages of Indexing
Searching For Records
The most important use for an index is in finding a record or set of records matching a WHERE clause. Indexes can help queries with speicfic range. as well as queries looking for a specific value. E.g the following queries can all benefit from an index on UnitPrice:DELETE FROM Customers WHERE Country = "USA" UPDATE Customers SET Region = "Pacific" WHERE Country = "USA" SELECT * FROM Customers WHERE Country="USA" or "Brasil"
Indexes work well when searching for a record in DELETE and UPDATE commands as they do for SELECT statements.
Sorting Records
When we require sorted results, the database tries to find an index and avoids sorting the results while execution of the query. We control sorting of a dataset by specifying a field, or fields, in an ORDER BY clause, with the sort order as ascending (ASC) or descending(DESC). E.g. Query below returns all customers sorted by Country:
SELECT * FROM Customers ORDER BY Country ASC
When there is no indexes, the database will scan the Customers table and then sort the rows to process the query. However, the index we created on Country (Country) before will provide the database with a already sorted list of Countries. The database can simply scan the index from the first record to the last record and retrieve the rows in sorted order. The same index works same with the following query, It simply scans the index in reverse.
SELECT * FROM Customers ORDER BY Country DESC;
Grouping Records
We can use a GROUP BY clause to group records and aggregate values, e.g. for counting the number of customers in a country. To process a query with a GROUP BY clause, the database will quite ofen sort the results on the columns included in the GROUP BY. The following query counts the number of customers from every country with the same UnitPrice value.
SELECT Count(*) FROM Products GROUP BY UnitPrice
Index Drawbacks
There are few drobacks of indexes. While indexes provide a substantial performance benefit to searches, there is also a downside to indexing.
Indexes and Disk Space
Indexes are stored on the disk, and the amount of space required will depend on the size of the table, and the number and types of columns used in the index. Disk space is generally cheap enough to trade for application performance, particularly when a database serves a large number of users. To see the space required for a table, use the sp_spaceused system stored procedure in a query window. EXEC sp_spaceused Customers
Result
name                rows        reserved           data               index_size         unused
---------        ----------- ------------------ ------------------ ------------------
Customers        91          200 KB             24 KB              176 KB             0 KB
From the above output, the table data uses 24 kb, while the table indexes use about 18 times as much, or 176 kilobytes. The ratio of index size to table size can vary greatly, depending on the columns, data types, and number of indexes on a table.
Indexes and Data Modification
If the data is change or modified on regular intervals then database engine requires to update all the indexes, thus too many indexes will slows down the performance. Thus Database used for transaction processing should use fewer indexes to allow for higher throughput on insert and updates. While in DSS (Decision Support System) and datawarehousing where information is static and queries is required largely for the reporting purposes than the modification purposes then heavy indexing is required to optimze the performance.
Another downside to using an index is the performance implication on data modification statements. Any time a query modifies the data in a table (INSERT, UPDATE, or DELETE), the database needs to update all of the indexes where data has changed. As we discussed earlier, indexing can help the database during data modification statements by allowing the database to quickly locate the records to modify, however, we now caveat the discussion with the understanding that providing too many indexes to update can actually hurt the performance of data modifications. This leads to a delicate balancing act when tuning the database for performance.
Additional Index Guidelines
In order to create effective index choice of correct columns and types is very important.
Keeping Index Keys Short
It becomes harder for database engine to work on larger an index key. E.g. An integer key is smaller in size then a character field for holding 100 characters. Keep keep clustered indexes as short as possible.
We must try to avoid using character columns in an index, particularly primary key indexes. Integer columns will always have an advantage over character fields in ability to boost the performance of a query.
Distinct Index Keys
Indexes with a small percentage of duplicated values are always effective.
An index with a high percentage of unique values is a selective index. Obviously, a unique index is the most selective index of all, because there are no duplicate values. SQL Server will track statistics for indexes and will know how selective each index is. The query optimizer utilizes these statistics when selecting the best index to use for a query.
Conclusion
In this article I have tried to explain how to create, manage, and select indexes for SQL Server tables. Most of what I have covered is true for any relational database engine. Proper indexes plays crucial role in good performance in large databases. It is very difficult to make up with best queries with poor indexing at the same time, we can make up for a poorly written query with a good indexing.......
Javascript Field Validations -- Client Side Scripting
By Nannette Thacker - 08/19/1999
This page is designed as a reference where you can snag source code for both the HTML form elements and the Javascript field validations.
How to use this form: Press the Submit button without filling out the form. It will bring up the first error message. Correct the field pertaining to the first error message, then press the Submit button again for the next error message. Work your way through the form to see how the validations work. There are several Submit buttons on the page to spare you from having to scroll up and down.
Below is the source code:
<script Language="JavaScript">
<!--
function Form1_Validator(theForm)
{

var alertsay = ""; // define for long lines
// alertsay is not necessary for your code,
// but I need to break my lines in multiple lines
// so the code won't extend off the edge of the page

// check to see if the field is blank
if (theForm.Alias.value == "")
{
alert("You must enter an alias.");
theForm.Alias.focus();
return (false);
}

// require at least 3 characters be entered
if (theForm.Alias.value.length < 3)
{
alert("Please enter at least 3 characters in the \"Alias\" field.");
theForm.Alias.focus();
return (false);
}

// allow ONLY alphanumeric keys, no symbols or punctuation
// this can be altered for any "checkOK" string you desire
var checkOK = "ABCDEFGHIJKLMNOPQRSTUVWXYZabcdefghijklmnopqrstuvwxyz0123456789";
var checkStr = theForm.Alias.value;
var allValid = true;
for (i = 0;  i < checkStr.length;  i++)
{
ch = checkStr.charAt(i);
for (j = 0;  j < checkOK.length;  j++)
if (ch == checkOK.charAt(j))
break;
if (j == checkOK.length)
{
allValid = false;
break;
}
}
if (!allValid)
{
alert("Please enter only letter and numeric characters in the \"Alias\" field.");
theForm.Alias.focus();
return (false);
}

// require at least 5 characters in the password field
if (theForm.Password.value.length < 5)
{
alert("Please enter at least 5 characters in the \"Password\" field.");
theForm.Password.focus();
return (false);
}

// check if both password fields are the same
if (theForm.Password.value != theForm.Password2.value)
{
	alert("The two passwords are not the same.");
	theForm.Password2.focus();
	return (false);
}

// allow only 150 characters maximum in the comment field
if (theForm.comment.value.length > 150)
{
alert("Please enter at most 150 characters in the comment field.");
theForm.comment.focus();
return (false);
}

// check if no drop down has been selected
if (theForm.sex.selectedIndex < 0)
{
alert("Please select one of the \"Gender\" options.");
theForm.sex.focus();
return (false);
}

// check if the first drop down is selected, if so, invalid selection
if (theForm.sex.selectedIndex == 0)
{
alert("The first \"Gender\" option is not a valid selection.");
theForm.sex.focus();
return (false);
}

// check if no drop down or first drop down is selected, if so, invalid selection
if (theForm.date_month.selectedIndex <= 0)
{
alert("Please select a month.");
theForm.date_month.focus();
return (false);
}

// check if no drop down or first drop down is selected, if so, invalid selection
if (theForm.date_day.selectedIndex <= 0)
{
alert("Please select a day.");
theForm.date_day.focus();
return (false);
}

// check if no drop down or first drop down is selected, if so, invalid selection
if (theForm.date_year.selectedIndex <= 0)
{
alert("Please select a year.");
theForm.date_year.focus();
return (false);
}

// check if email field is blank
if (theForm.Email.value == "")
{
alert("Please enter a value for the \"Email\" field.");
theForm.Email.focus();
return (false);
}


// test if valid email address, must have @ and .
var checkEmail = "@.";
var checkStr = theForm.Email.value;
var EmailValid = false;
var EmailAt = false;
var EmailPeriod = false;
for (i = 0;  i < checkStr.length;  i++)
{
ch = checkStr.charAt(i);
for (j = 0;  j < checkEmail.length;  j++)
{
if (ch == checkEmail.charAt(j) && ch == "@")
EmailAt = true;
if (ch == checkEmail.charAt(j) && ch == ".")
EmailPeriod = true;
	  if (EmailAt && EmailPeriod)
		break;
	  if (j == checkEmail.length)
		break;
	}
	// if both the @ and . were in the string
if (EmailAt && EmailPeriod)
{
		EmailValid = true
		break;
	}
}
if (!EmailValid)
{
alert("The \"email\" field must contain an \"@\" and a \".\".");
theForm.Email.focus();
return (false);
}


// check if numbers field is blank
if (theForm.numbers.value == "")
{
alert("Please enter a value for the \"numbers\" field.");
theForm.numbers.focus();
return (false);
}

// only allow numbers to be entered
var checkOK = "0123456789";
var checkStr = theForm.numbers.value;
var allValid = true;
var allNum = "";
for (i = 0;  i < checkStr.length;  i++)
{
ch = checkStr.charAt(i);
for (j = 0;  j < checkOK.length;  j++)
if (ch == checkOK.charAt(j))
break;
if (j == checkOK.length)
{
allValid = false;
break;
}
if (ch != ",")
allNum += ch;
}
if (!allValid)
{
alert("Please enter only digit characters in the \"numbers\" field.");
theForm.numbers.focus();
return (false);
}

// require at least one radio button be selected
var radioSelected = false;
for (i = 0;  i < theForm.fruit.length;  i++)
{
if (theForm.fruit[i].checked)
radioSelected = true;
}
if (!radioSelected)
{
alert("Please select one of the \"Fruit\" options.");
return (false);
}

// check if no drop down or first drop down is selected, if so, invalid selection
if (theForm.rangefrom.selectedIndex <= 0)
{
alert("Please select a valid number in the range \"From\" field.");
theForm.rangefrom.focus();
return (false);
}

// check if no drop down or first drop down is selected, if so, invalid selection
if (theForm.rangeto.selectedIndex <= 0)
{
alert("Please select a valid number in the range \"To\" field.");
theForm.rangeto.focus();
return (false);
}

// require that the To Field be greater than or equal to the From Field
var chkVal = theForm.rangeto.value;
var chkVal2 = theForm.rangefrom.value;
if (chkVal != "" && !(chkVal >= chkVal2))
{
alert("The \"To\" value must be greater than or equal to (>=) the \"From\" value.");
theForm.rangeto.focus();
return (false);
}

// check if more than 5 options are selected
// check if less than 1 options are selected
var numSelected = 0;
var i;
for (i = 0;  i < theForm.province.length;  i++)
{
if (theForm.province.options[i].selected)
numSelected++;
}
if (numSelected > 5)
{
alert("Please select at most 5 of the \"province\" options.");
theForm.province.focus();
return (false);
}
if (numSelected < 1)
{
alert("Please select at least 1 of the \"province\" options.");
theForm.province.focus();
return (false);
}

// require a value be entered in the field
if (theForm.NumberText.value == "")
{
alert("Please enter a value for the \"NumberText\" field.");
theForm.NumberText.focus();
return (false);
}

// require that at least one character be entered
if (theForm.NumberText.value.length < 1)
{
alert("Please enter at least 1 characters in the \"NumberText\" field.");
theForm.NumberText.focus();
return (false);
}

// don't allow more than 5 characters be entered
if (theForm.NumberText.value.length > 5)
{
	 alertsay = "Please enter at most 5 characters in "
	 alertsay = alertsay + "the \"NumberText\" field, including comma."
alert(alertsay);
theForm.NumberText.focus();
return (false);
}

// only allow 0-9, hyphen and comma be entered
var checkOK = "0123456789-,";
var checkStr = theForm.NumberText.value;
var allValid = true;
var decPoints = 0;
var allNum = "";
for (i = 0;  i < checkStr.length;  i++)
{
ch = checkStr.charAt(i);
for (j = 0;  j < checkOK.length;  j++)
if (ch == checkOK.charAt(j))
break;
if (j == checkOK.length)
{
allValid = false;
break;
}
if (ch != ",")
allNum += ch;
}
if (!allValid)
{
alert("Please enter only digit characters in the \"NumberText\" field.");
theForm.NumberText.focus();
return (false);
}

// require a minimum of 9 and a maximum of 5000
// allow 5,000 (with comma)
var chkVal = allNum;
var prsVal = parseInt(allNum);
if (chkVal != "" && !(prsVal >= "9" && prsVal <= "5000"))
{
	alertsay = "Please enter a value greater than or "
	alertsay = alertsay + "equal to \"9\" and less than or "
	alertsay = alertsay + "equal to \"5000\" in the \"NumberText\" field."
alert(alertsay);
theForm.NumberText.focus();
return (false);
}

// alert if the box is NOT checked
if (!theForm.checkbox1.checked)
{
alertsay = "Just reminding you that if you wish "
alertsay = alertsay + "to have our Super Duper option, "
alertsay = alertsay + "you must check the box!"
alert(alertsay);
}

// require that at least one checkbox be checked
var checkSelected = false;
for (i = 0;  i < theForm.checkbox2.length;  i++)
{
if (theForm.checkbox2[i].checked)
checkSelected = true;
}
if (!checkSelected)
{
alert("Please select at least one of the \"Test Checkbox\" options.");
return (false);
}

// only allow up to 2 checkboxes be checked
var checkCounter = 0;
for (i = 0;  i < theForm.checkbox2.length;  i++)
{
if (theForm.checkbox2[i].checked)
checkCounter = checkCounter + 1;
}
if (checkCounter > 2)
{
alert("Please select only one or two of the \"Test Checkbox\" options.");
return (false);
}

// because this is a sample page, don't allow to exit to the post action
// comes in handy when you are testing the form validations and don't
// wish to exit the page
alertsay = "All Validations have succeeded. "
alertsay = alertsay + "This is just a test page. There is no submission page."
alert(alertsay);
return (false);
// replace the above with return(true); if you have a valid form to submit to
}
//--></script>

<form action="javascript.asp?ID=<%=siteID%>"
method="POST" onsubmit="return Form1_Validator(this)" name="Form1">
<input type="submit" name="Submit" value="Submit"><p>

Alias:
	<input type="text" size="15" maxlength="15" name="Alias"><br>
	3 checks:
	Not blank, at least 3 characters, only alphanumeric characters allowed.<p>

Password:
	<input type="password" size="10" maxlength="10" name="Password">

Verify Password:
	<input type="password" size="10" maxlength="10" name="Password2"><br>
	2 checks: Require at least 5 characters in the first password field.
	Check if both password field values are the same.<p>

Comment: (Please enter 150 characters maximum.)<br>
<textarea name="comment" rows="4" cols="50" wrap="virtual">
</textarea><br>

Gender:
	<select name="sex" size="1">
<option>Select a Gender</option>
<option value="M">Male</option>
<option value="F">Female</option>
</select><br>
2 checks: Check that at least one drop down has been selected.
The first drop down is an invalid selection.<p>

Date Month:
	<select NAME="date_month">
		<option VALUE="0">
		<option VALUE="1">1
		<option VALUE="2">2
		<option VALUE="3">3
		<option VALUE="4">4
		<option VALUE="5">5
		<option VALUE="6">6
		<option VALUE="7">7
		<option VALUE="8">8
		<option VALUE="9">9
		<option VALUE="10">10
		<option VALUE="11">11
		<option VALUE="12">12
	</select>

	Day:
	<select NAME="date_day">
		<option VALUE="0">
		<option VALUE="1">1
		<option VALUE="2">2
		<option VALUE="3">3
		<option VALUE="4">4
		<option VALUE="5">5
		<option VALUE="6">6
		<option VALUE="7">7
		<option VALUE="8">8
		<option VALUE="9">9
		<option VALUE="10">10
		<option VALUE="11">11
		<option VALUE="12">12
		<option VALUE="13">13
		<option VALUE="14">14
		<option VALUE="15">15
		<option VALUE="16">16
		<option VALUE="17">17
		<option VALUE="18">18
		<option VALUE="19">19
		<option VALUE="20">20
		<option VALUE="21">21
		<option VALUE="22">22
		<option VALUE="23">23
		<option VALUE="24">24
		<option VALUE="25">25
		<option VALUE="26">26
		<option VALUE="27">27
		<option VALUE="28">28
		<option VALUE="29">29
		<option VALUE="30">30
		<option VALUE="31">31
	</select>

	Year:
	<select NAME="date_year">
		<option VALUE="0">
		<option VALUE="2000">2000
		<option VALUE="1999">1999
		<option VALUE="1998">1998
		<option VALUE="1997">1997
		<option VALUE="1996">1996
		<option VALUE="1995">1995
		<option VALUE="1994">1994
		<option VALUE="1993">1993
		<option VALUE="1992">1992
		<option VALUE="1991">1991
		<option VALUE="1990">1990
	</select>
<br>
2 checks: Check that at least one drop down has been selected.
The first drop down is an invalid selection.<p>

Email:
	<input type="text" size="60" name="Email" value><br>
	2 checks: Can't be blank. A valid email address must contain an "@"
	and a "." in the address.<p>

<input type="submit" name="Submit" value="Submit"> <p>

Numbers:</strong>
	<input type="text" size="3" maxlength="3" name="numbers"><br>
	2 checks: Can't be blank. Only numbers 0-9 accepted.<p>

Fruit<br>
	<input type="radio" name="fruit" value="A"> A. Apples<br>
	<input type="radio" name="fruit" value="B"> B. Oranges<br>
	<input type="radio" name="fruit" value="C"> C. Pears<br>
<input type="radio" name="fruit" value="D"> D. Lemons<br>
1 check: At least one radio button must be selected.<p>
<br>

Range From:
		<select NAME="rangefrom">
		<option VALUE="0" selected>
		<option VALUE="1">1
		<option VALUE="2">2
		<option VALUE="3">3
		<option VALUE="4">4
		<option VALUE="5">5
		<option VALUE="6">6
		<option VALUE="7">7
		<option VALUE="8">8
		<option VALUE="9">9
		</select>

	To:
		<select NAME="rangeto">
		<option VALUE="0" selected>
		<option VALUE="1">1
		<option VALUE="2">2
		<option VALUE="3">3
		<option VALUE="4">4
		<option VALUE="5">5
		<option VALUE="6">6
		<option VALUE="7">7
		<option VALUE="8">8
		<option VALUE="9">9
		</select><br>
3 checks: Must select at least one option from both the From and the To fields.
The FROM value must be less than or equal to the TO value.<p>

Select 1-5 Provinces: (0 or more than 5 not allowed)<br>
	<select NAME="province" size="5" MULTIPLE>
		<option value="AB">
		Alberta, Canada
		</option>
		<option value="BC">
		British Columbia, Canada
		</option>
		<option value="MB">
		Manitoba, Canada
		</option>
		<option value="NB">
		New Brunswick, Canada
		</option>
		<option value="NF">
		Newfoundland, Canada
		</option>
		<option value="NS">
		Nova Scotia, Canada
		</option>
		<option value="ON">
		Ontario, Canada
		</option>
		<option value="PE">
		Prince Edward Island, Canada
		</option>
		<option value="PQ">
		Quebec, Canada
		</option>
		<option value="SK">
		Saskatchewan, Canada
		</option>
		<option value="YT">
		Yukon - N.W.T., Canada
		</option>
	</select>
<br>2 checks: At least 1 option must be selected.
No more than 5 options may be selected.
<p>
Number between 9 and 5000. Accepts commas:
Enter a number: <input type="text" size="5" maxlength="5" name="NumberText"><br>
5 checks: Cannot be blank. Must enter at least one character.
Can't enter more than 5 characters, including comma.
Must be between 9 and 5000. Accepts numbers, commas and hyphens,
so allows up to 5 characters for text field maxlength.<p>

Check Box: <input type="checkbox" name="checkbox1" value="Y"><br>
1 check: Reminds the user they have not checked the box.
Does not fail the validation however.<p>

Test Boxes: Check at least 1. No more than 2.
<input type="checkbox" name="checkbox2" value="1">Test1
<input type="checkbox" name="checkbox2" value="2">Test2
<input type="checkbox" name="checkbox2" value="3">Test3 <br>
2 checks: Requires at least one of the 3 checkboxes be selected.
Only allows a maximum of 2 boxes to be selected.<p>
<p>

<input type="submit" name="Submit" value="Submit">
<input type="reset" name="Reset" value="Reset"><p>
</form>
Subscribe to:
Posts (Atom)


