Can you OverRide a WCF [OperationContract] Breafly

Today I will tell you how to obtain method overloading in WCF.

Just to give a little background, we cannot implement method overloading in WCF.
This is because WSDL(Web Service Definition Language) does not support features of OOPs.

If you don’t agree with me, try creating method overloading in WCF and run the same.
Without fail it will give InvalidOperationException. J

Now here we go on to implement the Method overloading WCF.

First created your overload as you do in normal C# application in Service file.

Here is the sample I have used

public class Service1 : IService1
    {
        public string Add(int v1, int v2)
        {
            return (v1 + v2).ToString();
        }

        public string Add(string v1, string v2)
        {
            return (v1 + v2);
        }
    }

Go into the Iservice1.cs

And declare the method as usual.
Just make sure to provide different Value to Name attribute to OperationContract
See the example below

        [OperationContract(Name = "AddInt")]
        string Add(int v1, int v2);

        [OperationContract(Name = "AddString")]
        string Add(string v1, string v2);

Now create a simple Console application and add the service just created.

Create an instance of the service.
Refer to image below.


We can clearly see the two method just created.

One thing to catch here.

The method name exposed on the client side is not the one created on server side but the Value
we assign to the Name attribute to OperationContract

Now you will say where is Method overloading. Very true, as of now we have just be able to perform method overloading on service side.
To reflect the same on client side we need to do another little trick.
Here we go.

Go to Service Reference.cs file

Navigate to  public partial class Service1Client : System.ServiceModel.ClientBase<WCFSampleTest.ServiceReference1.IService1>, WCFSampleTest.ServiceReference1.IService1

There you will find the two method that we have create in service.

  public string AddInt(int v1, int v2) {
            return base.Channel.AddInt(v1, v2);
        }
       
  public string AddString(string v1, string v2) {
            return base.Channel.AddString(v1, v2);
        }

Just go and change the method name from to
As displayed below.

  public string Add(int v1, int v2) {
            return base.Channel.Add(v1, v2);
        }
       
  public string Add(string v1, string v2) {
            return base.Channel.Add(v1, v2);
        }

Now as this Class ServiceClient inherits the IService interface
We need to go and change the Interface acoordingly.


Here we go


[System.ServiceModel.OperationContractAttribute(Action="http://tempuri.org/IService1/AddInt", ReplyAction="http://tempuri.org/IService1/AddIntResponse",Name="AddInt")]
        string Add(int v1, int v2);       
        [System.ServiceModel.OperationContractAttribute(Action="http://tempuri.org/IService1/AddString", ReplyAction="http://tempuri.org/IService1/AddStringResponse",Name="AddString")]

Sometimes the 3rd Named parameter Name does not appear, if that happens go ahead and add manually.
And now your job is done.

You will now be able to see the the acutual methodOverload on the client side as well

Refer to below image

Explain Assembly Information in Asp.Net

Introduction

My first introduction to the .NET Global Assembly Cache (henceforth referred to only as the GAC) was during a Guerrilla .NET Course conducted by Develop Mentor a week after the .NET Framework Beta 1 Release. I was immediately fascinated by this magical and mysterious piece within the entire .NET puzzle (yes, .NET had been a puzzle to me for a very long time). While ordinary (Private) assemblies cohabit peacefully within their master’s (client executable’s) folder or sub-folders thereof, the highly sociable (Shared) assemblies, including the all important .NET System assemblies implementing the Framework Class Library, reside within this majestic abode called the GAC.
The primary purpose behind writing this article is to share my findings related to the GAC with the development community. The information presented herein is original and a direct result of my personal research. To the best of my knowledge, these details have not been covered in any .NET article or book.
Since references to Fusion occur throughout this article, it may be appropriate to clarify the significance of this name vis-à-vis the GAC. Fusion is the internal name of the project at Microsoft to eliminate the problems of sharing DLL code. The GAC was originally called the Fusion cache and is currently implemented within Fusion.dll.

Credits

I would like to thank Vince Henderson (Software Design Engineer/Test Lead), Sameer Bhangar (Software Design Engineer/Test) and Alan Shi (Software Design Engineer) from the Microsoft .NET Team for patiently answering my questions while I was researching the material for this article as well as for providing valuable suggestions after reviewing the first draft.

Disclaimers

Considering the Under-The-Hood nature of details covered in some sections of this article, appropriate cautionary notes have been placed immediately preceding such information. It will be prudent to heed these warnings and if you disregard these cautionary notes, it will be at your own risk.

The Basics

For the benefit of those that are genuinely unaware of what the GAC is, I am providing this simple description which has been plagiarized from the online documentation:
Each computer wherein the common language runtime is installed has a machine-wide code cache called the Global Assembly Cache. This Global Assembly Cache stores .NET assemblies specifically designated to be shared by several applications on that computer.
As a general rule, the Windows Registry is considered legacy within .NET and XCOPY deployment is highly encouraged, which in turn implies building assemblies that are private to a program’s main executable. Yet, there is a definite need for a central repository for .NET System assemblies as well as other user created Shared assemblies and it is this very need which is addressed by the GAC. Refer to .NET Framework Developer’s Guide: Global Assembly Cache for the formal product documentation on this topic.
The Microsoft KB article Q315682 HOW TO: Install an Assembly into the Global Assembly Cache in Visual Studio .NET walks the uninitiated through the steps required to install a .NET assembly into the GAC. If it is not already obvious, a key point to note here is that once your application installs Assemblies in the GAC, it loses the benefits of XCOPY deployment as these assemblies (other than the .NET System Libraries) must be explicitly installed in the GAC.
While covering the basics, it is important to understand the concept of Identity as it pertains to a .NET Assembly. An Assembly’s identity includes its simple textual name, a version number, an optional culture if the assembly contains localized resources, and an optional public key used to guarantee name uniqueness and to protect the name from unwanted reuse (name spoofing). An assembly with a simple Identity includes just the mandatory simple textual name and version number components. Since the GAC is the machine-wide repository for shared assemblies, it is very easy to run into the problem of name collisions if these assemblies only had simple identities because they are developed independently by different vendors and even developers within your own organization. Hence it is mandatory that every shared assembly installed in the GAC have a Strong Name. The formal definition of the term in the online documentation is
A strong name consists of the assembly's identity — its simple text name, version number, and culture information (if provided) — plus a public key and a digital signature. It is generated from an assembly file (the file that contains the assembly manifest, which in turn contains the names and hashes of all the files that make up the assembly), using the corresponding private key.
Refer to Strong-Named Assemblies and Creating and Using Strongly-named assemblies for the details around strongly-named assemblies. Of particular interest within the first URL are the three bullets that describe the requirements satisfied by strong names as well as the last paragraph that describes why a strong-named assembly can only reference other strong-named assemblies.

Popular misconceptions

One popular misconception is that strongly-named assemblies must always be installed in the GAC. Strongly-named assemblies can be put in the GAC, but by no-means have to be put there. It is desirable to put strongly-named assemblies under the application directory if you want to ensure your application has no system-wide impact, and make sure that it can be XCOPY deployed.
Another popular misconception is that assemblies must be installed in the GAC to make them accessible to COM Interop or unmanaged code. Neither of these scenarios mandates installing assemblies in the GAC and as a general guideline, you should install assemblies in the GAC only if they must be shared with other applications on the same machine.
Contrary to popular belief, it is not possible to directly reference an assembly from the GAC within a Visual Studio.NET project. In simpler terms, the assemblies listed within the .NET tab of the Add Reference dialog box for both Visual Studio.NET 2002 and 2003 are not enumerated from the GAC as this dialog box is path based. Refer to the More Information section of Microsoft KB article titled INFO: How to Display an Assembly in the Add Reference Dialog Box for a workaround to this very common issue faced by .NET developers.

The Public and not so public faces of the GAC

In order for the GAC to be useful, we need to be able to interact with it. I am aware of the following five interfaces available for such interaction.
  1. The Windows Installer 2.0
  2. The command line tool GACUtil.exe
  3. The Windows Shell namespace extension implemented in SHFusion.dll
  4. The .NET Framework Configuration Administrative tool
  5. Programmatically accessing the GAC through APIs
Each of these is explored in detail within the following sections. The GAC itself is implemented as a hierarchy of directories. When using these interfaces to interact with the GAC, we are isolated from the implementation details of the GAC (which by-the-way is a good thing).
The default ACLs inherited from the <%windir%> directory enable the local Administrators group and the SYSTEM user to have Full Control to the GAC. The local Users group has Read & Execute, List Folder Contents and Read permissions to the GAC. These permissions will come into play when you try interacting with the GAC using the techniques outlined in this article.

1. The Windows Installer 2.0

Developers of Windows Installer packages can install assemblies to the GAC using Microsoft Windows Installer 2.0. This is the preferred way for installing such shared assemblies and should be the only way shared assemblies are installed on non development machines. The main benefits of using the Windows Installer 2.0 for installing assemblies to the GAC are:
  1. It supports accurate reference counting based on installation, repair and removal of assemblies in the GAC.
  2. It supports Install-on-Demand of assemblies in the GAC. If an assembly was missing from the GAC and a user launches an application that requires that assembly, MSI will automatically install / re-install that assembly to the GAC.
  3. Rollback of unsuccessful installations, repairs and removals of assemblies in the GAC. Assemblies are added and removed from the GAC as a unit; that is, the files that constitute an assembly are always installed or removed together. This is due to the transactional model of the installation, which doesn't actually commit to the GAC until the end of the script so that rollback can remove the GAC assemblies.
Some starting references within the .NET and Visual Studio.NET documentation around Windows Installer 2.0 are as follows:

2. The command line tool GACUtil.exe

This command line tool allows you to install assemblies to the GAC, remove them from the GAC and list the contents of the GAC. The online documentation for this tool is available at Global Assembly Cache Tool (Gacutil.exe).
To install an assembly called MyAssembly in the GAC, you use the command
gacutil /i MyAssembly.dll
To remove this assembly from the GAC, you use the command
gacutil /u MyAssembly
To view the contents of the GAC, you use the command
gacutil /l
Note that when uninstalling, we use just the simple textual name of the assembly since for strong-named assemblies installed in the GAC, its simple textual name matches the DLL name.
Using the /r option (gacutil /ir MyAssembly.dll and gacutil /ur MyAssembly) will ensure that references to the assembly are traced. When listing shared assemblies using gacutil /lr, the traced references are also displayed for each shared assembly. In .NET Framework 1.1, the /r must be listed separately e.g. gacutil /l /r.
You should avoid using GACUtil to install assemblies to the GAC for the following reasons:
  1. Unless the /r option is used, there is no way to track installation references in the GAC.
  2. GACUtil.exe is part of the .NET Framework SDK and hence is not guaranteed to be on all target machines. Additionally, it is not marked as redistributable and hence you need to check the licensing to make sure you can package it up with your application’s installation image.
  3. Installing using GACUtil.exe does not enable Auto-Repair if the assembly in the GAC is missing (Auto-Repair is possible only with Windows Installer 2.0).

3. The Windows Shell namespace extension implemented in SHFusion.dll

Since a picture is worth a thousand words, I am including this image of the GAC as seen through the Windows Explorer when the Shell Extension SHFusion.dll is enabled.

The complete documentation for this Shell Extension is available at Assembly Cache Viewer (SHFusion.dll).
When the c:\windows\assembly directory is selected (clicked on), the right hand pane displays each and every assembly installed in the GAC along with additional information like Type, Version, Culture and Public Key Token. An assembly displayed with a Type of Native Images essentially means that an NGEN.exe generated native image is available for that assembly. Notice also that for every such assembly, there is a corresponding MSIL assembly e.g. System.Windows.Forms or System.Xml. This is required because the metadata is not included in the native image. The source IL images used to generate native images do not need to live in the GAC although they often do.
Selecting ‘Properties’ from the right-click menu displays the following properties window:

Most of this information is self evident but a couple of properties may need additional clarification.

References

This is not a very useful field and may well be removed in the next release of the .NET Framework. The basic problem is that the GAC implementation only gets a Yes / No answer from MSI on whether it has a reference to an assembly in the GAC but not an exact count of how many references MSI holds to the assembly (e.g. MSI could have 10 references and it'll still show up as only one reference). Additionally, the GAC implementation knows about its own traced references (gacutil /ir option). So the number displayed by the References field is really Number of Traced References + 1 (if MSI holds any references).
To view reference info gacutil /lr is a lot more useful. Even though it does not show details on MSI references but provides more info than just a number.

CodeBase

This property displays the path of origin for the assembly. It is for informational purposes only and cannot be relied on to be available always. When assemblies are installed through MSI, there's no codebase available for that shared assembly since the bits are streamed in from the MSI package and hence the field will display as blank. Basically, codebase is available only when a shared assembly is installed using a file path (e.g gacutil /i <full path name of the assembly>).
The value of this property should be clear when you consider that the display name for two different assemblies can be the same, say Microsoft’s System and Widgets’ System. Strong names make this a real possibility and the path of origin can help make clear to the user which assembly is being referred to whereas the different public key tokens would not. It is also important to point out that there is no mechanism to try to recover / restore files from this path of origin a la Windows File Protection or the Auto-Repair option supported by Windows Installer 2.0.

Disabling the Assembly Cache Viewer

WARNING: The following steps involve modifying the Windows Registry. If you use Registry Editor incorrectly, you may cause serious problems that may require you to reinstall your operating system. The author as well as Microsoft cannot guarantee that you can solve problems that result from using Registry Editor incorrectly. Use Registry Editor at your own risk.
If you want to disable the Assembly Cache Viewer and see the GAC in all its naked glory within Windows Explorer, you can set HKLM\Software\Microsoft\Fusion\DisableCacheViewer [DWORD] to 1.

4. The .NET Framework Configuration Administrative tool

The Microsoft .NET Framework Configuration MMC snap-in is accessible through Start | Control Panel | Administrative Tools. When you first click on the Assembly node under My Computer the following screen is displayed:

View List of Assemblies in the Assembly Cache
Upon selecting this task, the right pane displays the list of installed assemblies, similar to the view provided by the Assembly Cache Viewer.

The Action pull down menu includes the Copy, Delete, Properties and Help menu items, all of which are self explanatory. The properties window displays only the General tab. When compared to the properties window displayed by the Assembly Cache Viewer, the References property is missing while an additional Cache type property is displayed.
The View pull down menu includes the Add/Remove Columns, Help Topics and Refresh assembly list menu items. The Help Topic menu item switches to the view displayed when you first click on the Assembly Cache node.
Add an Assembly to the Assembly Cache
Upon selecting this task the following dialog box is displayed which enables an assembly to be installed into the GAC.

5. Programmatically accessing the GAC through APIs

CAUTION: Do not use these APIs in your application to perform assembly binds or to test for the presence of assemblies or other run time, development, or design-time operations. Only administrative tools and setup programs must use these APIs. If you use the GAC, this directly exposes your application to assembly binding fragility or may cause your application to work improperly on future versions of the .NET Framework.
While the previous four options for interacting with the GAC are useful, there are occasions when we may be forced to use a programmatic way to interact with the GAC through our own code. The developers that implemented the GAC have already accounted for this and there is a full fledged API that is available for this very purpose.
The Microsoft KB Article Q317540 Global Assembly Cache (GAC) APIs Are Not documented in the .NET Framework Software Development Kit (SDK) Documentation formally documents this API, so there is no reason for me to rehash the information within this section. It will be prudent to heed the cautionary note at the beginning of the KB article which has been reproduced in this article.

Relocating the GAC

The default location of the GAC is under the <%windir% >\assembly folder on the hard disk where the Windows operating system is installed. This location is not configurable during the .NET Framework setup / installation. Once the .NET Framework is fully installed, it is possible to relocate the GAC to a different location. The steps to move the GAC to a different location are as follows:
WARNING: The following steps involve modifying the Windows Registry. If you use Registry Editor incorrectly, you may cause serious problems that may require you to reinstall your operating system. The author as well as Microsoft cannot guarantee that you can solve problems that result from using Registry Editor incorrectly. Use Registry Editor at your own risk.
  1. Set the registry key CacheLocation (REG_SZ) under HKLM\Software\Microsoft\Fusion to the pathname of the folder where the GAC needs to be located. .NET will create an assembly subfolder underneath the CacheLocation specified in the registry key, so you should not include assembly in the pathname specified.
  2. XCOPY the contents of your current GAC (which most likely will be the default location c:\<%windir%>\Assembly) to this new location. You can also use the Explorer shell to copy the assembly subfolder underneath the current GAC location to the new location specified in the CacheLocation registry key.
As an example, if you want to move the GAC on your machine from the default c:\windows\assembly to d:\dotnetgac, you should
  • Set HKLM\Software\Microsoft\Fusion\CacheLocation to d:\dotnetgac.
  • XCOPY c:\windows\assembly to d:\dotnetgac\assembly
A few points worth noting regarding the GAC relocation process are as follows:
  • The order in which Steps 1 and 2 are performed is irrelevant.
  • Even the basic .NET Framework assemblies will not be found after changing the registry key unless you migrate or reinstall them.
  • .NET does not set any permission on the new cache location. The default location under <%windir%> inherits the ACLs so that only administrators have Modify permission to that folder. After relocating the GAC, you will need to manually set the appropriate ACLs on the new location so that the GAC cannot be tampered with by all users.
When I first tried to move the GAC to another location, I noticed that the Shell Namespace Extension SHFusion.dll displayed the abstracted view within Windows Explorer for both the original and new locations. Upon further investigation, I realized that SHFusion.dll uses the hidden file Desktop.ini under the <CacheLocation>\Assembly directory to determine how to display the contents of that folder.
Once the initial euphoria after learning this technique has subsided, the logical question one would ask is why would anyone ever want to do this in real life? Initially, I flirted with the idea of using this feature to have the GAC installed on a File Share (e.g. a Network Access Storage device) and reference that location from other machines that require the same set of shared assemblies. This way, the GAC would not occupy hard disk space on each machine within the cluster / group. Additionally, I would be able to install shared assemblies from one machine and have these available to .NET applications running on all other machines in that cluster / group.
Given my somewhat decent understanding of .NET Security (and without a lot of time available to experiment with this configuration), I quickly came to the conclusion that such a configuration would be impractical given the fact that the system assemblies themselves will be executed under the LocalIntranet Permission Set, leading to unpredictable behaviour. I am also sure that Microsoft Product Support considers this an unsupported configuration. All the same, I do feel that this would be a nice option to have as I have seen the size of the GAC bloat dramatically over time and a central location for a cluster of servers will be conducive to disk space as well as administration.
So the only good reason I can think of for now is to relocate the GAC to a different Windows drive (C: D: etc.) in case space becomes tight on the hard disk partition on which the GAC was initially installed. This is certainly possible given the amount of additional disk space that side-by-side installation of the .NET Framework and third party shared assemblies utilize.

Application Center 2000 Replication Support for .NET GAC

Application Center 2000 (AC2000) Replication feature ensures that specified files and directories are kept in sync across servers in a cluster. If such a file or directory is accidentally (or maliciously) deleted / overwritten, AC2000 Replication will ensure that the original is immediately replicated on that server (adding an event log entry to indicate the operation it performed).
Prior to the release of AC2000 SP2, GAC assembly replication support was made available as a separate download for AC2000 installed on servers running the Windows 2000 O/S. Microsoft KB article Q396250 INFO: Application Center 2000 GAC Replication Support for Windows 2000 has all the details regarding this interim support package. With the release of AC2000 SP2, the temporary version of the GAC assembly replication is no longer relevant (unless there is some kind of exception granted by Microsoft Support Services that allows a server installation to continue running AC2000 SP1). Installing AC2000 SP2 on servers running the Windows 2000 O/S wherein the temporary version of the GAC assembly replication has been previously installed will automatically replace it with the final version. AC2000 SP2 is the first service pack that supports Application Center on servers running Windows Server 2003 and installing SP2 on these servers will always install the final version of the GAC assembly replication feature.

Exploring the current implementation of the GAC

WARNING: The GAC details which are described within this section are relevant only to the implementation as observed in the Microsoft .NET Framework 1.0 and 1.1 releases. Subsequent releases of the .NET Framework may result in changes to or even a complete overhaul of today’s implementation. Any reliance on the implementation details described herein is strongly discouraged and should be used at your own risk.
Additionally, using MS DOS commands to alter or delete these internal folders or contents of files therein may lead to unpredictable behavior or other serious problems that may require you to reinstall the .NET Framework on the affected machine(s). Use such commands at your own risk.
As we know from a previous section, the default location of the GAC is under the <%windir% >\assembly folder. The following screen shot displays a MS DOS Command Window wherein various commands have been executed at the prompt.

The Dir command displays four separate directories which are briefly described here.
GAC: The container for all the MSIL assemblies installed within the GAC.
NativeImages1_v1.0.3705: The native images generated for .NET Framework 1.0.
Temp and Tmp : These are temporary staging directories that are used by the current implementation.
The Dir /AH command exposes the hidden Desktop.ini file used by SHFusion.dll while the type desktop.ini command reveals the contents of this file. I used the CLSID to search the HKCR node within the Registry Editor and found that it refers to a COM component implemented in SHFusion.dll. What is interesting is that MSCorEE.dll is listed under the InprocServer32 key even though the object is implemented in SHFusion.dll and SHFusion.dll is listed under the Server key. The reason for this is that MSCorEE.dll is the shim that knows about multiple side-by-side runtimes on the machine. Since SHFusion.dll lives under the versioned runtime directory, MSCorEE.dll is used as InProcServer32 so that it can load the correct version of SHFusion.dll at runtime.
Exploring further into the GAC folder reveals folders named after each of the assemblies installed in the GAC.

Progressively drilling through this hierarchy of folders reveals the organization of the GAC and how it implements Side-By-Side installation.

Within each folder for a shared assembly, there is a sub folder named using the version and public key token components of the assembly e.g. 1.0.3300.0__b77a5c561934e089. Within this sub folder resides the actual assembly that is installed into the GAC.
Notice the __AssemblyInfo__.ini file that resides alongside each and every assembly file. This stores assembly properties like URL, MVID, DisplayName etc. For assemblies that have a native image installed, a CustomString property is also included. It goes without saying that the format and information stored in this file is subject to change in future runtime versions.
The URL is the same as the Path of Origin displayed as the CodeBase property displayed within the Properties dialog displayed by SHFusion.dll.
DisplayName, Version, Culture and PublicKeyToken are the components that uniquely identify the assembly.
MVID and CustomString are used by the loader to determine if a specific pre-JITed assembly (installed using NGEN.exe) is valid to use during runtime.

What happens if a directory is accidentally deleted?

Since there is no Windows File Protection for GAC assemblies, it is important to reiterate what has been covered in previous sections of this article. If one accidentally deletes a folder within the GAC folder hierarchy, ONLY assemblies that are installed using MSI will be reinstalled at runtime if they are not found in the GAC. Since the .NET Framework is installed using MSI, all the System.* assemblies are considered safe from accidental or malicious tampering (provided the .NET Runtime MSI is accessible).

Summary

During the course of this article, we have explored the .NET GAC in sufficient detail. It is my sincere hope that the reader has learned something new in the process and will find some of this information useful when working with .NET on a day to day basis.
I am always open to suggestions for improvement and hence will appreciate healthy criticism related to the material presented here.

New Features in WCF

This article explains about the new features introduced in WCF 4.0.
.Net framework comes with new features and improved areas of WCF. It was mainly focused on simplifying the developer experience, enabling more communication scenario and providing rich integration with WWF.
The following items specifies the new features of WCF 4.0
Simplified configuration
This new feature shows simplification of WCF configuration section by providing default endpoint, binding and behavior configuration. It is not mandatory to provide endpoint while hosting service. Service will automatically create new endpoint if it does find any endpoint while hosting service. These changes make it possible to host configuration-free services.
Discovery service
There are certain scenario in which endpoint address of the service will be keep on changing. In that kind of scenario, client who consume this service also need to change the endpoint address dynamically to identify the service. This can be achieved using WS-Discovery protocol.
Routing service
This new feature introduces routing service between client and actual business service. This intermediated service Act as broker or gateways to the actual business services and provides features for content based routing, protocol bridging and error handling
REST Service
There are few features helps while developing RESTful service.
  • Automatic help page that describes REST services to consumer
  • Support for declarative HTTP catching
Workflow service
  • Improves development experience
  • Entire service definition can be define in XAML
  • Hosting workflow service can be done from .xamlx file, without using .svc file
  • Introduce new “Context” bindings like BasicHttpContextBinding, WSHttpContextBinding, or NetTcpContextBinding
  • In .Net4.0, WorkflowServiceHost class for hosting workflow services was redesigned and it is available in System.ServiceModel.Activities assembly. In .Net3.5, WorkflowServiceHost class is available in System.WorkflowServices assembly
  • New messaging activities SendReply and ReceiveReply are added in .Net4.0
Conclusion:
This article explain new featues introduced in WCF 4.0

Focus Dropdown value Based on DataBase Value

 protected void gdvViewInterview_RowDataBound(object sender, GridViewRowEventArgs e)
        {
            if (e.Row.RowType == DataControlRowType.DataRow)
            {
                Label lblInterviewStatus = (Label)e.Row.FindControl("lblCandStatus");
                if (lblInterviewStatus != null)
                {
                    ViewState["CandidateStatus"] = lblInterviewStatus.Text;
                }
                DropDownList ddlInterviewStatus = (DropDownList)e.Row.FindControl("ddlCandStatus");
                if (ddlInterviewStatus != null)
                {
                    ddlInterviewStatus.SelectedValue = Convert.ToString(ViewState["CandidateStatus"]);
                }

               
            }

Difference between String.Empty and "" in Asp.Net?

Just a few days back I was working with string. At many point of time I had to make a checking for empty string. I started thinking about the difference between “” and string.empty. and which one is a better way to check if the string is empty or not.
The difference between string.Empty and “” is very small. String.empty will not create any object while “” will create a new object in the memory for the checking. Hence string.empty is better in memory management.
But the comparison with string.length == 0 will be even faster and the better way to check for the empty string. And I also have a bias for checking with string.length in this case. But do not forget to make a checking for null value if you are also expecting null value in the comparison.

Export DataSet To Excel Using Asp.Net

Hi Everyone…
I have been exporting data from dataset to excel using nested loops, excel object, accessing each cell of excel sheet and each cell of dataset and so on and so forth until I find this……
Before writing about it a special thanks to Peter A. Bromberg for writing such a nice article which really made at least my life easy….:). In his article he wrote a very simple function to export data without using excel object and other messy stuff. XSL Transformation is applied to dataset and XML for excel is generated.
Below is the complete function which will write an Excel file to your local disk. You have to pass it the DataSet to export and path to where file should be generated.
public static void CreateWorkbook(DataSet ds, String path)
{
   XmlDataDocument xmlDataDoc = new XmlDataDocument(ds);
   XslTransform xt = new XslTransform();
   StreamReader reader =new StreamReader(typeof (WorkbookEngine).Assembly.GetManifestResourceStream(typeof (WorkbookEngine), “Excel.xsl”));
   XmlTextReader xRdr = new XmlTextReader(reader);
   xt.Load(xRdr, null, null);

   StringWriter sw = new StringWriter();
   xt.Transform(xmlDataDoc, null, sw, null);

   StreamWriter myWriter = new StreamWriter (path + “\\Report.xls“);
   myWriter.Write (sw.ToString());
   myWriter.Close ();
}

and thats it. Your DataSet has been exported to an Excel file which is saved at the path passed to this function.

Disable Back Button in Login Page in Asp.Net

<script type="text/javascript">
        window.history.forward();
        function noBack() { window.history.forward(); }
</script>


..................................................................................................
 <script type="text/javascript">
        function noBack() {
            window.history.forward()
        }
        noBack();
        window.onload = noBack;
        window.onpageshow = function(evt) { if (evt.persisted) noBack() }
        window.onunload = function() { void (0) }
    </script>


 ...................................................................
   <script type = "text/javascript" >

        function preventBack() { window.history.forward(); }

        setTimeout("preventBack()", 0);

        window.onunload = function() { null };

</script>

Specified Time Session Timeout And Redirect To Login Page In ASP.NET

Detecting Session Timeout and Redirect to Login Page in ASP.NET

In this example i'll explain how to detect session timeout and redirect to login page, session timeout occurs when user is idle for the time specified as Session timeout in web.config file using C# And VB.NET.

For this Example i've set time out value in web.config file to 1 minute.


1st Method
In web.config file, set the sessionstate mode to inproc and authentication mode to Forms
<system.web>
<compilation debug="true"/>
<authentication mode="Forms"/>
<sessionState mode="InProc" cookieless="false" timeout="1">
</sessionState>
</system.web> 

I've created three pages in this example , one is login page , when session expires , i redirect to this page , one is navigation page where i'll check if session is valid or not , if it is valid than only user will see this page other wise he gets redirected to login page.

Add Global.asax class file in root of your application or website.
This method works only if Global.asax is present in application.


Write below mentioned code in Page_Init event of the page where we want to check for session timeout.

we can also put this code in in a class and inherit all pages of application from this class acting as base class for all pages to check for session timeout.

C# CODE
protected void Page_Init(object sender, EventArgs e)
    {
        if (Context.Session != null)
        {
if (Session.IsNewSession)
            HttpCookie newSessionIdCookie = Request.Cookies["ASP.NET_SessionId"];
                if (newSessionIdCookie != null)
                {
                    string newSessionIdCookieValue = newSessionIdCookie.Value;
                    if (newSessionIdCookieValue != string.Empty)
                    {
                        // This means Session was timed Out and New Session was started
                        Response.Redirect("Login.aspx");
                    }
                }
            }
        }
    }

VB.NET CODE
Protected Sub Page_Init(sender As Object, e As EventArgs)
 If Context.Session IsNot Nothing Then
  If Session.IsNewSession Then
   Dim newSessionIdCookie As HttpCookie = Request.Cookies("ASP.NET_SessionId")
   If newSessionIdCookie IsNot Nothing Then
    Dim newSessionIdCookieValue As String = newSessionIdCookie.Value
    If newSessionIdCookieValue <> String.Empty Then
     ' This means Session was timed Out and New Session was started
     Response.Redirect("Login.aspx")
    End If
   End If
  End If
 End If
End Sub


2nd Method.
Code for Default.aspx
<%@ Page Language="C#" AutoEventWireup="true"
CodeFile="Default.aspx.cs" Inherits="_Default" %>

<!DOCTYPE html PUBLIC
"-//W3C//DTD XHTML 1.0 Transitional//EN"
"http://www.w3.org/TR/xhtml1/DTD/xhtml1-transitional.dtd">

<html xmlns="http://www.w3.org/1999/xhtml" >
<head runat="server">
<title>Untitled Page</title>
</head>
<body>
<form id="form1" runat="server">
<div>
<asp:Button ID="btnSessionStart"
runat="server"
OnClick="btnSessionStart_Click"
Text="Start Session" /><br />
<br />
<br />
<asp:Button ID="btnCheck"
runat="server"
OnClick="btnCheck_Click"
Text="Check Session ID" />
<br />
<asp:TextBox ID="txtSession"
runat="server"
Width="266px">
</asp:TextBox><br />
<br />
<asp:Button ID="btnGO"
runat="server"
OnClick="btnGO_Click"
Text="Go to Other Page" />
<br />
<br />
</div>
</form>
</body>
</html>

And the code behind for this page is like
protected void btnSessionStart_Click
(object sender, EventArgs e)
{
Guid Session_id = Guid.NewGuid();
Session["SessionID"]
= Session_id.ToString();

}
protected void btnCheck_Click
(object sender, EventArgs e)
{
if (Session["SessionID"] != null)
txtSession.Text =
Session["SessionID"].ToString();
else
txtSession.Text =
"Session has expired";
}
protected void btnGO_Click
(object sender, EventArgs e)
{
Response.Redirect("Default2.aspx");
}

On the page where we want to check the session has timed out or not, we need to check it in the Page_Init event of the page , if session is not null than user will be able to go to the page other wise he will be redirected to login page.

In this page I've just put a button to go to home page
<html xmlns="http://www.w3.org/1999/xhtml" >
<head runat="server">
<title>Untitled Page</title>
</head>
<body>
<form id="form1" runat="server">
<div>
<asp:Button ID="btnHome"
runat="server" OnClick="btnHome_Click"
Text="Home" /></div>
</form>
</body>
</html>

And the Code behind for this page is

protected void Page_Init(object sender, EventArgs e)
{
CheckSession();
}
protected void btnHome_Click(object sender, EventArgs e)
{
Response.Redirect("Default.aspx");
}

private void CheckSession()
{
if (Session["SessionID"] == null)
{
Response.Redirect("Login.aspx");
}

}

If we need to check this in all the pages of application than we can create a BaseClass and write the above mentioned code of CheckSession and Page_Init part and drive all ur pages from this class by typing BaseClassName in place of System.Web.UI.Page and it will check all pages for session timeout every time page is loaded

Tweets Posting Through ASP.NET

 Register Create Twiier Account in API


DownLoad Twitter DLL Heare


   Place Consumer Key,Secret Key in WEB.ConFig


 <appSettings>

    <add key="consumerKey" value="Place Consumer Key Heare"/>
    <add key="consumerSecret" value="Place Consumer Secret Key Heare"/>
  </appSettings>


Authntication Button Click Event(Optional)


protected void btnAuthenticate_Click(object sender, EventArgs e)
        {


            // add these to web.config or your preferred location
            var consumerKey = ConfigurationManager.AppSettings["consumerKey"];
            var consumerSecret = ConfigurationManager.AppSettings["consumerSecret"];

            //If User is not valid user
            if (Request.QueryString["oauth_token"] == null)
            {
                //Step 1: Get Request Token

                OAuthTokenResponse RequestToken = OAuthUtility.GetRequestToken(consumerKey, consumerSecret, "Redirect URL Place Heare");

                //Step 2: Redirect User to Requested Token
                Response.Redirect("http://twitter.com/oauth/authorize?oauth_token=" + RequestToken.Token);
            }
            else
            {
                //For Valid User
                string Oauth_Token = Request.QueryString["oauth_token"].ToString();
                var accessToken = OAuthUtility.GetAccessToken(consumerKey, consumerSecret, Oauth_Token, "");

                lblMessage.Text = "<b>Hello "

        + accessToken.ScreenName

        + ", Welcome to Go4Sharepoint.com Twitter App<b>";

                lblMessage.Text += "<br/> Token: " + accessToken.Token;
                lblMessage.Text += "<br/> TokenSecret: " + accessToken.TokenSecret;
                lblMessage.Text += "<br/> UserId: " + accessToken.UserId;
            }
        }


Tweets Posting:


 protected void btnPost_Click(object sender, EventArgs e)
        {
            // add these to web.config or your preferred location
            var consumerKey = ConfigurationManager.AppSettings["consumerKey"];
            var consumerSecret = ConfigurationManager.AppSettings["consumerSecret"];

            OAuthTokens accessToken = new OAuthTokens();
            accessToken.AccessToken = "Place Access Token Heare ";
            accessToken.AccessTokenSecret = "Place Access Token Secret Key";
            accessToken.ConsumerKey = consumerKey;
            accessToken.ConsumerSecret = consumerSecret;


                       TwitterStatus.Update(accessToken, txtpost.Text);


        }

Explain Session States in ASP.NET


Introduction

First of all, I would like to thank all the readers who have read and voted for my articles. In the Beginner's Guide series, I have written some articles on state management. Probably this is my last article on state management.
This article will give you a very good understanding of session. In this article, I have covered the basics of session, different ways of storing session objects, session behavior in web farm scenarios, session on Load Balancer, etc. I have also explained details of session behavior in a live production environment. Hope you will enjoy this article and provide your valuable suggestions and feedback.

What is Session?

Web is 
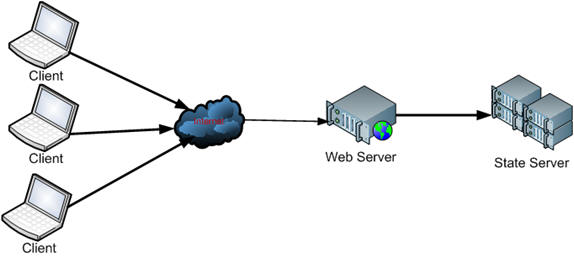
stateless, which means a new instance of a web page class is re-created each time the page is posted to the server. As we all know, HTTP is a stateless protocol, it can't hold client information on a page. If the user inserts some information and move to the next page, that data will be lost and the user would not be able to retrieve that information. What do we need here? We need to store information. Session provides a facility to store information on server memory. It can support any type of object to store along with our own custom objects. For every client, session data is stored separately, which means session data is stored on a per client basis. Have a look at the following diagram:
explor2.jpg
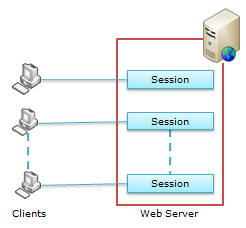
Fig: For every client, session data is stored separately
State management using session is one of the best ASP.NET features, because it is secure, transparent from users, and we can store any kind of object in it. Along with these advantages, some times session can cause performance issues in high traffic sites because it is stored in server memory and clients read data from the server. Now let's have a look at the advantages and disadvantages of using session in our web applications.

Advantages and disadvantages of Session?

Following are the basic advantages and disadvantages of using session. I have describe in details with each type of session at later point of time.

Advantages:

  • It helps maintain user state and data all over the application.
  • It is easy to implement and we can store any kind of object.
  • Stores client data separately.
  • Session is secure and transparent from the user.

Disadvantages:

  • Performance overhead in case of large volumes of data/user, because session data is stored in server memory.
  • Overhead involved in serializing and de-serializing session data, because in the case of StateServer and SQLServer session modes, we need to serialize the objects before storing them.
Besides these, there are many advantages and disadvantages of session that are based on the session type. I have discussed all of them in the respective sections below.

Storing and retrieving values from Session

Storing and retrieving values in session are quite similar to that in ViewState. We can interact with session state with the System.Web.SessionState.HttpSessionState class, because this provides the built-in session object in ASP.NET pages.
The following code is used for storing a value to session:
//Storing UserName in Session
Session["UserName"] = txtUser.Text;
Now, let's see how we can retrieve values from session:
//Check weather session variable null or not
if (Session["UserName"] != null)
{
    //Retrieving UserName from Session
    lblWelcome.Text = "Welcome : " + Session["UserName"];
}
else
{
 //Do Something else
}
We can also store other objects in session. The following example shows how to store a DataSet in session.
//Storing dataset on Session
Session["DataSet"] = _objDataSet;
The following code shows how we to retrieve that DataSet from session:
//Check weather session variable null or not
if (Session["DataSet"] != null)
{
    //Retrieving UserName from Session
    DataSet _MyDs = (DataSet)Session["DataSet"];
}
else
{
    //Do Something else
}

References:

Session ID

ASP.NET uses an 120 bit identifier to track each session. This is secure enough and can't be reverse engineered. When a client communicates with a server, only the session ID is transmitted between them. When the client requests for data, ASP.NET looks for the session ID and retrieves the corresponding data. This is done in the following steps:
  • Client hits the web site and information is stored in the session.
  • Server creates a unique session ID for that client and stores it in the Session State Provider.
  • The client requests for some information with the unique session ID from the server.
  • Server looks in the Session Providers and retrieves the serialized data from the state server and type casts the object.
Take a look at the the pictorial flow:

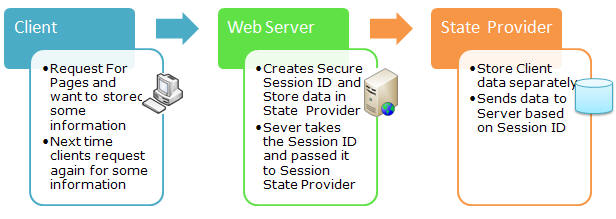
Fig: Communication of client, web server, and State Provider

References:

Session Mode and State Provider

In ASP.NET, there are the following session modes available:
  • InProc
  • StateServer
  • SQLServer
  • Custom
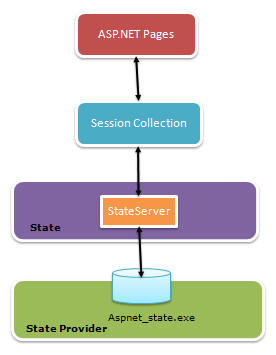
For every session state, there is a Session Provider. The following diagram will show you how they are related:

Fig: Session state architecture
We can choose the session state provider based on which session state we are selecting. When ASP.NET requests for information based on the session ID, the session state and its corresponding provider are responsible for sending the proper information. The following table shows the session mode along with the provider name:
Session State Mode State Provider
InProc In-memory object
StateServer Aspnet_state.exe
SQLServer Database
Custom Custom provider
Apart from that, there is another mode Off. If we select this option, the session will be disabled for the application. But our objective is to use session, so we will look into the above four session state modes.

Session States

Session state essentially means all the settings that you have made for your web application for maintaining the session. Session State itself is a big thing. It says all about your session configuration, either in the web.config or from the code-behind. In the web.config, <SessionState> elements are used for setting the configuration of the session. Some of them are Mode, Timeout, StateConnectionString, CustomProvider, etc. I have discussed about each and every section of the connection string. Before I discuss Session Mode, take a brief overview of session events.

Session Event

There are two types of session events available in ASP.NET:
  • Session_Start
  • Session_End
You can handle both these events in the global.asax file of your web application. When a new session initiates, the session_start event is raised, and the Session_End event raised when a session is abandoned or expires.
void Session_Start(object sender, EventArgs e) 
{
    // Code that runs when a new session is started
}

void Session_End(object sender, EventArgs e) 
{
    // Code that runs when a session ends. 
}

References:

Session Mode

I have already discussed about session modes in ASP.NET. Following are the different types of session modes available in ASP.NET:
  • Off
  • InProc
  • StateServer
  • SQLServer
  • Custom
If we set session Mode="off" in web.config, session will be disabled in the application. For this, we need to configure web.config the following way:

InProc Session Mode

This is the default session mode in ASP.NET. Its stores session information in the current Application Domain. This is the best session mode for web application performance. But the main disadvantage is that, it will lose data if we restart the server. There are some more advantages and disadvantages of the InProc session mode. I will come to those points later on.

Overview of InProc session mode

As I have already discussed, in InProc mode, session data will be stored on the current application domain. So it is easily and quickly available.

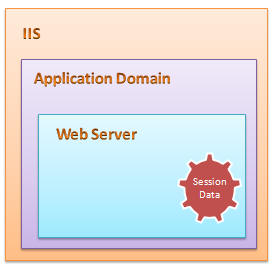
InProc session mode stores its session data in a memory object on the application domain. This is handled by a worker process in the application pool. So if we restart the server, we will lose the session data. If the client request for data, the state provider read the data from an in-memory object and returns it to the client. In web.config, we have to mention the session mode and also set the timeout.
explor3.gif
The above session timeout setting keeps the session alive for 30 minute. This is configurable from the code-behind too.
Session.TimeOut=30;
There are two types of session events available in ASP.NET: Session_Start() and Session_End and this is the only mode that supports the Session_End() event. This event is called after the session timeout period is over. The general flow for the InProc session state is like this:
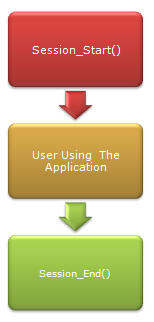
When the Session_End() is called depends on the session timeout. This is a very fast mechanism because no serialization occurs for storing and retrieving data, and data stays inside the same application domain.

When should we use the InProc session mode?

InProc is the default session mode. It can be very helpful for a small web site and where the number of users is very less. We should avoid InProc in a Web Garden scenario (I will come to this topic later on).

Advantages and disadvantages

Advantages:
  • It store session data in a memory object of the current application domain. So accessing data is very fast and data is easily available.
  • There is not requirement of serialization to store data in InProc session mode.
  • Implementation is very easy, similar to using the ViewState.
Disadvantages:
Although InProc session is the fastest, common, and default mechanism, it has a lot of limitations:
  • If the worker process or application domain is recycled, all session data will be lost.
  • Though it is the fastest, more session data and more users can affect performance, because of memory usage.
  • We can't use it in web garden scenarios.
  • This session mode is not suitable for web farm scenarios.
As per the above discussion, we can conclude that InProc is a very fast session storing mechanism but suitable only for small web applications. InProc session data will get lost if we restart the server, or if the application domain is recycled. It is also not suitable for Web Farm and Web Garden scenarios.
Now we will have a look the other options available to overcome these problems. First comes the StateServer mode.

StateServer Session Mode

Overview of StateServer session mode

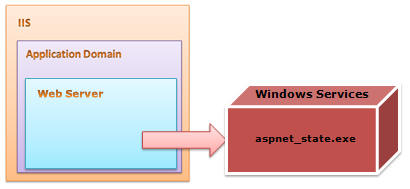
This is also called Out-Proc session mode. StateServer uses a stand-alone Windows Service which is independent of IIS and can also be run on a separate server. This session state is totally managed by aspnet_state.exe. This server may run on the same system, but it's outside of the main application domain where your web application is running. This means if you restart your ASP.NET process, your session data will still be alive. This approaches has several disadvantages due to the overhead of the serialization and de-serialization involved, it also increases the cost of data access because every time the user retrieves session data, our application hits a different process.

Configuration for StateServer session mode

In StateServer mode, session data is stored in a separate server which is independent of IIS and it is handled by aspnet_state.exe. This process is run as a Windows Service. You can start this service from the Windows MMC or from the command prompt.

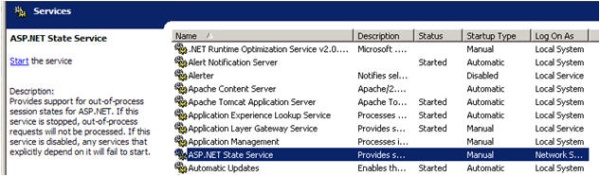
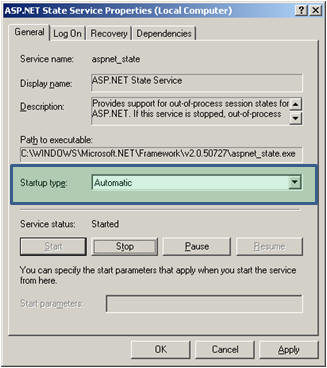
By default, the "Startup Type" of the ASP.NET state service is set to Manual; we have to set it to Automatic.

From the command prompt, just type "net start aspnet_state". By default, this service listens to TCP port 42424, but we can change the port from the Registry editor as show in the picture below:

Now have a look at the web.config configuration for the StateServer setting. For the StateServer setting, we need to specify the stateConnectionString. This will identify the system that is running the state server. By default, stateConnectionString used the IP 127.0.0.1 (localhost) and port 42424.
explor9.gif
When we are using StateServer, we can configure the stateNetworkTimeOut attribute to specify the maximum number of seconds to wait for the service to respond before canceling the request. The default timeout value is 10 seconds.
explor10.gif
For using StateServer, the object which we are going to store should be serialized, and at the time of retrieving, we need to de-serialize it back. I have described this below with an example.

How the StateServer Session Mode works

We use the StateServer session mode to avoid unnecessary session data loss when restarting our web server. StateServer is maintained by the aspnet_state.exe process as a Windows service. This process maintains all the session data. But we need to serialize the data before storing it in StateServer session mode.

As shown in the above figure, when the client sends a request to the web server, the web server stores the session data on the state server. The StateServer may be the current system or a different system. But it will be totally independent of IIS. The destination of the StateServer will depend on the web.config stateConnectionString setting. If we set it to 127.0.0.1:42424, it will store data in the local system itself. For changing the StateServer destination, we need to change the IP, and make sure aspnet_state.exe is up and running on that system. Otherwise you will get the following exception while trying to store data on session.

When we are storing an object on session, it should be serialized. That data will be stored in the StateServer system using the State Provider. And at the time of retrieving the data, the State Provider will return the data. The complete flow is given in the picture below:

Example of StateServer Session Mode

Here is a simple example of using the StateServer session mode. I have created this sample web application directly on IIS so that we can easily understand its usage.
Step 1: Open Visual Studio > File > New > Web Sites. Choose Location as HTTP and create the web application.

Now if you open IIS, you will see a virtual directory created with the name of your web application, in my case it is StateServer.

Step 2: Create s simple UI that will take the roll number and the name of a student. We will store the name and roll number in a state server session. I have also created a class StudentInfo. This class is listed below:
[Serializable]
public class StudentInfo
{
    //Default Constructor
    public StudentInfo()
    {
       
    }
    /// <summary>
    /// Create object of student Class
    /// </summary>
    /// <param name="intRoll">Int RollNumber</param>
    /// <param name="strName">String Name</param>
    public StudentInfo(int intRoll, string strName)
    {
        this.Roll = intRoll;
        this.Name = strName;
    }

    private int intRoll;
    private string strName;
    public int Roll
    {
        get
        {
            return intRoll;
        }
        set
        {
            intRoll = value;
        }
    }

    public string Name
    {
        get
        {
            return strName;
        }
        set
        {
            strName = value;
        }
    }
}
Now have a look at the code-behind. I have added two buttons: one for storing session and another for retrieving session.
protected void btnSubmit_Click(object sender, EventArgs e)
{
    StudentInfo _objStudentInfo = 
      new StudentInfo(Int32.Parse( txtRoll.Text) ,txtUserName.Text);
    Session["objStudentInfo"] = _objStudentInfo;
    ResetField();
}
protected void btnRestore_Click(object sender, EventArgs e)
{
    StudentInfo _objStudentInfo = (StudentInfo) Session["objStudentInfo"];
    txtRoll.Text = _objStudentInfo.Roll.ToString();
    txtUserName.Text = _objStudentInfo.Name;
}
Step 3: Configure your web.config for state server as I have already explained. And please make sure aspnet_state.exe is up and running on the configured server.
Step 4: Run the application.

Enter the data, click on Submit.
There are the following tests that I have made which will totally explain how exactly StateServer is useful.
First: Remove the [Serializable ] keyword from the StudentInfo class and try to run the application. When you click on the Submit button, you will get the following error:

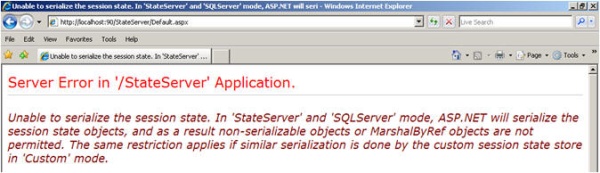
Which clearly says that you have to serialize the object before storing it.
Second: Run the application, store data by clicking on the Submit button. Restart IIS.

In the case of InProc, you will have already lost your session data, but with StateServer, click on Restore Session and you will get your original data, because StateServer data does not depend on IIS. It keeps it separately.
Third: Stop aspnet_state.exe from the Windows Services MMC and submit the data. You will get the following error:

because your State Server process is not running. So please keep in mind these three points when using StateServer mode.

Advantages and Disadvantages

Based on the above discussion:
Advantages:
  • It keeps data separate from IIS so any issues with IIS will not hamper session data.
  • It is useful in web farm and web garden scenarios.
Disadvantages:
  • Process is slow due to serialization and de-serialization.
  • State Server always needs to be up and running.
I am stopping here on StateServer, you will find some more interesting points on it in the Load Balancer, Web Farm, and Web Garden section.

References:

SQLServer Session Mode

Overview of SQL Server Session Mode

This session mode provide us more secure and reliable session management in ASP.NET. In this session mode, session data is serialized and stored in A SQL Server database. The main disadvantage of this session storage method is the overhead related with data serialization and de-serialization. It is the best option for using in web farms though.

To setup SQL Server, we need these SQL scripts:
  • For installing: InstallSqlState.sql
  • For uninstalling: UninstallSQLState.sql
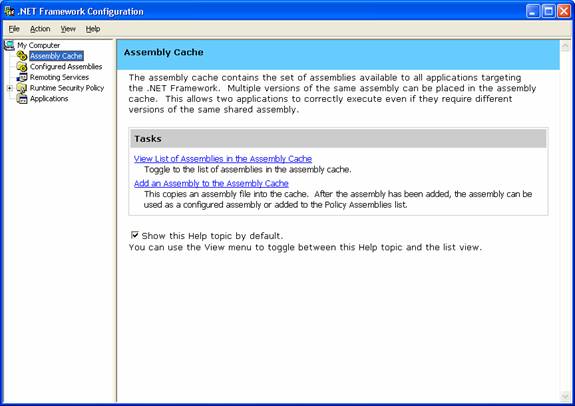
The easiest way to configure SQL Server is using the aspnet_regsql command.
I have explained in detail the use of these files in the configuration section. This is the most useful state management in web farm scenarios.

When should we use SQLServer Session Mode?

  • SQL Server session mode is a more reliable and secure session state management.
  • It keeps data in a centralized location (database).
  • We should use the SQLServer session mode when we need to implement session with more security.
  • If there happens to be frequent server restarts, this is an ideal choice.
  • This is the perfect mode for web farm and web garden scenarios (I have explained this in detail later).
  • We can use SQLServer session mode when we need to share session between two different applications.

Configuration for SQLServer Session Mode

In SQLServer session mode, we store session data in SQL Server, so we need to first provide the database connection string in web.config. The sqlConnectionString attribute is used for this.
After we setup the connection string, we need to configure the SQL Server. I will now explain how to configure your your SQL Server using the aspnet_regsql command.
Step 1: From command prompt, go to your Framework version directory. E.g.: c:\windows\microsoft.net\framework\<version>.
Step 2: Run the aspnet_regsql command with the following parameters:

Have a look at the parameters and their uses:
Parameters Description
-ssadd Add support for SQLServer mode session state.
-sstype p P stands for Persisted. It persists the session data on the server.
-S Server name.
-U User name.
-P Password.
After you run the command, you will get the following message:

That's all.
Step 3: Open SQL Server Management Studio, check if a new database ASPState has been created, and there should be two tables:
  • ASPStateTempApplications
  • ASPStateTempSessions

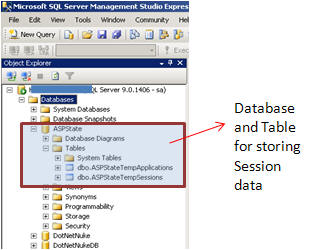
Change the configuration string of the StateServer example and run the same sample application.
Just store the roll number and user name and click on the Submit button. Open the ASPStateTempSessions table from SQL Server Management Studio.. here is your session data:

Now do the following test that I have already explained in the StateServer mode section:
  1. Remove the Serialize keyword from the StydentInfo class
  2. Reset IIS and click on Restore Session
  3. Stop SQL Server Services
I think I have explained the SQLServer session mode well.

Advantages and Disadvantages

Advantages:
  • Session data not affected if we restart IIS.
  • The most reliable and secure session management.
  • It keeps data located centrally, is easily accessible from other applications.
  • Very useful in web farms and web garden scenarios.
Disadvantages:
  • Processing is very slow in nature.
  • Object serialization and de-serialization creates overhead for the application.
  • As the session data is handled in a different server, we have to take care of SQL Server. It should be always up and running.

References:

Custom Session Mode

Overview of Custom Session Mode

Commonly we use the InProc, StateServer, or SQLServer session modes for our application, but we also need to know the fundamentals of the Custom session mode. This session mode is quite interesting, because Custom session gives full control to us to create everything, even the session ID. You can write your own algorithm to generate session IDs.
You can implement custom providers that store session data in other storage mechanisms simply by deriving from the SessionStateStoreProviderBase class. You can also generate a new session ID by implementing ISessionIDManager.
These are the methods called during the implementation of Custom session:
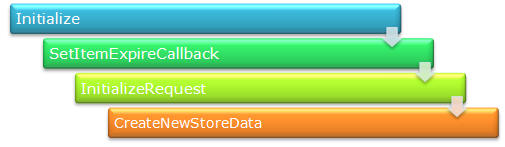
In the Initialize method, we can set a custom provider. This will initialize the connection with that provider. SetItemExpireCallback is used to set SessionTimeOut. We can register a method that will be called at the time of session expiration. InitializeRequest is called on every request and CreateNewStoreData is used to create a new instance of SessionStateStoreData.

When should we use Custom Session Mode?

We can use Custom session mode in the following cases:
  • We want to store session data in a place other than SQL Server.
  • When we have to use an existing table to store session data.
  • When we need to create our own session ID.

What configuration do we need for it?

We need to configure our web.config like this:

If you want to explore this more, please check the References section.

Advantages and Disadvantages

Advantages:
  • We can use an existing table for storing session data. This is useful when we have to use an existing database.
  • It's not dependent on IIS, so restarting the web server does not have any effect on session data.
  • We can crate our own algorithm for generating session ID.
Disadvantages:
  • Processing of data is very slow.
  • Creating a custom state provider is a low-level task that needs to be handled carefully to ensure security.
It is always recommended to use a third party provider rather than create your own.

References:

Overview of production deployment

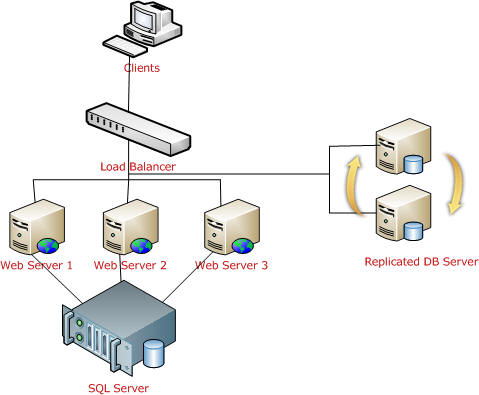
Production environments are where we deploy our applications on a live production server. It is a major and big challenge for web developers to deploy their applications on a live server, because in a big production environment, there are a large number of users and it is hard to handle the load for so many users with a single server. Here comes in the concepts of Web Farm, Load Balancer, Web Garden, etc.
Just a few months back, I deployed a web application in a live production environment which is accessed by millions of user and there were more than 10 Active Directory instances, more than 10 web servers over a Load Balancer, and several database server, Exchange Server, LCS Server, etc. The major risk involved in multiple servers is session management. The following picture shows a general diagram of production environments:

I will try to explain the different scenarios that you need to keep in mind while deploying your application.

Application Pool

This is one of the most important things you should create for your applications in a production environment. Application pools are used to separate sets of IIS worker processes that share the same configuration. Application pools enable us to isolate our web application for better security, reliability, and availability. The worker process serves as the process boundary that separates each application pool so that when one worker process or application has an issue or is recycled, other applications or worker processes are not affected.

Identity of Application Pool

Application pool identity configuration is an important aspect of security in IIS 6.0 and IIS 7.0, because it determines the identity of the worker process when the process is accessing a resource. In IIS 7.0, there are three predefined identities that are the same as in IIS 6.0.
Application Pool Identity Description
LocalSystem Built-in account that has administrative privileges on the server. It can access both local and remote resources. For any kind accessing of server files or resources, we have to set the identity of the application pool to LocalSystem.
LocalServices Built-in account has privileges of an authenticated local user account. It does not have any network access permission.
NetworkServices This is the default identity of Application Pool. NetworkServices has the privileges of an authenticated local user account.

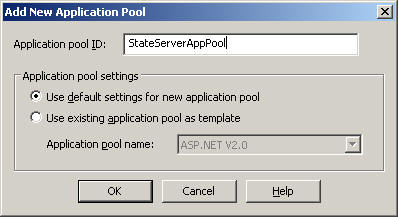
Creating and assigning Application Pool

Open IIS Console, right click on Application Pool Folder > Create New.

Give the Application Pool ID and click OK.

Now, right click on the Virtual Directory (I am using StateServer web sites) and assign StateServerAppPool to the StateServer Virtual Directory.

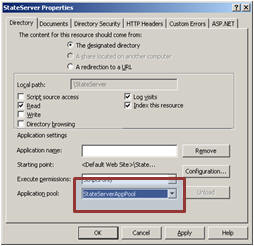
So this StateServer web site will run independently with StateServerAppPool. Any problem related with other applications will not affect this application. This is the main advantage of creating application pools separately.

Web Garden

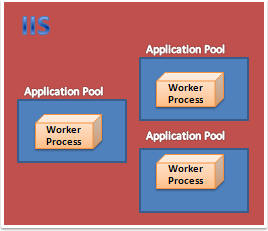
By default, each application pool runs with a single worker process (W3Wp.exe). We can assign multiple worker processes with a single application pool. An application pool with multiple worker processes is called a Web Garden. Many worker processes with the same Application Pool can sometimes provide better throughput performance and application response time. And each worker process should have its own Thread and memory space.

As shown in the picture, in IIS, there may be multiple application pools and each application pool will have at least one worker process. A Web Garden should contain multiple worker processes.
There are certain restrictions in using a Web Garden with your web application. If we use the InProc session mode, our application will not work correctly because the session will be handled by a different worker process. To avoid this problem, we should use the OutProc session mode and we can use a session state server or SQL-Server session state.
Main advantage: The worker processes in a Web Garden share the requests that arrive for that particular application pool. If a worker process fails, another worker process can continue processing the requests.

How to Create a Web Garden?

Right click on Application Pool > Go to Performance tab > Check Web Garden section (highlighted in picture):

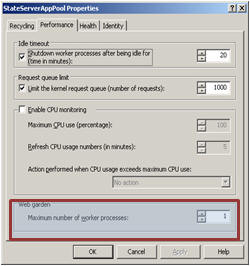
By default, it would be 1. Just change it to more than one.

How Session depends on Web Garden?

I have already explained that InProc is handled by a worker process. It keeps data inside its memory object. Now if we have multiple worker processes, then it would be very difficult to handle the session because each and every worker process has its own memory, so if my first request goes to WP1 and it keeps my session data and the second request goes to WP2, I am trying to retrieve session data and it will not be available, which will throw an error. So please avoid Web Gardens in InProc session mode.
We can use StateServer or SQLServer session modes in Web Gardens because as I have already explained, these two session modes do not depend on worker processes. In my example, I have also explained that if you restart IIS, you are still able to access your session data.
In short:
Session Mode Recommended
InProc No
StateServer Yes
SQLServer Yes

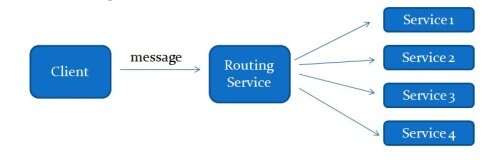
Web Farm and Load Balancer

This is the most common terms that are used in production deployments. These terms come in when we are using multiple web servers for deploying our applications. The main reason for using these is we have to distribute the load over multiple servers. A Load Balancer is used to distribute the load on multiple servers.

If we take a look at the above diagram, the client request the URL and it will hit a Load Balancer, which decides which server to access. The load balancer will distribute the traffic over all the different web servers.
Now how does this affect Session?

Handling Session in web farm and load balancer scenarios

Handling session is one of the most challenging jobs in a web farm.
InProc: In InProc session mode, session data is stored in an in-memory object of the worker process. Each server will have its own worker process and will keep session data inside its memory.

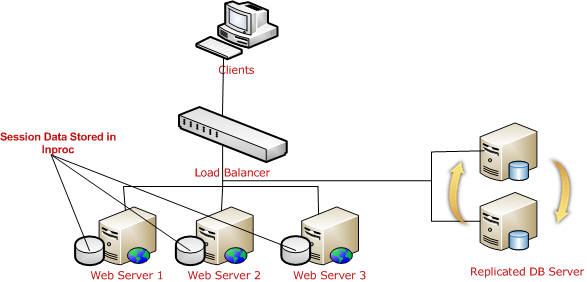
If one server is down, and if the request goes to a different server, the user is not able to get session data. So it is not recommended to use InProc in Web Farms.
StateServer: I have already explained what a state server is and how to configure a state server, etc. For web farm scenarios, you can easily understand how much this is important because all session data will be stored in a single location.

Remember, in a web farm, you have to make sure you have the same <machinekey> in all your web servers. Other things are the same as I have describe earlier. All web.config files will have the same configuration (stateConnectionString) for session state.
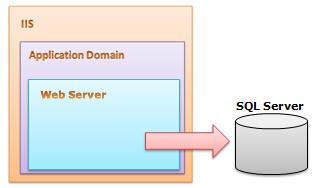
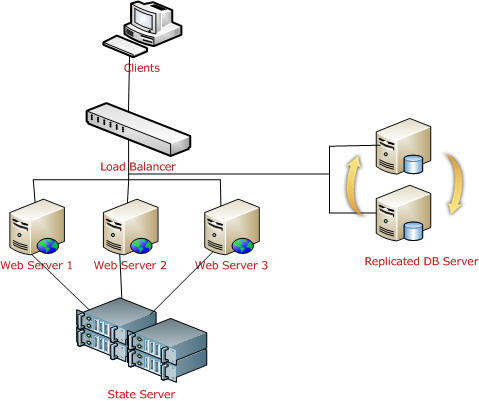
SQL Server: This is another approach, the best that we can use in a web farm. We need to configure the database first. The required steps have been explained covered.
explor37.jpg
As shown in the above picture, all web server session data will be stored in a single SQL Server database. And it is easily accessible. Keep one thing in mind, you should serialize objects in both StateServer and SQLServer modes. If one of the web servers go down, the load balancer will distribute the load to other servers and the user will still be able to read session data from the server, because data is stored in a centralized database server.
In summary, we can use either StateServer or SQLServer session mode in a web farm. We should avoid InProc.

Session and Cookies

Clients use cookies to work with session. Because clients need to present the appropriate session ID with each request. We can do this in the following ways:

Using cookies

ASP.NET creates a special cookie named ASP.NET_SessionId automatically when a session collection is used. This is the default. Session ID is transmitted through that cookie.

Cookie munging

Some older browsers do not support cookies or the user may disable cookies in the browser, in that case, ASP.NET transmits session ID in a specially modified (or “munged”) URL.

How Cookie Munging works?

When the user requests for a page on a server, the server encoded the session ID and adds it with every HREF link in the page. When the user clicks on a link, ASP.NET decodes that session ID and passes it to the page that the user is requesting. Now the requesting page can retrieve session variables. This all happens automatically if ASP.NET detects that the user's browser does not support cookies.

How to implement Cookie Munging?

For this, we have to make our session state cookie-less.

Removing Session

Following are the list of methods that are used to remove Session:
Method Description
Session.Remove(strSessionName); Removes an item from the session state collection.
Session.RemoveAll() Removes all items from the session collection.
Session.Clear() Remove all items from session collection. Note: There is no difference between Clear and RemoveAll. RemoveAll() calls Clear() internally.
Session.Abandon() Cancels the current session.

Enabling and disabling Session

For performance optimization, we can enable or disable session because each and every page read and write access of the page involves some performance overhead. So it is always better to enable and disable session based on requirements rather than enable it always. We can enable and disable session state in two ways:
  • Page level
  • Application level

Page level

We can disable session state in page level using the EnableSessionState attribute in the Page directive.
explor38.gif
This will disable the session activities for that particular page.
The same way, we can make it read-only also. This will permit to access session data but will not allow writing data on session.
explor39.gif

Application level

Session state can be disabled for the entire web application using the EnableSessionState property in Web.Config.
explor40.gif
Generally we use page level because some pages may not require any session data or may only read session data.

References:

Summary

Hope you are now really familiar with Session, its use, how to apply it in web farms, etc. To summarise:
  • The in-process (InProc) session provider is the fastest because of everything being stored inside memory. Session data will be lost if we restart the web server or if the worker process is recycled. You can use this in small web applications where the number of users is less. Do not use InProc in web farms.
  • In StateServer session mode, session data is maintained by aspnet_state.exe. It keeps session data out of the web server. So any issues with the web server does not affect session data. You need to serialized an object before storing data in StateServer session. We can use this safely in web farms.
  • SQLServer session modes store data in SQL Server. We need to provide the connection string. Here we also need to serialize the data before storing it to session. This is very useful in production environments with web farms.
  • We can use a Custom provider for custom data sources or when we need to use an existing table to store session data. We can also create custom session IDs in Custom mode. But it is not recommended to create your own custom provider. It is recommended to use a third party provider.
Hope you have enjoyed the article. Please give your suggestions and feedback for further improvements. Again thanks for reading.

Further study and references

I have already added some in the various sections. Here I am giving a few more links which will really help you for further study: