Exception Handling in C#.Net

1. Introduction to Exceptions

An Exception is an object delivered by the Exception class. This Exception class is exposed by the System.Exception namespace. Exceptions are used to avoid system failure in an unexpected manner. Exception handles the failure situation that may arise. All the exceptions in the .NET Framework are derived from the System.Exception class.
To understand exception, we need to know two basic things:
  1. Somebody sees a failure situation that happened and throws an exception by packing the valid information.
  2. Somebody who knows that a failure may happen catches the exception thrown. We call it Exception Handler.
Below is a simple example, which shows what happens when an Exception is not handled:
class ExceptionsEx
{
    //001: Start the Program Execution.
    public void StartProgram()
    {
        Console.WriteLine("Making Call to F1() " );
        F1();
        Console.WriteLine("Successfully returned from F1() " );
    }

    //002: Set of Function that calls each other
    public void F1()
    {
        Console.WriteLine("Making Call to F2() " );
        throw new System.Exception();
        F2();
        Console.WriteLine("Successfully returned from F2() " );
    }
    public void F2()
    {
        Console.WriteLine("Inside F2 " );
    }

    //Client 001: Program Entry
    [STAThread]
    static void Main(string[] args)
    {
        //Create the Object and start the Execution
        ExceptionsEx app = new ExceptionsEx();
        app.StartProgram();
    }
}
In the above code, look at the function F1 that throws an Exception. But, there is no handler to deal with the thrown exception. This situation is called an Un-Handled exception situation. When you execute the code, you get an unhandled exception dialog.
Pic01.jpg The above dialog is shown in debug mode, so you may get a chance to break the execution to see where the exception is thrown (or) continue ignoring the exception (not advisable).
In release mode, you will get un-handled Exception in the form of Application crash.
Pic02.jpg 
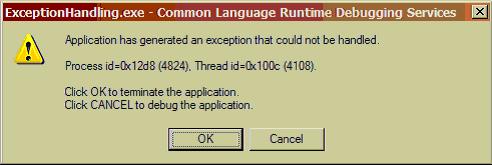
So, how do we avoid Un-Handled Exception? Simple, handle it.

2. Handling Exception

To handle the exception, we need to place the code within the try block. When an exception occurs inside the try block, the control looks for the catch block and raises an exception that is handled in the catch block. Below is the simple skeleton for the try and catch block:
try
{
    //Some Code that may expected to raise an exception
}
catch
{
    //Raised exception Handled here
}
The above skeleton handles any exception. But, the main disadvantage is that we don’t know what exception is raised and who raised the exception. Below is the example that handles the Exception raised by the function F1 and avoids the crash:
class ExceptionsEx
{
    //001: Start the Program Execution.
    public void StartProgram()
    {
        Console.WriteLine("Making Call to F1() " );
        try
        {
            F1();
        }
        catch
        {
            Console.WriteLine("Some Exception Occurred. 
  I don't know what Exception it is and where it Occurred. Sorry!");
        }
        Console.WriteLine("Successfully returned from F1() " );
    }

    //002: Set of Function that calls each other
    public void F1()
    {
        Console.WriteLine("Making Call to F2() " );
        throw new System.Exception();
        Console.WriteLine("Successfully returned from F2() " );
    }

    //Client 001: Program Entry
    [STAThread]
    static void Main(string[] args)
    {
        //Create the Object and start the Execution
        ExceptionsEx app = new ExceptionsEx();
        app.StartProgram();
    }
}

3. Exception Bubbling

In the above example, we saw that Exception is handled in the catch block. But, the function call order is simple (Call Stack) that is; StartProgram calls the function F1 and F1 raised exception is handled in the catch block of the StartProgram.
Imagine the situation what happens if there are multiple nested function calls, and exception occurred in the fourth or fifth nested call. Look at the picture below:
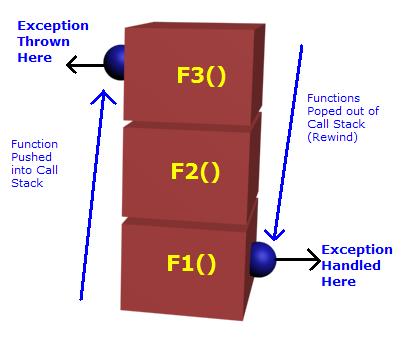
PicA.jpg
  • F1(): Calls F2 within the try block and handles the exception in catch block
  • F2(): Makes a call to the function F3. But it neither wraps the call for F3 in the try block nor has the exception handler
  • F3(): Raises an Exception
Note, when the exception is thrown by the function F3, even though the caller is F2, as there is no catch handler, the execution comes out of F2 and enters the catch block of F1. Travelling back from F3->F2->F1 is known as Stack Unwind. And exception occurred in F3 is handled in F1 even when there is no handler at F2 is known as Exception Bubbling.
Below is the example that demonstrates the Exception Bubbling:
using System;

namespace ExceptionHandling
{
    class ExceptionsEx
    {
        //001: Start the Program Execution.
        public void StartProgram()
        {
            Console.WriteLine("Making Call to F1() " );
            try
            {
                F1();
            }
            catch
            {
                Console.WriteLine("Some Exception Occurred. 
  I don't know what Exception it is and where it Occurred. Sorry!");
            }
            Console.WriteLine("Successfully returned from F1() " );
        }

        //002: Set of Function that calls each other
        public void F1()
        {
            Console.WriteLine("Making Call to F2() " );
            F2();
            Console.WriteLine("Successfully returned from F2() " );
        }
        public void F2()
        {
            Console.WriteLine("Making Call to F2() " );
            F3();
            Console.WriteLine("Successfully returned from F2() " );
        }
        public void F3()
        {
            Console.WriteLine("Inside F3 " );
            throw new System.Exception();
        }

        //Client 001: Program Entry
        [STAThread]
        static void Main(string[] args)
        {
            //Create the Object and start the Execution
            ExceptionsEx app = new ExceptionsEx();
            app.StartProgram();
        }
    }
}

4. The Importance of Finally Block

In the above example, we saw that when an exception occurs, we directly jump back on the call stack and travel back searching for the catch handler. What about the piece of code that comes next to the exception raising code? If we do releasing resource and releasing the heap memory in the next couple of statements, that will not get reached. Right?
Finally block is the solution for this. Now look at the improved exception-handling skeleton below:
try
{
}
catch
{
}
finally
{
}
Whatever happens inside the try block, it is guaranteed that finally block gets executed. Hence, all resource releases should be in the finally block. Have a look at the below picture:
PicB.jpg 
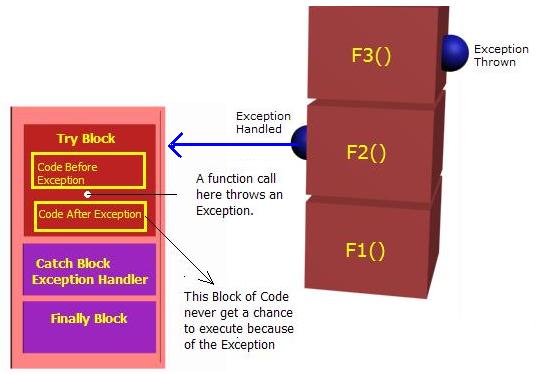
Exception raised at function F3 is handled in the function F2. Look at the try block, I marked two blocks of code before exception and code after exception. It is obvious that when an exception raised, the set of code inside the code after exception is never executed. If resources are allocated in code before exception and the allocated resources are released in code after exception, we do have a resource leak for each exception occurred. Also, think about business logic that needs to revert back apart from the resource leak. This is why finally block is introduced.
Whether an Exception occurs or not, the code inside finally block always gets executed. So you can keep all the cleaning code inside the finally block. The attached sample solution explains the above situation. Put a break point in the very first statement of the function public void StartProgram() and examine the situation explained above. Note, the usage of try block with only finally and without catch in function F2. Think about it.

5. What is Exception Class?

This class is provided by .NET Framework to handle any exception that occurred. The Exception class is the base class for all other Exception class provided by .NET Framework.
The exception object has some important properties. Some of then are given below:
Property Usage
Message Gives detailed information about the message
StackTrace Gives the function stack to show where exception is thrown
Targetsite Shows which method throws the exception
In the previous example, we only used the catch block and missed all the above said information. The exception object is thrown by the piece of code, which raises an Exception and the handler code catches that Exception object and makes use of the information packed in it. Consider the below example:
void SomefunctionX()
{
 throw new DivideByZeroException();
}

void SomeFunctionY()
{
 try
 {
  SomefunctionX();
 }
catch (DivideByZeroException Ex)
 {
 //Use the Ex here to get information
 }
}
The example was shown just to understand from where the object that is used in the catch block is coming from. Hope, now you know the exception instance created on the throw statement caught in the catch block and used. Note that, the base class of DivideByZeroException is ArithmaticException, which is derived from the System.Exception. Now the question is, May I use ArithmaticException in the catch block? Yes. Why not? That is the beauty of polymorphism. When you do, always keep in mind that you are moving from more specialized information thrown to the generalized one.

6. Handler for Multiple Exceptions

A code placed in the try block can raise different kinds of exception. It can be say, a Divide by Zero or a Network System Access Denied or a File not exists. How do you handle all the exceptions? The answer is, you can place multiple catch blocks for a try block. When an exception is thrown, type of that exception is examined against each catch block. When a match occurs (even polymorph), the exception enters into the catch block and gets handled.
Let me walk through an example, which will explain the following to you:
  1. Make use of Exception object in the catch block
  2. Using multiple catch blocks for different exceptions
  3. The importance order of the catch blocks
1) Program enters the main function and calls the member function StartProgram after creating the object of type ExceptionsP2.
[STAThread]
public static void Main(string[] args)
{
 ExceptionsP2 start = new ExceptionsP2();
 start.StartProgram();
}
2) The StartProgram function makes a call to Calculate function. And this call is placed in the try block as it is expected that there be some arithmetic exception and possibly a Divide by Zero exception. Two catch blocks are placed for the try block of code. One is DivideByZeroException and other one is System.Exception. Inside each catch block, the exception object caught was used to display the Exception message, and function call stack of where the exception raised. Below is the code:
//001: Function that Handles the Exception
public void StartProgram()
{
 Console.WriteLine("Calling the Function Calculate");
 try
 {
  Calculate();
 }
 catch (DivideByZeroException Ex)
 {
  Console.WriteLine("Divide By Zero. 
   Look at the Call stack for More information");
  Console.WriteLine("Packed Message: " +  Ex.Message );
  Console.WriteLine("Thrown By: " + Ex.TargetSite );
  Console.Write("Call Stack: " + Ex.StackTrace );
 }
 catch (Exception Ex)
 {
  Console.WriteLine("General Exception Occurred");
  Console.WriteLine("Packed Message: " +  Ex.Message );
  Console.Write("Call Stack: " + Ex.StackTrace );
 }
}
3) The calculate is just an intermediate function which makes a call to Divide. Note how the stack rewind and exception bubbling is happening. Below is the function which makes a call to divide, and does not have any Exception handler code:
//002: An intermediate function, just for Demo Purpose
public void Calculate()
{
 Console.WriteLine("Calling Divide Function ");
 Divide();
}
4) The divide function tries to divide a number by zero. The .NET environment detects the situation and raises the exception for us. Note there is no throw statement here. In my previous examples (actually in the previous part), I forced the system to throw an Exception for my demonstration purpose. We usually use the throw statement for Custom defined exceptions. The .NET environment is smart enough to detect the exception at right time and raise it. Below is the code for divide:
//003: The Divide function which actually raises an Exception
public void Divide()
{
 int x = 10;
 int y = 0;
 y = x / y;   
}

7. Closing Notes

The DivideByZeroException thrown in the Divide function is caught by the StartProgram function. Then the exception object is matched against the first catch block. As there is a match, the exception enters that catch block.
What happens if System.Exception catch block is before the DivideByZeroException? We do enter the System.Exception catch block even though a more perfect match exists. Because, the exception caught is matched from top to bottom. As the System.Exception is on the top (that is; Before DivideByZero) and the caught Exception DivideByZeroException is polymorphically a System.Exception the execution control just enters the System.Exception catch block.
So always keep in mind to place more specific catch statement first and move down with more Generalized Exceptions. Look at the code below how a smart developer placed his catch block based on what his Team Lead told.
Lead: “The code block may raise a DivideByZeroException or Any ArithmeticException. It is possible to have FileNotFound Exception also. These are the possibilities of Exception I am seeing when I am reviewing your code. But, for safety, try to handle all exceptions in the world and it is OK if it is not more specific”.
That's all, the Lead went to a meeting.
Forget what meeting he is going for, see how the developer placed his catch block:
try
{
 // The set of code and function here
 // reviewed by an Experienced lead.
}
catch (System.FileNotFoundException Ex)
{
 //File Not Found Exception is Different from Divide by zero.
 //Look at the Inheritance hierarchy in MSDN for FileNotFoundException
 //and DivideByZeroException.
 //So I don't care Which one First, FileNotFond or DivideByZero
}
catch( System.DivideByZeroException Ex) 
{
 //Divide by Zero Exception. Need More Specialized care
}
catch (System.ArithmeticException Ex)
{
 // For any ArithmaticException except DivideByZero. Because I already handled it 
 // before this catch statement
}
catch(System.Exception Ex)
{
 //I am not expecting that this would Occur. As per my Lead
 //I placed it for safe to handle any Exception in the world 
 // That derived from Exception.
}
finally
{
 //Clean-up code
}

Explain about DefaultIfEmpty() in LINQ

Using Linq DefaultIfEmpty() extension method

By Using DefaultIfEmpty() extension method you can check the sequence for empty and return something for it and do some manipulation on it afterwards.

For example

1
2
var numbers = new int[] {1,2,3,4,5,6,7};
Console.WriteLine(numbers.DefaultIfEmpty().Sum());
If the sequence is empty it will return 0 otherwise it will sum and return that.

By Default if you want to return some value other then 0 it will return that as well


1
Console.WriteLine(numbers.DefaultIfEmpty(100).Sum());
In this case it will return 100 if the sequence is empty.

Explain about ISAPI DLL and ISAPI Filter


ISAPI (Internet Server Application Program Interface) is a set of Windows program calls that let you write a Web server application that will run faster than a common gateway interface (CGI) application. A disadvantage of a CGI application (or "executable file," as it is sometimes called) is that each time it is run, it runs as a separate process with its own address space, resulting in extra instructions that have to be performed, especially if many instances of it are running on behalf of users. Using ISAPI, you create a dynamic link library (DLL) application file that can run as part of the Hypertext Transport Protocol (HTTP) application's process and address space. The DLL files are loaded into the computer when HTTP is started and remain there as long as they are needed; they don't have to be located and read into storage as frequently as a CGI application.
A special kind of ISAPI DLL is called an ISAPI filter, which can be designated to receive control for every HTTP request. You can create an ISAPI filter for encryption or decryption, for logging, for request screening, or for other purposes.

Introduction

Unless you have been a caveman, you have seen a number of web sites that whenever is browsed, the navigation ends up to a DLL file residing in a scripting directory of that dominium! Something like the following pseudo URL:
http://www.mydomain.com/script/example.dll?ID=p05874&Tx=870250AZT6
What does this DLL suppose to do and what does it have to do with today's paper?
These DLLs are created using the Internet Server API, or ISAPI for short. ISAPI is developed to provide a benefit or two, over the shortcomings of Common Gateway Interface, CGI. Although we surprisingly experience new web sites developed exclusively by CGI scripts nowadays, however, ISAPI DLLs have got something to offer that CGI could never bring us this way or that way.
I am going to start off this paper by describing the underlying details that any ISAPI programmer has to know, to be able to develop a better ISAPI extension. From then on, I will go through a development of a useful ISAPI extension step by step. The extension is supposed to validate a given credit card. Yeah! This is also my answer to those people who asked me the algorithm involved validating a credit card over and over again. Gotta go!

What is ISAPI?

Internet Server Application Programming Interface (ISAPI), is an API developed to provide the application developers with a powerful way to extend the functionality of Internet Information Server (IIS). Although ISAPI extensions by no means are limited to IIS, they are extensively used in conjunction with MS-IIS.

CGI vs. ISAPI

Developing a CGI program involves creating an EXE with C, C++, and/or Perl programming languages. This EXE file will be executed and terminated for every request received, causing an excessive memory usage, whenever users hit the same page over and over again!
This excessive memory usage that could bring the server completely down, has been solved under ISAPI extensions. An ISAPI extension is a regular DLL file that exposes 3 special functions that is called by the calling process (i.e., IIS) and therefore, will be loaded to memory once, no matter how many clients are going to use it at the same time. (It would be a good idea if you could take a look at a reference, to see how memory management is done under Windows 2000. The Visual C++ 6.0 Bible, Chapter 18, The Memory Management, describes it well!)

ISAPI fundamentals

Since the ISAPI extension and the calling process (IIS) live at the same address space, they could contact each other, directly. This means a great potential to bring the whole IIS down, and in some cases, the entire web server! Take a look at the following figure:

You see whatever problem your extension encounters, it could affect the entire web server process, if it's not handled properly. As illustrated above, communicating between the extension and IIS is done via a pointer to a structure of type ECB, or Extension Control Block that is declared as follows:
typedef struct _EXTENSION_CONTROL_BLOCK
{
   DWORD     cbSize;                 // size of this struct.
   DWORD     dwVersion;              // version info of this spec
   HCONN     ConnID;                 // Context number not to be modified!
   DWORD     dwHttpStatusCode;       // HTTP Status code
   CHAR      lpszLogData[HSE_LOG_BUFFER_LEN];// null terminated log info

   LPSTR     lpszMethod;             // REQUEST_METHOD
   LPSTR     lpszQueryString;        // QUERY_STRING
   LPSTR     lpszPathInfo;           // PATH_INFO
   LPSTR     lpszPathTranslated;     // PATH_TRANSLATED

   DWORD     cbTotalBytes;           // Total bytes indicated from client
   DWORD     cbAvailable;            // Available number of bytes
   LPBYTE    lpbData;                // pointer to cbAvailable bytes

   LPSTR     lpszContentType;        // Content type of client data

   BOOL (WINAPI * GetServerVariable) (HCONN hConn,
   LPSTR      lpszVariableName,
   LPVOID     lpvBuffer,
   LPDWORD    lpdwSize );

   BOOL (WINAPI * WriteClient)  (HCONN ConnID,
   LPVOID     Buffer,
   LPDWORD    lpdwBytes,
   DWORD      dwReserved );

   BOOL (WINAPI * ReadClient)  (HCONN ConnID,
   LPVOID     lpvBuffer,
   LPDWORD    lpdwSize );

   BOOL (WINAPI * ServerSupportFunction)( HCONN hConn,
   DWORD      dwHSERequest,
   LPVOID     lpvBuffer,
   LPDWORD    lpdwSize,
   LPDWORD    lpdwDataType ); 

}EXTENSION_CONTROL_BLOCK, *LPEXTENSION_CONTROL_BLOCK; 
Whatever information either the calling process or the extension wants to pass to the other, is done through this control block. We will shortly have a look at this ECB structure. For now, let's see how IIS works in conjunction with your extension, to serve the visitor of your web site.
Whenever an extension is accessed (e.g., http://www.mydomain.com/script/example.dll?ID=p05874 & Tx=870250AZT6), IIS checks to see whether the example.dll is loaded into memory. If it is not, then it initiates the loading process. Once the DLL is loaded into memory, a worker thread starts running to manage our extension, and thereafter the entry point (DLLMain function) is called. When the DLLMain finishes, the server makes a call to GetExtensionVersion function to perform two tasks:
  1. Exchange version information
  2. Get a short text description of the extension
The server then calls the HttpExtensionProc function passing a copy of the ECB's pointer to start the actual ISAPI extension. This is the function that makes writing data back to the client, possible! We will examine this, shortly.
The third and the last entry point in an ISAPI extension DLL is the TerminateExtension function that is called whenever the extension is going to be unloaded from the memory. All the cleanup code can be done in this function.
In brief, an ISAPI extension is a regular DLL that exposes 3 functions to interact with the server:
  1. GetExtensionVersion
  2. HttpExtensionProc
  3. TerminateExtension (optional)
Having this information in hand, let's start with the DLLMain, the entry point of any DLL!

DLLMain, the entry point

As indicated by Microsoft, "the DllMain function is an optional entry point into a dynamic-link library (DLL). If the function is used, it is called by the system when processes and threads are initialized and terminated, or upon calls to the LoadLibrary and FreeLibrary functions", that is prototyped as follows:
BOOL APIENTRY DllMain(HANDLE hModule, DWORD dwCallReason, 
                                            LPVOID lpReserved);
If you provide your extension with this function, it will be called upon the initialization and the termination process of your extension. The state is indicated by the dwCallReason parameter that could be one the following predefined values:
  • DLL_PROCESS_ATTACHED
  • DLL_THREAD_ATTACH
  • DLL_THREAD_DETACH
  • DLL_PROCESS_DETACH
Describing each of these parameters in detail is beyond the scope of this paper, so I simply refer you to Microsoft's Developer Network to read more about this function.
Anyhow, we could save the hModule parameter for later use in our extension (if this suites us) and simply return TRUE from this function. We usually do not have anything to do in this function, while developing an extension!

GetExtensionVersion, the actual entry point

This function is actually the first entry point that is called by IIS to determine the information about the extension. To understand this better, let's have a look at it's prototype:
BOOL WINAPI GetExtensionVersion(HSE_VERSION_INFO *pVer);
Upon the activation of this function, we are supposed to fill out the extension information within the pVer parameter passed to the function. This pointer is of type HSE_VERSION_INFO that is declared as follows:
typedef struct _HSE_VERSION_INFO
{
   DWORD dwExtensionVersion;
   CHAR lpszExtensionDesc[HSE_MAX_EXT_DLL_NAME_LEN];
}HSE_VERSION_INFO, *LPHSE_VERSION_INFO;
where dwExtensionVersion is the extension version and lpszExtensionDescription is the description of the extension. If we return TRUE from this function, we notify IIS that our extension is ready to be used. Otherwise, IIS will not use the extension.

HttpExtensionProc, the main entry point

The amazing part of any ISAPI extension starts when the extension procedure (HttpExtensionProc) is called. As far as you could remember, this is the procedure that makes writing data back to the client possible! To see how this happens, lets start by having a look at the prototype of HttpExtensionProc:
DWORD WINAPI HttpExtensionProc(EXTENSION_CONTROL_BLOCK *pECB);
where pECB is a pointer to an extension control block, that makes the intercommunication between the server and the extension possible. You decide what the web page should contain and how to present it to the user in this entry point. But how?
Do you recall the members of the ECB's structure? ECB contains a method, prototyped as follows:
BOOL WriteClient(HCONN ConnID, LPVOID Buffer, LPDWORD lpdwBytes, 
                                                        DWORD dwSync);
Using this member function, you can send the data present in the given Buffer to the client that is identified by its ConnID, the one that made the request. For example, to send A BIG RED ROSE to a client, you could simply make the following calls:
char szBigRedRos[] = 
  "<font color='#FF0000' size='3'><b>A BIG RED ROSE</b></font>";
DWORD dwSize = strlen(szBigRedRos);
pECB->WriteClient(pECB->ConnID, szBigRedRose, dwSize, 0);


ISAPI filters are DLL files that can be used to modify and enhance the functionality provided by IIS. ISAPI filters always run on an IIS server, filtering every request until they find one they need to process. The ability to examine and modify both incoming and outgoing streams of data makes ISAPI filters powerful and flexible.
Filters are registered at either the site level or the global level (that is, global filters apply to all sites on the IIS server), and are initialized when the worker process is started. A filter listens to all requests to the site on which it is installed.
Both ISAPI filters and ISAPI extensions can only be developed using C/C++. Visual Studio comes with wizards that make ISAPI development fast and easy.
ISAPI filters can be registered with IIS to modify the behavior of a server. For example, filters can perform the following tasks:
  • Change request data (URLs or headers) sent by the client
  • Control which physical file gets mapped to the URL
  • Control the user name and password used with anonymous or basic authentication
  • Modify or analyze a request after authentication is complete
  • Modify a response going back to the client
  • Run custom processing on "access denied" responses
  • Run processing when a request is complete
  • Run processing when a connection with the client is closed
  • Perform special logging or traffic analysis.
  • Perform custom authentication.
  • Handle encryption and compression.
NoteNote:
ISAPI filter DLLs cannot be requested explicitly, like ISAPI extensions can.
Every ISAPI filter is contained in a separate DLL that must export two entry-point functions, GetFilterVersionand HttpFilterProc, and optionally export the TerminateFilter function. The metabase property, FilterLoadOrder, contains a list of all filters that IIS loads when the Web service is started.

The following steps outline the interaction between ISAPI filters and IIS:

  1. When IIS initially loads an ISAPI filter, it also creates and partially populates an HTTP_FILTER_VERSION structure. It then calls the filter's GetFilterVersion function, passing a pointer to the new structure as a parameter.
  2. The ISAPI filter populates the HTTP_FILTER_VERSION structure with version information and descriptive information. More importantly, the filter also uses HTTP_FILTER_VERSION to specify which event notifications it should receive, and to declare the general priority level for the filter. In addition, the filter also indicates whether it is interested in events from secure ports only, unsecure ports only, or both.
  3. Each HTTP transaction between IIS and a client browser triggers several distinct events. Every time an event occurs for which an ISAPI filter is registered, IIS calls the filter's HttpFilterProc entry-point function.
    If more than one ISAPI filter is registered for a given event, IIS notifies the filters that the event occurred. The filters, which are marked as high, medium, or low priority, are notified according to priority in descending order. If more than one ISAPI filter is declared the same general priority level, IIS uses the order in which the filters appear in the FilterLoadOrder property to resolve the tie.
  4. The ISAPI filter uses the notification type information, passed by IIS as a parameter to HttpFilterProc, to determine which particular data structure is pointed to by the other HttpFilterProc parameter, pvNotification. The ISAPI filter then uses the data contained in that data structure, as well as in the context structure HTTP_FILTER_CONTEXT, to perform any custom processing.
  5. Once processing is complete, the filter returns one of the SF_STATUS status codes to IIS, and IIS continues processing the HTTP request or response until another event occurs for which ISAPI filters are registered.
  6. When the Web service is stopped or unloaded, IIS calls TerminateFilter in all ISAPI filters as part of its shutdown sequence, for any filters that implemented and exported the function. TerminateFilter is typically used to perform cleanup and de-allocation of allocated resources.
GetFilterVersion is called exactly once, when the ISAPI filter is initially loaded. Any per-connection initializations the developer wants to perform must be managed internally within the context of the HttpFilterProc function call.

Explain about IEnumerable Interface and yield Keyword

Introduction

In this article we will discuss about the IEnumerable interface. We will discuss how IEnumerable interface facilitate the use of foreach statement to iterate through a set of data. We will then look how to implement our own collections that implement IEnumerable interface. The use of yield keyword and Enumerating generic collections will also be discussed in this article.

Background 

Whenever we work with collection of objects, we might find ourselves in need to iterate the collection. The best way to iterate through a collection is by implementing the Iterator pattern. (refer: Understanding and Implementing the Iterator Pattern in C# and C++[^]). C# provides a very clean construct of foreach statement to iterate in a read only manner over a collection.
C# also provides us the possibility of using the same foreach construct and all the enumeration techniques on our custom collection objects by implementing the IEnumerable interface. So let us see how we can implement IEnumerable interface with our custom collection classes.

Using the code

Enumerating the Collection classes

Before starting the discussion let us see how we can use the Built-in classes and iterate over them. Lets start by looking into the ArrayList class that implements IEnumerable and see how we can have read only iteration over that using foreach statement.
// Let us first see how we can enumerate an object implementing IEnumerable
ArrayList list = new ArrayList();

list.Add("1");
list.Add(2);
list.Add("3");
list.Add('4');

foreach (object s in list)
{
    Console.WriteLine(s);
}

Enumerating the Generic Collection classes

The Arraylist class is a generalized class that let us keep a collection. We can also have a generic class in which we can provide the type along with the data. Iterating over generic collection classes is also possible because they implement IEnumerable<T> interface. Lets see how we can enumerate over a generic collection.
// Let us first see how we can enumerate an object implementing IEnumerable<T>
List<string> listOfStrings = new List<string>();

listOfStrings.Add("one");
listOfStrings.Add("two");
listOfStrings.Add("three");
listOfStrings.Add("four");

foreach (string s in listOfStrings)
{
    Console.WriteLine(s);
}
Now our objective is to have our own custom collection class and a generic collection class that should implement the IEnumerable and IEnumerable<T> interface respectively to provide the possibility of enumerating over them.

Understanding the yield keyword

Before jumping into the Implementation of these classes, we need to understand a very important keyword yield which actually facilitate the enumeration over collection. yield statement is used while returning a value from a function.
A normal method call like the one shown below will return only the first value no matter how many times it is called.
static int SimpleReturn()
{
    return 1;
    return 2;
    return 3;
}

static void Main(string[] args)
{
    // Lets see how simeple return works
    Console.WriteLine(SimpleReturn());
    Console.WriteLine(SimpleReturn());
    Console.WriteLine(SimpleReturn());
    Console.WriteLine(SimpleReturn());
}
The reason for this is that the normal return statement does not preserve the state of the function while returning. i.e. every call to this function is a new call and it will return the first value only.
Where as if I replace the return keyword by yield return then the function will become capable of saving its state while returning the value. i.e. when the function is called second time, it will continue the processing from where is has returned in the previous call.
static IEnumerable<int> YieldReturn()
{
    yield return 1;
    yield return 2;
    yield return 3;
}
static void Main(string[] args)
{
    // Lets see how yield return works
    foreach (int i in YieldReturn())
    {
        Console.WriteLine(i);
    }
}
When we run the above code it will return 1,2 and then 3. The only catch while using the yield return statement is that the function should return an IEnumerable and should be called from an iteration block i.e. foreach statement.

Implementing IEnumerable in our custom Collection class

Now in our custom collection classes, if we define a function that will iterate over all the elements in the collection and return then using the yield keyword, we will be able to get hold of all the elements in the the collection.
So let us define our own MyArrayList class and implement IEnumerable interface, which will force us to implement the GetEnumerator function. This function will iterate over the collection and do a yield return on all the elements.
class MyArrayList : IEnumerable
{
    object[] m_Items = null;
    int freeIndex = 0;

    public MyArrayList()
    {
        // For the sake of simplicity lets keep them as arrays
        // ideally it should be link list
        m_Items = new object[100];
    }

    public void Add(object item)
    {
        // Let us only worry about adding the item 
        m_Items[freeIndex] = item;
        freeIndex++;
    }

    // IEnumerable Member
    public IEnumerator GetEnumerator()
    {
        foreach (object o in m_Items)
        {
            // Lets check for end of list (its bad code since we used arrays)
            if(o == null)
            {
                break;
            }

            // Return the current element and then on next function call 
            // resume from next element rather than starting all over again;
            yield return o;
        }
    }
}
This class will now let us enumerate all the elements using a foreach stemement.
static void Main(string[] args)
{
    //Let us now go ahead and use our custom MyArrayList with IEnumerable implemented
    MyArrayList myList = new MyArrayList();

    myList.Add("1");
    myList.Add(2);
    myList.Add("3");
    myList.Add('4');

    foreach (object s in myList)
    {
        Console.WriteLine(s);
    }
}
Note: This class is neither complete not a very good implementation. The only purpose of the sample implementation is to demonstrate the implementation of IEnumerable interface.

Implementing IEnumerable<T> in our custom Generic Collection class

Let us now take this approach a little further and define a generic collection class capable of being enumerated. To do this we need to implement IEnumerable<T> interface.
class MyList<T> : IEnumerable<T>
{
    T[] m_Items = null;
    int freeIndex = 0;

    public MyList()
    {
        // For the sake of simplicity lets keep them as arrays
        // ideally it should be link list
        m_Items = new T[100];
    }

    public void Add(T item)
    {
        // Let us only worry about adding the item 
        m_Items[freeIndex] = item;
        freeIndex++;
    }

    #region IEnumerable<T> Members

    public IEnumerator<T> GetEnumerator()
    {
        foreach (T t in m_Items)
        {
            // Lets check for end of list (its bad code since we used arrays)
            if (t == null) // this wont work is T is not a nullable type
            {
                break;
            }

            // Return the current element and then on next function call 
            // resume from next element rather than starting all over again;
            yield return t;
        }
    }

    #endregion

    #region IEnumerable Members

    System.Collections.IEnumerator System.Collections.IEnumerable.GetEnumerator()
    {
        // Lets call the generic version here
        return this.GetEnumerator();
    }

    #endregion
}

This class will now let us enumrate all the elements using a foreach stemement.
static void Main(string[] args)
{
    // Let us first see how we can enumerate an custom MyList<t> class implementing IEnumerable<T>
    MyList<string> myListOfStrings = new MyList<string>();

    myListOfStrings.Add("one");
    myListOfStrings.Add("two");
    myListOfStrings.Add("three");
    myListOfStrings.Add("four");

    foreach (string s in myListOfStrings)
    {
        Console.WriteLine(s);
    }
}
</t>
So now we have a collection class and a generic collectio class that implement IEnumerable and IEnumerable<T> respectively. Althogh These class is neither complete not a very good implementation but they do serve the purpose of the article i.e. to demonstrate the implementation of IEnumerable interface.

Point of interest

What we have tried to do in this article is see how can we implement the IEnumerable and IEnumberable<T> interface. We have looked into the significance of yield keyword. This stuff is known to most experienced C# programmers but the beginners might find it useful. I hope this has been informative.

Explain about CTE and Temp Table and Table Variable

Temp Table or Table variable or CTE are commonly used for storing data temporarily in SQL Server. In this article, you will learn the differences among these three.

CTE

CTE stands for Common Table expressions. It was introduced with SQL Server 2005. It is a temporary result set and typically it may be a result of complex sub-query. Unlike temporary table its life is limited to the current query. It is defined by using WITH statement. CTE improves readability and ease in maintenance of complex queries and sub-queries. Always begin CTE with semicolon.

A sub query without CTE is given below :

  1. SELECT * FROM (
  2. SELECT Addr.Address, Emp.Name, Emp.Age From Address Addr
  3. Inner join Employee Emp on Emp.EID = Addr.EID) Temp
  4. WHERE Temp.Age > 50
  5. ORDER BY Temp.NAME

By using CTE above query can be re-written as follows :

  1. ;With CTE1(Address, Name, Age)--Column names for CTE, which are optional
  2. AS
  3. (
  4. SELECT Addr.Address, Emp.Name, Emp.Age from Address Addr
  5. INNER JOIN EMP Emp ON Emp.EID = Addr.EID
  6. )
  7. SELECT * FROM CTE1 --Using CTE
  8. WHERE CTE1.Age > 50
  9. ORDER BY CTE1.NAME

When to use CTE

  1. This is used to store result of a complex sub query for further use.
  2. This is also used to create a recursive query.

Temporary Tables

In SQL Server, temporary tables are created at run-time and you can do all the operations which you can do on a normal table. These tables are created inside Tempdb database. Based on the scope and behavior temporary tables are of two types as given below-
  1. Local Temp Table

    Local temp tables are only available to the SQL Server session or connection (means single user) that created the tables. These are automatically deleted when the session that created the tables has been closed. Local temporary table name is stared with single hash ("#") sign.
    1. CREATE TABLE #LocalTemp
    2. (
    3. UserID int,
    4. Name varchar(50),
    5. Address varchar(150)
    6. )
    7. GO
    8. insert into #LocalTemp values ( 1, 'Shailendra','Noida');
    9. GO
    10. Select * from #LocalTemp
    The scope of Local temp table exist to the current session of current user means to the current query window. If you will close the current query window or open a new query window and will try to find above created temp table, it will give you the error.
  2. Global Temp Table

    Global temp tables are available to all SQL Server sessions or connections (means all the user). These can be created by any SQL Server connection user and these are automatically deleted when all the SQL Server connections have been closed. Global temporary table name is stared with double hash ("##") sign.
    1. CREATE TABLE ##GlobalTemp
    2. (
    3. UserID int,
    4. Name varchar(50),
    5. Address varchar(150)
    6. )
    7. GO
    8. insert into ##GlobalTemp values ( 1, 'Shailendra','Noida');
    9. GO
    10. Select * from ##GlobalTemp
    Global temporary tables are visible to all SQL Server connections while Local temporary tables are visible to only current SQL Server connection.

Table Variable

This acts like a variable and exists for a particular batch of query execution. It gets dropped once it comes out of batch. This is also created in the Tempdb database but not the memory. This also allows you to create primary key, identity at the time of Table variable declaration but not non-clustered index.
  1. GO
  2. DECLARE @TProduct TABLE
  3. (
  4. SNo INT IDENTITY(1,1),
  5. ProductID INT,
  6. Qty INT
  7. )
  8. --Insert data to Table variable @Product
  9. INSERT INTO @TProduct(ProductID,Qty)
  10. SELECT DISTINCT ProductID, Qty FROM ProductsSales ORDER BY ProductID ASC
  11. --Select data
  12. Select * from @TProduct
  13. --Next batch
  14. GO
  15. Select * from @TProduct --gives error in next batch

Note

  1. Temp Tables are physically created in the Tempdb database. These tables act as the normal table and also can have constraints, index like normal tables.
  2. CTE is a named temporary result set which is used to manipulate the complex sub-queries data. This exists for the scope of statement. This is created in memory rather than Tempdb database. You cannot create any index on CTE.
  3. Table Variable acts like a variable and exists for a particular batch of query execution. It gets dropped once it comes out of batch. This is also created in the Tempdb database but not the memory.