SQL Server Profiler Breafly

Introduction

Microsoft SQL Server Profiler is a graphical user interface to SQL Trace for monitoring T-SQL Statements of Database Engine. We can save and reuse the state at a later point of time.
  • We can do the following using SQL Server Profiler
    • Create a trace
    • Watch the trace results as the trace runs
    • Store the trace results in a table
    • Start, stop, pause, and modify the trace results as necessary
    • Replay the trace results
  • Use SQL Server Profiler to monitor only the events in which you are interested.
Menu Path: Start | All Programs | Microsoft SQL Server 2005 | Performance Tools | SQL Server Profiler.
The following screen will come:
Screenshot - pic1.jpg
Figure 1.0
Click on <Connect> Button. New Properties Screen will come:
Screenshot - properties.jpg
Figure 1.1
It has two selection tabs:
  • General: It is used for general setting for Trace Database Engine.
  • Event: It is used to add or remove some selected event for monitor.
In General Section (as given in Figure 1.1), it is divided into four sections.
Section 1: In this section, you have to just specify the name of your trace, Trace provider name and server name are predefined and based upon your SQL Server.
And it is not editable.
Section 2: It is the template section. You can choose different type of Templates based upon your requirements. It is the configuration for trace. By default, it is "Standard (Default)" templates. Others templates are T-SQL, T-SQL Duration, T-SQL Reply, T-SQL SPs, etc. You can create your own custom Templates by selecting different Events and Event Class. It is saved as ".tdf" Extension.
Section 3: This section is related to save your trace. Either as File (.trc) or in a database. as table. While clicking on Save to file check box, File save dialog box should open and you can save that file (with .trc extension).
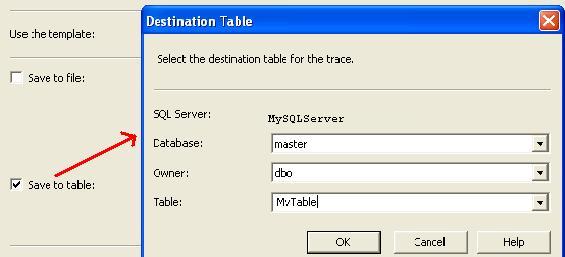
If you check the "Save to Table", it will connect with your server and ask you to which database you want to save that trace table information.
Screenshot - savetotable.jpg
Figure 1.2
Section 4: You can stop your trace on a particular time. Check the "Enable trace stop time" checkbox and give the time at which you want to stop track, SQL Server will automatically stop trace on that time.
Now Move To "Event Section" Tab.
Now we need to know some definition with respect to SQL Server Profiler.

What is an Event?

An Event is an action or operation that is performed in your SQL Server 2005 Database Engine.
Some examples of Events are:
    • Transact-SQL SELECT, INSERT, UPDATE, and DELETE statements.
    • User login and logout
    • Execution of Stored procedures
    • Operation with cursor
SQL Server profiler is able to trace all of these events and all these events are categories on a particular Event class.

What is an Event Class?

Event class is a type of event that can be traced.
Some examples are:
  • SQL: BatchCompleted
  • SQL: Batch Starting
  • Audit Login
  • Audit Logout
  • Lock: Acquired
  • Lock: Released
Now you can select events from this screen:
Screenshot - events.jpg
Figure 1.3
In section 1, we can select the proper check box based upon our requirement, section 2 will display the details of Selected events and Events class. If you check in the check box of section 3, you will get all the list of Events and Columns in Section 1.
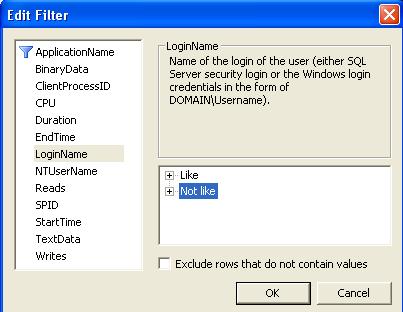
Section 4 is something like customization. Just click on the "Column Filter Button". In this section, you can specify some condition (like or Not like).
Screenshot - Filter1.jpg
Figure 1.4
By clicking on "Organize Column" button, you can change the sequence of order of selected events.
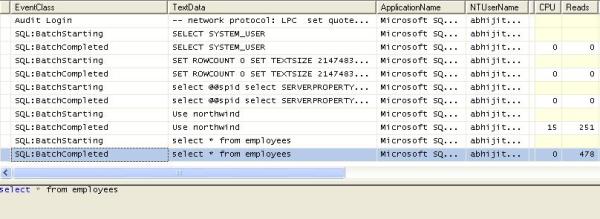
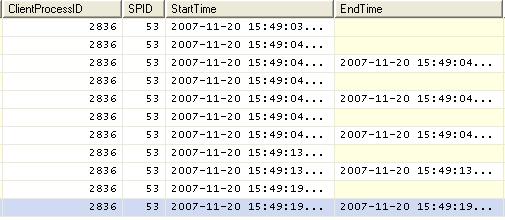
Now Click on the "Run" Button, then Trace window will come:
Screenshot - trace1.jpg
Screenshot - trace2.jpg
Figure 1.5
Using these windows, you will get the detailed time duration of a query and all other events information that you have selected.
You can save this result and use it in future. Or you can extract a particular query from the trace, just right click and click on "Extract Event Data". And save this as a SQL Script.

Reply in SQL Server Profiler

SQL Server profiler has a Reply facility which has the ability to save a trace and replay it later.
Replay is useful to troubleshoot an application. Trace replay supports debugging by using Toggle Breakpoint and the Run to Cursor options on the SQL Server Profiler Replay menu.
Anything changed in SQL Server Management Studio will be traced by the SQL Profiler. So it can basically be used for database performance check. We also have "SQL Server Performance Monitor" to monitor the System and Server performance too.

RollBack in SQL Server

SQL SERVER – Rollback TRUNCATE Command in Transaction

This is very common concept that truncate can not be rolled back. I always hear conversation between developer if truncate can be rolled back or not.
If you use TRANSACTIONS in your code, TRUNCATE can be rolled back. If there is no transaction is used and TRUNCATE operation is committed, it can not be retrieved from log file. TRUNCATE is DDL operation and it is not logged in log file.
Update: (Based on comments of Paul Randal) Truncate *IS* a logged operation, it just doesn’t log removing the records, it logs the page deallocations.
Following example demonstrates how during the transaction truncate can be rolled back.
The code to simulate above result is here.
USE tempdb
GO
-- Create Test Table
CREATE TABLE TruncateTest (ID INT)
INSERT INTO TruncateTest (ID)
SELECT 1
UNION ALL
SELECT 2
UNION ALL
SELECT 3
GO
-- Check the data before truncate
SELECT * FROM TruncateTest
GO
-- Begin Transaction
BEGIN TRAN
-- Truncate Table
TRUNCATE TABLE TruncateTest
GO
-- Check the data after truncate
SELECT * FROM TruncateTest
GO
-- Rollback Transaction
ROLLBACK TRAN
GO
-- Check the data after Rollback
SELECT * FROM TruncateTest
GO
-- Clean up
DROP TABLE TruncateTest
GO

Explain JQuery Breafly

In this tutorial you will learn about 2 different jQuery plugin patterns (pattern A and pattern B) -- by the end of this tutorial, you should be able to grasp the basic behind writing custom jQuery plugins. jQuery books as well as a few online tutorials were used as references in writing this tutorial.

There are plenty of other jQuery tutorials on the Internet and there are jQuery books that I have found very helpful in the past. I have also found out that most jQuery plugin tutorials talk about the basics, but often skip detailed description of functionality. But still, you are probably looking for a quick way to get started. Whether you know Javascript or not, you can write jQuery plug ins, even though the jQuery framework is based on Javascript language.
( Simple Jquery For Beginers?)
When I was learning about writing jQuery plugins for the first time, one of the difficulties that I had while looking at jQuery plugin tutorials written by other people was that they merely explained what code needed to be implemented in order to make a jQuery plugin function. This is often enough, but the advantages of detailed information on how to build your own jQuery plug ins can go a long way, once you make the commitment to learn and understand the basic principles of writing plug ins for jQuery framework. If for any reason at all, a thorough understanding of these principles will help you write plug ins you can't find anywhere else on the Internet. Many of the beginners try to copy and paste the code from cookie-cutter tutorials. Many tutorial authors offer well-written jQuery code that works in all browsers, but copying it into your site will not help you to understand how the code actually works. It has been scientifically proven that being genuinely curious about learning a subject will make a greater impact on the student's memory than when the subject has no interest what so ever about the subject he is trying to learn. This is why I recommend paying attention to the information stored on this page. If anything, at least you will learn to understand the basics of jQuery. For example, some of the most common questions one may have when beginning learning about how to write a jQuery plugin are
  (What Is Jquery?)
    What is the difference between using $.myfunction and $.fn.myfunction?
    What does the dollar sign mean?(What Is Jaquery $ Symbol)
    What does the jQuery function jQuery.extend do and how to use it?
    How to initialize my jQuery plugin and pass it function parameters?
    How to provide default values for and how to override initialization parameters? If you are curious about in depth implementation of jQuery interface for adding your own code into existing framework, this tutorial is for you!

In this jQuery plugin tutorial I will walk you through the process of writing your own jQuery plugins. This process is the same every time you decide to create a new plugin. Once you understand how your JavaScript code can be integrated into the main jQuery object you will no longer need documentation and will be able to focus on programming plugins.
Objects in JavaScript

As you may already know, JavaScript is an object-oriented language. It would be improper to describe jQuery to someone who had not yet studied objects in JavaScript. The basic philosophy of object design in JavaScript is that when you declare (or define) a function, that function is by default a class and can be instantiated as an object. We can use the new operator to instantiate copies of the same class. It just so happened that instead of the traditional keyword class, JavaScript prefers the keyword function. It is interesting to note that a class in JavaScript can be used both as a class from which other classes can be inherited (by implementing what is known as prototype inheritance) or the same exacty construct can be used as an actual function that we can call later.
The main jQuery object

The main jQuery object is simply defined with the keyword function as an object whose identifier name is $. For a deeper insight into what this really means, I have written another tutorial What does the dollar sign mean? Be sure to read it if you're still confused about the dollar sign identifier notation.

The jQuery object is equivalent to a global function, such as window.$. You see, in JavaScript, when you extend the window object (that must exist in all browsers by design), or in other words, attach new member functions with the dot (.) to the window object, it means that you will be able to call that object either by window.myobj(); or simply myobj(); You are allowed to do so because every function you attach to the window object can also be called from the global scope in your script. Internally, the jQuery object is created like so:


    var jQuery = window.jQuery = window.$ = function(selector, context)
    {
       // ...
       // other internal initialization code goes here
    };

This precise declaration allows us to refer to the main jQuery object by the identifier name jQuery, or the dollar sign ($). You need to know that jQuery, window.jQuery, window.$ or simply $ can be used interchangeably, because as the declaration stated in the code block above tells us, it refers to the same object in memory. Please note the selector and context parameters of the jQuery function object. The selector is usually a string that selects a number of elements from the DOM. It can also be the this object (a self-reference). The jQuery selector parameter accepts the same values you would expect to use in a CSS style definition. For example, consider the following jQuery object call:


// Select all elements of class: "someClass" and
// apply a red border to all of them
jQuery(".someClass").css("border", "1px solid red");

// Select an element with id: someId and insert dynamic html into it
jQuery("#someId").html("<b>So Bold!</b>");

// Exactly the same as above, but using $
$("#someId").html("<b>So Bold!</b>");

This is an example of how powerful a short jQuery statement can be. You dont need to worry about writing your own document.getElementById functions that tend to clutter the code. With just one line of code, jQuery selects all elements of the requested type by scanning the entire DOM and applies the desired effect. Many people use jQuery just for the intuitive element-selector functionality, but if you like this so far, you are going to love the rest of the features at your command when you work with the jQuery framework. It's good to note that jQuery cares about cross-browser compatibility.
jQuery Plugin Entry Point

I would like to begin with a jQuery plugin example code as seen used by most people, followed by an explanation of what it means. But because I am targeting the absolute jQuery beginners who may not have enough experience with JavaScript, I'd like to clarify a few things first. When learning a new language or a framework such as jQuery, you need to understand where the entry point of your plugin program is. Traditionally, for years prior to jQuery, some JavaScript programmers liked to execute their crucial code in the window.onload function as illustrated below:


// Override the onload event
window.onload = function()
{
    // the page finished loading, do something here...
}

This code actually overrides the onload event of the HTML <body> tag. All this means to us is that our code will be executed soon as the page is finished loading. It makes sense because sometimes pages take time to load, or the downloading process is segmented by the browser architecture. We would not want to compile and execute any JavaScript code on a page that is currently being loaded. The jQuery internal architecture also utilizes the window.onload event, but before it does so, it checks whether the entire DOM (document object model) has been loaded because it is very important. It is not enough for jQuery to know that the page has been loaded, we must ensure that the DOM has been fully constructed. This is achieved by listening to the DOMContentLoaded in most browsers, but we don't need to worry about this at all because jQuery takes care of this for us internally. To provide us with this functionality, jQuery gives us a new method called ready that we can call on the main jQuery object itself. When writing a jQuery plugin, we use the ready function to check whether we are 'ready' to execute our plugin code. Please note that this is not yet the plugin code, this will be the entry point of our plugin. You can think of this as a jQuery's version of window.onload function:


<script type = "text/javascript">
    // Define the entry point
    $(document).ready(function()
    {
        // The DOM (document object model) is constructed
        // We will initialize and run our plugin here
    });
</script>

Let's think for a moment that we are writing a plugin called Shuffle. Assuming the plugin provides two separate functions for initialization as well as execution of the base code, the code may have looked something like the following:


<script type = "text/javascript">
    // One way to initialize plugin code
    $(document).ready(function()
    {
        jQuery.Shuffle.initialize( "monalisa.jpg", 5, 8, 67, 1500);
        jQuery.Shuffle.run();
    });
</script>

More than often, the code above can be improvised. Is it required to use this specific format for initializing and executing our plugin? No. For me personally, because I come from C and C++ background writing computer games, I like to separate initialization and execution function calls like I show above.
Internal definition of a jQuery plugin

The coding style is entirely up to you but also depends on what you are trying to accomplish. It is easy to think that a plugin must be written, initialized and executed in a certain way all the time but this is simply not true. The reason you see many different styles and syntactical differences in jQuery plugin code is that the programmers are trying to accomplish different things. Additional knowledge of JavaScript Inheritance and function closures may help here quite a bit.

First let's talk a little about the following syntax seen in many a plugin written by jQuery programmers. It is very easy to get confused about it especially for programmers with only intermediate knowledge of JavaScript. So, this may seem quite ambiguous at first.


<script type = "text/javascript">
    (function($){ ... })(jQuery);
</script>

What is going on here? First of all, in a real-world scenario, the three dots would be replaced with actual code that we would like to be executed. Here we see a definition of an anonymous function (also known as function closure), that takes a parameter called dollar sign ($). The function is wrapped in parenthesis, but why? You see, the function in this example is an anonymous function that has no reference to itself, but by wrapping it in parenthesis, the JavaScript syntax allows us to reference to an anonymous function we just created. We could have added a dot (.) after the function definition wrapped in parenthesis and called a member function that this function object supports. We could then add the dot at the end of that statements as well, and call yet another member function that can be executed on the type of the object returned by the previous function. This chaining feature of JavaScript language is common throughout many other script languages, for example Perl. It is a common script-language feature because it makes your code miniature.

So, by wrapping an anonymous function with parenthesis we can reference to that function's memory location without actually refering to the name of that function - and well, we can't do that because the function has no name! Furthermore, not only can we reference to a function that has no name, we can also call that function in the same statement that created it. And that's exactly what's going on here. The nameless function is defined, wrapped in parenthesis, and then that function is immediately called. This is only one example of the function closure usage that you will see throughout jQuery and other advanced JavaScript code.

Why would someone do such a thing? There are several reasons. This is done to minimize code length and more importantly, to hide parameters that start with the dollar sign character from the global scope of the script. The real reason for doing that is for cases where you are using multiple frameworks that may use the dollar sign function object in the global scope of the program (which is a very bad design idea in itself). But in real circumstances, when would we see that happen? That depends on circumstances and developer's choices. Since in this tutorial we are not using any additional frameworks or outside code, this obscure and sometimes confusing syntax is not necessary and the chances of creating a conflict are zero. When learning, it is sometimes a good idea to simplify. Let's take a look at a very basic plugin construction idea:


<script type = "text/javascript">
    jQuery.func = doSomething;
    jQuery.fn.func = doSomethingElse;
</script>

Where doSomething and doSomethingElse are simply previously defined function objects. However, this technique is not always desired because we are losing the ability to chain our jQuery plugin with other jquery API functions that already exist, or that are created by other developers. In the end, what it comes down to is that if you want your plugin have that chaining functionality, you must use the self-calling function mechanism as explained above. If chaining the functionality of your plugin with other people's code is not important to you, simply add your own objects and variables to the $. or $.fn objects. Also keep in mind that as discussed earlier, jQuery, the dollar sign (and even something like window.$) can be used interchangeably and refer to the same exact object in memory. jQuery documentation tells us to use jQuery object instead of the dollar sign. The dollar sign must be hidden, it must only be used internally in the jQuery architecture. Do not expose the dollar sign to the implementators of your plugin.
jQuery Plugin Design Pattern `A`

Now, let's consider the internal code of an arbitrary plugin that uses the self-referencing anonymous function call that takes the jQuery object as the only parameter. I wanted to include additional comments to explain what each part means. The comments obviously clutter the code, but I think it is slightly more intuitive than explaining each line by writing about it and I tried to format the comments in a conscious way.

It is easy to get confused about what the this keyword is refered to in this pattern in different places in the code. I created some local variables that I named vari, stored within the main jQuery object ($.vari), and a jquery fn object ($.fn.vari). These could have been function objects too, but for simplicity's sake I use basic variables. You can see these values displayed with alert functions in the following code. I did this to demonstrate which varibles the this keyword will refer to in different function scopes. (For those who may not know, in classic computer programming a scope can be defined by the opening and closing brackets {, and } which modifies the visibility behavior of variables. I don't want to go any further into explaining how JavaScript scope works because it is like a science of its own, but I hope this clears some fog for people who may not know how the scope works. If you do, that's great!

Let's take our first look at the classic jQuery plugin pattern. First, I want to show the pattern without the comment clutter.


(function($)
{
    $.vari = "$.vari";
    $.fn.vari = "$.fn.vari";

    // $.fn is the object we add our custom functions to
    $.fn.DoSomethingLocal = function()
    {
        return this.each(function()
        {
            alert(this.vari);    // would output `undefined`
            alert($(this).vari); // would output `$.fn.vari`
        });
    };
})(jQuery);

// $ is the main jQuery object, we can attach a global function to it
$.DoSomethingGlobal = function()
{
    alert("Do Something Globally, where `this.vari` = " + this.vari);
};

$(document).ready(function()
{
    $("div").DoSomethingLocal();
    $.DoSomethingGlobal();
});

And here are some details:


// plugin-name.js - define your plugin implementation pattern
(function($) // The $ here signifies a parameter name
             // As you can see from below, (jQuery) is
             // immediately passed as the $ param
{
    $.vari = "$.vari";
    $.fn.vari = "$.fn.vari";

    // 1.) Add a custom interface `DoSomethingLocal`
    //     Which will modify all selected elements!
    //     If you are a software engineer, think about this as
    //     a member function of the main jQuery class
    $.fn.DoSomethingLocal = function()
    {
        // return the object back to the chained call flow
        return this.each(function() // This is the main processor
                                    // function that executes on
                                    // each selected element
                                    // (e.g: jQuery("div"))
        {
            // this     ~ refers to a DOM element
            // $(this)  ~ refers to a jQuery object

            // Here, the `this` keyword is a self-refence to the
            // selected object `this.vari` is `undefined` because
            // it refers to selected DOM elements. So, we can do
            // something like: var borderStyle = this.style.border;
            // While $(this).vari, or jQuery(this).vari refers
            // to `$.fn.vari`

            // You would use the $(this) object to perform
            // any desired modification to the selected elements
            // $(this) is simply a reference to the jQuery object
            // of the selected elements
            alert(this.vari);    // would output `undefined`
            alert($(this).vari); // would output `$.fn.vari`
        });
    };
})(jQuery); // pass the jQuery object to this function

// 2.) Or we can add a custom interface to the global jQuery
//     object. In this case, it makes no sense to enumerate
//     through objects with `each` keyword because this function
//     will theoretically work in the `global` scope. If you are
//     a professional software engineer, think about this
//     as a [static function]
$.DoSomethingGlobal = function()
{
    // this will output this.vari = $.vari
    alert("Do Something Globally, where `this.vari` = " + this.vari);
};

// index.html - test the plugin
$(document).ready(function()
{
    $("div").DoSomethingLocal();
    $.DoSomethingGlobal();
});

There are two different types of interfaces you can add to the main jQuery object that is already defined by the framework. Please take a look at the example above where we have just added the function DoSomethingLocal and DoSomethingGlobal.

1.) DoSomethingLocal is defined as $.fn.DoSomethingLocal. You can add as many custom functions to the jQuery.fn (or simply $.fn) object as required by your plugin implementation. Any function you add to the $.fn object is assumed to work on references to an instance of an element/object that was selected. This is what the $.fn syntax means - we are simply adding a custom interface to a jQuery object that assumes selected elements.

2.) DoSomethingGlobal is applied directly to the global jQuery object as $.DoSomethingGlobal. A function attached to the jQuery framework in such way assumes that it will not work on selected elements but rather it will work in the global scope and contain practically any implementation.
jQuery Plugin Design Pattern `B`

Many people prefer wrapping the plugin code in an anonymous function, instantly call it by adding the parenthesis at the end of the statement and pass jQuery object to it like shown in the jQuery Plugin Pattern A above, but do we have to do that? We don't. Let's take a look at the alernative way of building jQuery plugins, which some people will find more straightforward and easy to read. If you don't feel comfortable with the classic pattern presented above, you might as well play around with the following pattern until you become familiar with jQuery plugin development. Please note that the following pattern must only be used in cases where you are not implementing chainability, in other words, you must assume that your plugin functions will not be returning a jQuery object. You must also point this out in your documentation.


// Plugin base object
$.gShuffle = function()
{

}

// Initializes plugin
$.gShuffle.initialize = function()
{

}

// Runs the plugin
$.gShuffle.run = function()
{

};

Final Thoughts

Well, this tutorial has already taken several hours to write and edit. I hope I pointed out some of the things that made jQuery plugin development more clear for you. Have fun building jQuery plugins!

1. Learning jQuery: Better Interaction Design and Web Development with Simple JavaScript Techniques

2. jQuery Reference Guide: A Comprehensive Exploration of the Popular JavaScript Library

3. jQuery in Action
Did this article help you learn something new?

If the content on this website somehow helped you to learn something new, please let others know about it by sharing it on your website or on your Facebook page with your friends. In addition you can help by making a donation or bookmarking this site.

JavaScript Dollar Sign ($) - What is it for?

Javascript Dollar Sign. A beginner, or even a seasoned JavaScript programmer may be slightly intimidated having once spotted something as ambiguous as the dollar sign ($) in JavaScript code. Seeing for the first time the usage of the Dollar Sign, it may be difficult to grasp having not read any books about JavaScript and jQuery. To explain the usage of the dollar sign in JavaScript code, I need to lay out some general details. In JavaScript, the dollar sign commonly appears in variable definitions and function calls. Let me assure you that there is nothing mysterious about the dollar sign, for it is just a variable (or an identifier) name. There is nothing Greek about it. As an example of this, the insanely popular JavaScript framework, about which I had previously written an article (What is jQuery?) uses the dollar sign to instantiate the main jQuery object.

In many computer programming languages or script languages a variable is also referred to as an identifier. Each programming language has a design whether it be C, C++, PHP, Java or Javascript. Each language design also has a set of rules. For example, in JavaScript the rules for defining variables is that each identifier must start with a letter, the dollar sign ($) or the underscore character (_) and must never start with a digit (such as 0-1) or some of the other characters such as punctuation signs and a few others (because that would confuse the crap out of the compiler). Both of these symbols ($ and _) are special cases and may also appear in the rest of the identifier name. So, as an example, a variable identifier named by five consequent dollar signs such as $$$$$ (or five, or another number of underscores in a row, for that matter) is totally acceptable because it falls within the rules of the JavaScript language syntax. This is simply a language rule that JavaScript programmers must live with. And believe me, there are very good reasons for that.

Once upon a time, there was a global function object, whose identifier's name was a single dollar sign $. This coding practice (lack of the var keyword) was undesirable by the skilled and the aged programmers, because we do not favor global variables in our JavaScript code unless we are cheating. However, the important part is that this function could have been named almost anything such as: a, z or even a single underscore: _

// An example of legal identifier names

var A = function() {
    alert("function A was called");
}

var $ = function() {
    alert("function $ was called");
}

var _ = function() {
    alert("function _ was called");
}

Using other uncommon characters

Furthermore, in addition to the dollar sign and the underscore character, in JavaScript version 1.5 and later, you can also use ISO 8859-1 and Unicode letters such as Ø to name your identifiers. Surprisingly for some, one can also use the \uXXXX Unicode escape sequences where XXXX would be a number such as 0024. What is interesting is that the unicode \u0024 escape sequence translates to, guses what?... the dollar sign. And it is even possible to call the function, literally defined with identifier named \u0024 by refering to it with the dollar sign character! Of course, just because this is possible, it is very uncommon to do this in your code. I consider this an undesirable practice, because not only many programmers are not aware of this, if you use these "techniques" the code starts to look confusing and unreadable.

As you may know, JavaScript is an object-oriented programming language by design. There are several different ways to assign a value to an identifier. For example, when we use the keyword var, the JavaScript will create a variable in the current (or local) scope of the code block you are adding the code to. If we skip the var keyword, the variable will still be created, but in the global scope of your program, which means it would be visible from anywhere in the (.js) file. Again, try to avoid using globals. I know this is a page about the dollar sign, but if it is not yet obvious to you, the no-globals rule will surface once you work with large-scale projects, multiple components written by someone else and/or in a team of a few other software engineers. So if someone tells you it is okay to use globals, and create variables without the var keyword - don't believe their lies.

One more thing. Because JavaScript variables are objects by design you can assign functions to your variables. You can even assign "member" functions to functions that already exist. But by trying to assign a function to a function object that does not yet exist will not compile in JavaScript. If you really want to get in depth with this, I will ask you to pay careful attention to the code shown below.

Now, with the knowledge you've gained from this article, and without copy and pasting the code to test it in your browser, can you tell whether the following code will compile?

<script type = "text/javascript">
window.onload = function()
{
    // Define function objects
    var func1   = function() { alert("hello from func1"); }
    func1.func2 = function() { alert("hello from func1.func2"); };
    var _       = function() { alert("hello from _"); }
    var \\u0024  = function() { alert("hello from $ defined as \u0024"); }
    var Ø       = function() { alert("hello from Ø"); }
    var $$$$$   = function() { alert("hello from $$$$$"); }
    var $func$  = function() { alert("hello from $func$"); }
    var __      = function() { alert("hello from __"); }
    _.$         = function() { alert("hello from _.$"); }
    __.__       = function() { alert("hello from __.__"); }
    $.member    = function() { alert("hello from $.member"); }

    // Call functions defined above one by one
    func1();
    func1.func2();
    _();
    $();
    Ø();
    $$$$$();
    $func$();
    $.member();
    _.$();
    __();
    __.__();
}
</script>

Permitted identifier characters

By convention, the dollar sign ($), the underscore (_) and even some ASCII character are permitted to be used anywhere in a JavaScript identifier (Source: Ecma Script documentation (7.6 Identifiers, ECMA-262, 3rd Ed.) the dollar sign is intended for use only in mechanically generated code. This means that we do not want to use the dollar sign ($) in our indentifier names, unless we are writing a framework. The following is a list of permitted characters that can be used anywhere in an identifier name:

    IdentifierName ::
    IdentifierStart
    IdentifierName IdentifierPart
    IdentifierStart ::
    UnicodeLetter
    $
    _
    UnicodeEscapeSequence
    IdentifierPart ::
    IdentifierStart
    UnicodeCombiningMark
    UnicodeDigit
    UnicodeConnectorPunctuation
    UnicodeEscapeSequence

The point of this article is to show you that the dollar sign character (implemented by the popular js framework called Prototype and then picked up by the jQuery developers) is simply an identifier name, nothing more. Why is it used by programmers? Well, it is a very convenient way to name a function that has a distinct purpose in framework code. And this is the reason jQuery's main object, defined as the dollar sign, can be used interchangeably with the actual object whose name is jQuery. We do not use $ in our custom code, we use the jQuery object. If you are familiar with jQuery and you have paid close attention to its documentation, using the $ alias for the actual object named jQuery in your jQuery plugin code is not desired, although, for some reason it is very common among programmers who find it cute.
Dollar Sign ($) Usage Summary

The dollar sign usage is semantics. It is an identifier name. Psychologically, it looks cute and convenient. Internally, it is just a function or an alpha-numeric variable reference. But it really makes no difference whether you use $ or _ or any other character as explained in the article on my website linked to from this page by the author of this page, for which I thank him.

The usage of the $, as pointed out by the Ecmascript specification, is a character that is allowed to be contained in a variable identifier name. Using the $ as the only character in an identifier name sure does make it look strange, but the difference is semantic in nature. As far as I know, doing so is no different than using any other character such as a, or b in an identifier name.

Again, Ecmascript specification documentation tells us that the $ should be used by internal code such as the jQuery framework simply out of convenience. So this means we should not use it in our code just because it looks cool, unless we are programming a framework that can really benefit from it, because it makes the global framework object unique and separate from the rest of the code.

jQuery Book Reference List:

1. Learning jQuery: Better Interaction Design and Web Development with Simple JavaScript Techniques

2. jQuery Reference Guide: A Comprehensive Exploration of the Popular JavaScript Library

3. jQuery in Action
Did this article help you learn something new?

If the content on this website somehow helped you to learn something new, please let others know about it by sharing it on your website or on your Facebook page with your friends. In addition you can help by making a donation or bookmarking this site.
What is jQuery?

jQuery is a JavaScript library (there is a multitude of books written about jQuery), created by John Resig in 2006 that I have become familiar with. I am a Web Developer and I have several years of experience working with JavaScript. I watched the language mature from what is now called Web 1.0 (when it was used simply as a script language to process form input) to Web 2.0. It was a little after I learned about JavaScript's Object-Oriented capabilities that I first heard of jQuery from a friend. My friend is also a hobbyist Web Developer, who instant messaged me the link to the jQuery website (www.jquery.com) and said I might find it interesting. At the time I was a little hesitant to give jQuery a try. After all, what was this jQuery, a JavaScript querying framework of some sorts? What did it query and how? What could I do with it?
Looking at the jQuery black website's front page, and the large "Download the most-recent version" button it all seemed like I would spend a long time to learn about the benefits, advantages, disadvantages (or pros and cons) of this framework. I have already spent enough time learning about Object-Oriented JavaScript and experimented with my own website frameworks written in JavaScript. Why would I consider learning a JavaScript framework that someone else wrote?

The simple jQuery world

jQuery was starting to ring in my ears more often than I had expected as the time went by. I heard that important Internet-based companies were using jQuery. I knew there may have been something about it I should know, but still couldn't dedicate enough time to learn anything about it. All I heard was that there were some kinds of jQuery "plugins" that everyone wrote and uploaded on the Internet. I was starting to get more curious, and even made plans to look at jQuery in the near future. It was only a few weeks later that I was interviewing with an Internet-based company, one of the candidacy requirements was basic knowledge of JavaScript and jQuery. To test my level of expertise with JavaScript, I was asked to write my own jQuery plugin by the software engineers in the company. I knew little about jQuery but was getting increasingly surprised at how easy it was to program by calling various methods of the framework. The framework that in a peculiar way asked you to call each method with a function represented by the dollar sign ($) character. But more about this later in this blog.

So what kind of things can you do with jQuery?

My first jQuery shuffle plugin, called gShuffle (play with gShuffle) features some of the interesting things you can do with jQuery. For this plugin I decided to slice up a picture of the Mona Lisa painting by Leonardo DaVinci. You will find more information on that page. You can also take a quick look at the gShuffle source code and see for yourself how simple the code is that achieves a fairly complex (compared to the old Web 1.0 standards) "shuffle" effect.
For those who may not know, using dynamic properties of web programming is the new trend (I am writing this as of December, 2008) in the industry and jQuery makes it just that much simpler to work with dynamic elements. No longer would I need to create utility functions for things such as fade-in and out effects, sliding and resizing effects and coming up with clever ways to capture events with JavaScript code to keep my HTML code clean of those onclick = '...' commands within the tags. jQuery makes assigning a function to capture dispatched events incredibly simple and elegant. It is possible to assign a callback function to all DOM (document object model) elements of interest on your page with a single function call! Of course it would also do so in a multi-browser compatible way.

Is jQuery faster than JavaScript?

jQuery is a web development framework that is written in JavaScript and therefore cannot be "faster" than JavaScript. However, jQuery certainly makes your code much more elegant. jQuery uses CSS-like selectors (the space, the pound sign, the dot and the greater than sign) to select a set of desired elements and apply any function to them. If you are curious about how jQuery does this, the source code is available at their website as a regular js file and does not contain anything that you would not expect from JavaScript. The developers of MooTools have created a page that demonstrates performance of several JavaScript frameworks that inlcudes jQuery. jQuery is a very well-designed framework and it is no surprise that it scores high among the top frameworks as the MooTool's CSS Selector Speed Test page demonstrates that.

Should I use jQuery or JavaScript?

This is a good question. This really depends on the circumstances and what kind of things you are working on. I see that the web-based applications that assume heavy-traffic bandwidth will benefit from jQuery's size. All, or at least most developers will obviously benefit from jQuery's syntax, short learning curve, and the logical way in which jQuery works (it is possible to create multi-chained statements where each member function returns a jQuery object for the element you are working with, so that you can apply additional code to the elements that are returned). On the other hand, for projects where bandwidth volume plays little role, regular Javascript code may be used if the programmed doesn't feel comfortable with using jQuery yet. Having said this, it is difficult to go back to "regular" JavaScript programming once you have experienced front-end web development with jQuery, especially if you are working with a lot of dynamic elements in your project.

Should I use jQuery or Prototype?

There is a heated debate in the Web Developer community as to which framework is better, and which one to choose for your own projects. The answer to this question is not simple due to the increasing number of different JavaScript frameworks, their feature sets, the learning curve, the .js file size for websites that care about bandwidth and finally, the script execution speed (in particular the CSS-selector algorithms). It seems that quite a few people who started with the Prototype library are now baptising to jQuery for a few of those reasons. That's not to say that jQuery is better than Prototype or vice versa. There is simply no "best" JavaScript framework, and it is the choice that is left to the developer. It seems that once you learn jQuery it is difficult to make a different choice. There are probably less people who have converted to Prototype from jQuery.
jQuery Book Reference List: 1. Learning jQuery: Better Interaction Design and Web Development with Simple JavaScript Techniques
2. jQuery Reference Guide: A Comprehensive Exploration of the Popular JavaScript Library
3. jQuery in Action
Did this article help you learn something new? If the content on this website somehow helped you to learn something new, please let others know about it by sharing it on your website or on your Facebook page with your friends. In addition you can help by making a donation or bookmarking this site.

JQuery For Beginers

jQuery: beginner’s tutorial

Today I’ll try to explain this magical jQuery everybody is talking about. Why on this blog? Because it can help you create many awesome things. :D
If you want to learn jQuery you’ll have to know the basics of JavaScript because jQuery is a framework for this language. And because JavaScript never goes alone you have to know the basics of HTML and CSS.
 What is jQuery?
From my point of view it’s a customized way of writing JavaScript code. Why use it if you have the old one? Easy question … jQuery is shorter, flexible and  it works in every browser. Is that enough for you? :)
Let’s get started! The easiest way to learn is to show you some code and explain what it does. Here it is:

<html>
  <head>
    <script type="text/javascript" src="http://ajax.googleapis.com/ajax/libs/jquery/1.4.2/jquery.min.js"></script>

    <script type="text/javascript">
      $(document).ready(function(){
        $("button").click(function(){
          $("#test").animate({width:500},1500);
          $(".testText").fadeIn(1500);
        });

        $("button").mouseout(function(){
          $(".testText").fadeOut(1000);
          $("#test").animate({width:50}, 1000);
        });
      });
    </script>
  </head>
<body>
  <button>Start Animation</button>
  <div id="test" style="background:#8CC63F; height:100px;width:50px;position:relative">
    <span class="testText" style="display:none;">This is a test text ... :D  </span>
  </div>
</body>
</html>
Don’t panic! I’ll guide you one step at a time. First let’s see what the code does. Below is the effect.

First thing is first … you need to import the jQuery file for all of this to work. You can download it or you can use the available Google link like I did in this line:
<script type="text/javascript" src="http://ajax.googleapis.com/ajax/libs/jquery/1.4.2/jquery.min.js"></script>
As you can see all the JavaScript code in the example looks like this $(selector).function(); . Every jQuery code will start with $ unless you change it ( but this is not important now :D ).
As you can see the selector works just like in CSS with some minor improvements.
  • $(document) – selects the entire document
  • $(“button”) – selects all the button HTML elements ( in our example there is just one ) … this works for any other element: $(“div”) , $(“p”), $(“li”) and so on
  • $(“#test”) – selects the element with the id “test”
  • $(“.testText”) – selects all elements that have the class “testText”
… and now some that are not in this example:
  • $(this) – selects the current element
  • $(“li:first”) – selects the first li element
  • $(“[href$='.png']“) – selects all elements with a href attribute ending in .png
I’m not going to put here all the variations. For more selectors visit the documentation at their website. :D
What’s that after the selector? Well … it can be 2 things: a trigger or an effect.
A trigger is an event that interacts with the user. Here are some examples: .click(), .mouseover(), mouseout(), .change(), .keypress(), .ready(), .load() and many more. The name of every trigger is very suggestive of what it does. For a full list of events/triggers visit the official jQuery documentation.
Now let’s get back to the example … let’s translate what was written:
$(document).ready(function(){
        $("button").click(function(){
          $("#test").animate({width:500},1500);
          $(".testText").fadeIn(1500);
        });
“When the document is ready … if the button is clickedanimate the #test element by setting his width to 500 in 1500 milliseconds … and fade in all the elements with the .testText class in 1500 milliseconds” :D
I know! I know! I didn’t tell you about animate and fade in and other effects like that. Well you know what? I’m not going to. I believe that by translating the example you kind of got the point.
There are many effects and you can manipulate any element in any way you can think of. Here is a full list of effects.
As I said in the title … this is a beginners tutorial. I hope you liked it and I’m not going to fill your head with more in this post.
It’s up to you to navigate trough the links above and test what you learn. Try it for yourself and if you think it’s worth sharing leave a comment with your work.
See you next time :D

JQuery Controls:

  • $('*'): This selector selects all elements in the document.
  • $("p > *"): This selector selects all elements that are children of a paragraph element.
  • $("#specialID"): This selector function gets the element with id="specialID".
  • $(".specialClass"): This selector gets all the elements that have the class of specialClass.
  • $("li:not(.myclass)"): Selects all elements matched by <li> that do not have class="myclass".
  • $("a#specialID.specialClass"): This selector matches links with an id of specialID and a class of specialClass.
  • $("p a.specialClass"): This selector matches links with a class of specialClass declared within <p> elements.
  • $("ul li:first"): This selector gets only the first <li> element of the <ul>.
  • $("#container p"): Selects all elements matched by <p> that are descendants of an element that has an id of container.
  • $("li > ul"): Selects all elements matched by <ul> that are children of an element matched by <li>
  • $("strong + em"): Selects all elements matched by <em> that immediately follow a sibling element matched by <strong>.
  • $("p ~ ul"): Selects all elements matched by <ul> that follow a sibling element matched by <p>.
  • $("code, em, strong"): Selects all elements matched by <code> or <em> or <strong>.
  • $("p strong, .myclass"): Selects all elements matched by <strong> that are descendants of an element matched by <p> as well as all elements that have a class of myclass.
  • $(":empty"): Selects all elements that have no children.
  • $("p:empty"): Selects all elements matched by <p> that have no children.
  • $("div[p]"): Selects all elements matched by <div> that contain an element matched by <p>.
  • $("p[.myclass]"): Selects all elements matched by <p> that contain an element with a class of myclass.
  • $("a[@rel]"): Selects all elements matched by <a> that have a rel attribute.
  • $("input[@name=myname]"): Selects all elements matched by <input> that have a name value exactly equal to myname.
  • $("input[@name^=myname]"): Selects all elements matched by <input> that have a name value beginning with myname.
  • $("a[@rel$=self]"): Selects all elements matched by <p> that have a class value ending with bar
  • $("a[@href*=domain.com]"): Selects all elements matched by <a> that have an href value containing domain.com.
  • $("li:even"): Selects all elements matched by <li> that have an even index value.
  • $("tr:odd"): Selects all elements matched by <tr> that have an odd index value.
  • $("li:first"): Selects the first <li> element.
  • $("li:last"): Selects the last <li> element.
  • $("li:visible"): Selects all elements matched by <li> that are visible.
  • $("li:hidden"): Selects all elements matched by <li> that are hidden.
  • $(":radio"): Selects all radio buttons in the form.
  • $(":checked"): Selects all checked boxex in the form.
  • $(":input"): Selects only form elements (input, select, textarea, button).
  • $(":text"): Selects only text elements (input[type=text]).
  • $("li:eq(2)"): Selects the third <li> element
  • $("li:eq(4)"): Selects the fifth <li> element
  • $("li:lt(2)"): Selects all elements matched by <li> element before the third one; in other words, the first two <li> elements.
  • $("p:lt(3)"): selects all elements matched by <p> elements before the fourth one; in other words the first three <p> elements.
  • $("li:gt(1)"): Selects all elements matched by <li> after the second one.
  • $("p:gt(2)"): Selects all elements matched by <p> after the third one.
  • $("div/p"): Selects all elements matched by <p> that are children of an element matched by <div>.
  • $("div//code"): Selects all elements matched by <code>that are descendants of an element matched by <div>.
  • $("//p//a"): Selects all elements matched by <a> that are descendants of an element matched by <p>
  • $("li:first-child"): Selects all elements matched by <li> that are the first child of their parent.
  • $("li:last-child"): Selects all elements matched by <li> that are the last child of their parent.
  • $(":parent"): Selects all elements that are the parent of another element, including text.
  • $("li:contains(second)"): Selects all elements matched by <li> that contain the text second.

Explain About ArrayList in Asp.Net

Create an ArrayList

The ArrayList object is a collection of items containing a single data value.
Items are added to the ArrayList with the Add() method.
The following code creates a new ArrayList object named mycountries and four items are added


Example:
<script  runat="server">
Sub Page_Load
if Not Page.IsPostBack then
   dim mycountries=New ArrayList
   mycountries.Add("Norway")
   mycountries.Add("Sweden")
   mycountries.Add("France")
   mycountries.Add("Italy")
   mycountries.TrimToSize()
   mycountries.Sort()
   rb.DataSource=mycountries
   rb.DataBind()
end if
end sub

sub displayMessage(s as Object,e As EventArgs)
lbl1.text="Your favorite country is: " & rb.SelectedItem.Text
end sub
</script>


<html>
<body>

<form runat="server">
<asp:RadioButtonList id="rb" runat="server"
AutoPostBack="True" onSelectedIndexChanged="displayMessage" />
<p><asp:label id="lbl1" runat="server" /></p>
</form>

</body>
</html>


OutPut:


Your favorite country is: Norway


Explain About Sorted List in Asp.Net

The SortedList Object

The SortedList object contains items in key/value pairs. A SortedList object automatically sort the items in alphabetic or numeric order.
Items are added to the SortedList with the Add() method. A SortedList can be sized to its final size with the TrimToSize() method.
The following code creates a SortedList named mycountries and four elements are added:

Example:

<script  runat="server">
sub Page_Load
if Not Page.IsPostBack then
   dim mycountries=New SortedList
   mycountries.Add("N","Norway")
   mycountries.Add("S","Sweden")
   mycountries.Add("F","France")
   mycountries.Add("I","Italy")
   rb.DataSource=mycountries
   rb.DataValueField="Key"
   rb.DataTextField="Value"
   rb.DataBind()
end if
end sub

sub displayMessage(s as Object,e As EventArgs)
lbl1.text="Your favorite country is: " & rb.SelectedItem.Text
end sub
</script>


<html>
<body>

<form runat="server">
<asp:RadioButtonList id="rb" runat="server"
AutoPostBack="True" onSelectedIndexChanged="displayMessage" />
<p><asp:label id="lbl1" runat="server" /></p>
</form>

</body>
</html>


OutPut:

Your favorite country is: Italy


Explain About Hash Table in Asp.Net

Create a Hashtable

The Hashtable object contains items in key/value pairs. The keys are used as indexes, and very quick searches can be made for values by searching through their keys.
Items are added to the Hashtable with the Add() method.
The following code creates a Hashtable named mycountries and four elements are added:

Example :

<script  runat="server">
sub Page_Load
if Not Page.IsPostBack then
   dim mycountries=New Hashtable
   mycountries.Add("N","Norway")
   mycountries.Add("S","Sweden")
   mycountries.Add("F","France")
   mycountries.Add("I","Italy")
   rb.DataSource=mycountries
   rb.DataValueField="Key"
   rb.DataTextField="Value"
   rb.DataBind()
end if
end sub

sub displayMessage(s as Object,e As EventArgs)
lbl1.text="Your favorite country is: " & rb.SelectedItem.Text
end sub
</script>


<html>
<body>

<form runat="server">
<asp:RadioButtonList id="rb" runat="server"
AutoPostBack="True" onSelectedIndexChanged="displayMessage" />
<p><asp:label id="lbl1" runat="server" /></p>
</form>

</body>
</html>


OutPut:


Your favorite country is: Norway


Differences between Datagrid, Datalist and Repeater In Asp.Net?

1. Datagrid has paging while Datalist doesnt.
2. Datalist has a property called repeat. Direction = vertical/horizontal. (This is of great help in designing layouts). This is not there in Datagrid.
3. A repeater is used when more intimate control over html generation is required.
4. When only checkboxes/radiobuttons are repeatedly served then a checkboxlist or radiobuttonlist are used as they involve fewer overheads than a Datagrid.
The Repeater repeats a chunk of HTML you write, it has the least functionality of the three. DataList is the next step up from a Repeater; accept you have very little control over the HTML that the control renders. DataList is the first of the three controls that allow you Repeat-Columns horizontally or vertically. Finally, the DataGrid is the motherload. However, instead of working on a row-by-row basis, you’re working on a column-by-column basis. DataGrid caters to sorting and has basic paging for your disposal. Again you have little contro, over the HTML. NOTE: DataList and DataGrid both render as HTML tables by default.
Out of the 3 controls, I use the Repeater the most due to its flexibility w/ HTML. Creating a Pagination scheme isn't that hard, so I rarely if ever use a DataGrid. Occasionally I like using a DataList because it allows me to easily list out my records in rows of three for instance.


Datagrid is most restrictive as regards to customization followed by DataList and finally Repeater is the most customizable.
Datagrid has built in paging, sorting and editing capabilities which are not there with the other two controls. So if you want users to sort / page / edit data, datagrid is the natural choice.
DataList and repeater have better performance than datagrid. So if performance is a major concern, for example, a site with large number of concurrent visitors, then you could think of datalist or repeater.
Repeater is the most customizable. It allows you to create structures like nested lists, for example.
A datagrid row displays one record from the data source, while a datalist row can display more than one records (set by RepeatColumns property)
Datagrid and Datalist are derived from WebControl while Repeater is not, and so does not have the stylistic properties of web controls.
All are similar in that they have a datasource property and ItemCreated, ItemDataBound and ItemCommand events....................................................................................................................................................
1. Datagrid has paging while Datalist doesnt.
2. Datalist has a property called repeat. Direction = vertical/horizontal. (This is of great help in designing layouts). This is not there in Datagrid.
3. A repeater is used when more intimate control over html generation is required.
4. When only checkboxes/radiobuttons are repeatedly served then a checkboxlist or radiobuttonlist are used as they involve fewer overheads than a Datagrid.
The Repeater repeats a chunk of HTML you write, it has the least functionality of the three. DataList is the next step up from a Repeater; accept you have very little control over the HTML that the control renders. DataList is the first of the three controls that allow you Repeat-Columns horizontally or vertically. Finally, the DataGrid is the motherload.

However, instead of working on a row-by-row basis, you're working on a column-by-column basis. DataGrid caters to sorting and has basic paging for your disposal. Again you have little contro, over the HTML. NOTE: DataList and DataGrid both render as HTML tables by default.

Out of the 3 controls, I use the Repeater the most due to its flexibility w/ HTML. Creating a Pagination scheme isn't that hard, so I rarely if ever use a DataGrid. Occasionally I like using a DataList because it allows me to easily list out my records in rows of three for instance.

Explain About page Directives in ASP.NET

Directives are used to pass optional settings to the ASP.NET pages and compilers. They typically have the following syntax:
<%@ directive attribute=value [attribute=value] %>
There are many valid types of directives, which will be described in detail in the following sections. Each directive can have one or more attribute/value pairs, unless otherwise noted. Attribute/value pairs are separated by a space character. Be careful not to have any space characters surrounding the equal sign (=) between the attribute and its value.
Directives are typically located at the top of the appropriate file, although that is not a strict requirement. For example, Application directives are at the top of the global.asax file, and Page directives are at the top of the .aspx files.

1. Application Directive

The Application directive is used to define application-specific attributes. It is typically the first line in the global.asax file.
Here is a sample Application directive:
<%@ Application Language="C#" Codebehind="Global.asax.cs"\
    Inherits="WebApplication1.Global" %>
There are four possible attributes for use in the Application directive, which are outlined in Table below
 
Possible attributes for the Application directive
Attribute
Description
CodeBehind
Used by Visual Studio .NET to identify a code-behind file.
Inherits
The name of the class to inherit from.
Description
Text description of the application. This is ignored by the parser and compiler.
Language
Identifies the language used in any code blocks. Valid values are "C#", "VB", and "JS". As other languages adopt support for the .NET Framework, this list will be expanded.

2. Assembly Directive

The Assemblydirective links an assembly to the application or page at parse-time. It is analogous to the /reference: command-line switch used by the C# and VB.NET command-line compilers.
The Assembly directive is contained in either the global.asax file, for application-wide linking, or in a page (.aspx) or user control (.ascx) file, for linking to a specific page or user control. There can be multiple Assembly directives in any file. Each Assembly directive can have multiple attribute/value pairs.
Assemblies located in the \bin subdirectory under the application's virtual root are automatically linked to the application and do not need to be included in an Assembly directive. There are two permissible attributes, listed in Table below.
 
Attributes for the Assembly directive
Attribute
Description
Name
The name of the assembly to link to the application or page. Does not include a filename extension. Assemblies usually have a dll extension.
Src
Path to a source file to dynamically compile and link.
For example, the following Assembly directives link to the assembly or assemblies contained in the MyAssembly.dll file, and compile and link to a C# source code file named SomeSource.cs:
<%@ Assembly Name="MyAssembly" %>
<%@ Assembly Src="SomeSource.cs" %>
This directive is often used in conjunction with the Import directive, described later in this chapter.

3 Control Directive

The Control directive is used only with user controls and is contained in user control files (.ascx). There can only be a single Control directive per .ascx file. Here is an example:
<%@ Control Language="VB" EnableViewState="false" %>
The Control directive has many possible attributes. Some of the more common attributes appear in Table below.
 
Attributes for the Control directive
Attribute
Values
Description
AutoEventWireup
true, false
Enables or disables event auto wiring. Default is true.
ClassName
any valid class name
The class name for the page that will be compiled dynamically.
Debug
true, false
Enables or disables compiling with debug symbols. Default is false.
Description
string
Text description of the page, ignored by the parser.
EnableViewState
true, false
Indicates if view state is maintained across page requests. Default is true.
Explicit
true, false
If language is VB, tells compiler to use Option Explicit mode. Default is false.
Inherits
class name
Name of code-behind or other class for the page to inherit.
Language
VB, C#, JS
Programming language used for in-line code and script blocks. As other languages adopt support for the .NET Framework this list will be expanded.
Src
filename
Relative or fully qualified filename containing code-behind class.
Strict
true, false
If language is VB, tells compiler to use Option Strict mode. Default is false.

4 Implements Directive

The Implements directive is used in page (.aspx) and user control (.ascx) files or associated code-behind files. It specifies a COM+ interface that the current page implements. This allows a page or user control to declare the interface's events, methods, and properties.
For example, the following Implements directive allows access to a custom IDataAccess interface contained in a custom ProgrammingASPNET namespace:
<%@ Implements Interface="ProgrammingASPNET.IDataAccess" %>

5 Import Directive

The Import directive imports a namespace into a page, user control, or application, making all the classes and namespaces of the imported namespace available. It is analogous to the using statement in C# and the Imports statement in VB.NET. Imported namespaces can either be part of the .NET Framework Class Library or custom.
If the Import directive is contained in global.asax, then it applies to the entire application. If it is in a page (.aspx) or user control (.ascx) file, then it only applies to that page or user control.
Each Import directive can have only a single namespace attribute. If you need to import multiple namespaces, use multiple Import directives.
The following namespaces are automatically imported into all pages and user controls and do not need to be included in Import directives:
System
System.Collections
System.Collections.Specialized
System.Configuration
System.IO
System.Text
System.Text.RegularExpressions
System.Web
System.Web.Caching
System.Web.Security
System.Web.SessionState
System.Web.UI
System.Web.UI.HtmlControls
System.Web.UI.WebControls
The following two lines import the System.Drawing namespace from the .NET Base Class Library and a custom namespace:
<%@import namespace="System.Drawing" %>
<%@import namespace="ProgrammingASPNET" %>

6 OutputCache Directive

The OutputCache directive controls output caching for a page or user control..

7 Page Directive

The Page directive is used to define attributes for the page parser and compiler specific to the page (.aspx) file. There can be no more than one Page directive for each page file. Each Page directive can have multiple attributes.
The Page directive has many possible attributes. Some of the more common attributes of the Page directive are listed in Table below.
 
Attributes for the Page directive
Attribute
Values
Description
AutoEventWireup
true, false
Enables or disables event auto wiring. Default is true.
Buffer
true, false
Enables or disables HTTP response buffering. Default is true.
ClassName
Any valid class name
The class name for the page that will be compiled dynamically.
ClientTarget
Any valid user-agent value or alias
Targets user agent that server controls should render content for.
CodeBehind
filename
Used by Visual Studio .NET to indicate the name of the code-behind file.
Debug
true, false
Enables or disables compiling with debug symbols. Default is false.
Description
string
Text description of the page, ignored by the parser.
EnableSessionState
true, false, ReadOnly.
Enables, disables, or makes SessionState read-only. Default is true.
EnableViewState
true, false
Enables or disables maintenance of view state across page requests. Default is true.
ErrorPage
  Targets URL for redirection if an unhandled page exception occurs.
Explicit
true, false
If language is VB, tells compiler to use Option Explicit mode. Default is false.
Inherits
class name
Name of code-behind or other class
Language
VB, C#, JS
Programming language used for in-line code.
Src
filename
Relative or fully qualified filename containing code behind class.
Strict
true, false
If language is VB, tells compiler to use Option Strict mode. Default is false.
Trace
true, false
Enables or disables tracing. Default is false.
TraceMode
SortByTime, SortByCategory
Indicates how trace messages are to be displayed. Default is SortByTime.
Transaction
NotSupported, Supported, Required, RequiresNew
Indicates if transactions supported on this page. Default is NotSupported.
The following code snippet is a Page directive specifying the language, a class to inherit, and a code-behind source file:
<%@ Page Language="C#" inherits="CodeBehindDemo"  src="codebehind.cs" %>

8 Reference Directive

The Reference directive can be included in a page file (.aspx). It indicates that another page or user control should be compiled and linked to the current page, giving you access to the controls on the linked page or user control as part of the ControlCollection object.
There are two permissible attributes: Page and Control. For either, the allowable value is a relative or fully qualified filename. For example:
<%@ Reference page="AnotherPage.aspx" %>

9 Register Directive

The Register directive is used in custom server controls and user controls to associate aliases with namespaces.

If this tutorial doesn't answer your question, and you have a specific question, just ask an expert here. Post your question to get a direct answer.