Maintain GridView Inside DropDown Selected Value in Asp.Net


        protected void gdvViewInterview_RowDataBound(object sender, GridViewRowEventArgs e)
        {
            if (e.Row.RowType == DataControlRowType.DataRow)
            {
                Label lblInterviewStatus = (Label)e.Row.FindControl("lblCandStatus");
           

                if (lblInterviewStatus != null)
                {
                    ViewState["CandidateStatus"] = lblInterviewStatus.Text;
                }
                DropDownList ddlInterviewStatus = (DropDownList)e.Row.FindControl("ddlCandStatus");
                if (ddlInterviewStatus != null)
                {
                    ddlInterviewStatus.SelectedValue = Convert.ToString(ViewState["CandidateStatus"]);
                }

               
            }
        }

Cascading DropDown in Asp.Net GridView

I wrote this article sometime ago in response to a query asked by a dotnetcurry.com viewer. The user had a requirement where he had two dropdownlist in the GridView and the second one was to be populated at runtime based on the selected value of the first dropdownlist – A case of cascading dropdownlists.
Here’s an approach I followed without using a single line of code. We will be using the Categories and Products table of the Northwind database to show the cascading effect.
Viewers, who have prior experience in configuring the SqlDataSource, can jump directly to Step 5:
Step 1: Open VS 2008. Click File > New > Website. Choose ASP.NET Website from the list of installed template, choose target platform as .NET Framework 3.5, choose the desired language and enter the location where you would like to store the website on your FileSystem. I have created a folder called VS2008 Projects, so the location over here is C:\VS2008 Projects\ CascadingDropDownInGridView. After typing the location, click OK.
Step 2: Open Default.aspx. Switch to the Design mode of Default.aspx. Open the toolbox (Ctrl+Alt+X) > Data Tab > Drag and drop a SqlDataSource control on to the form. Click on the smart tag or right click SqlDataSource > Show Smart Tag > ‘Configure Data Source’ wizard. Click on ‘New Connection’ to open the ‘Add Connection’. Type your ‘Server Name’ and ‘Select a database Name’ to connect to. Over here, I have used (local) as the ‘ServerName’ and the database I am connecting to, is Northwind. Click on ‘Test Connection’ to make sure that there are no errors while connecting to the server. Click Ok.
Step 3: In the ‘Configure Data Source’, click ‘Next’. An option will be displayed to save the connection string to the configuration file. Select the checkbox ‘Yes, save this connection as:’, type a name for the connectionstring ‘NorthwindConnectionString’ and click Next.
Step 4: In the ‘Configure Select Statement’ > select ‘Specify Columns from Tables or Views’ radiobutton > Select ‘Categories’ table in the Name and choose CategoryID, CateogoryName as columns. Click Next > ‘Test Query’ to preview data > click Finish. The wizard adds a SqlDataSource control to the page as shown below.
<asp:SqlDataSource ID="SqlDataSource1" runat="server"
ConnectionString="<%$ ConnectionStrings:NorthwindConnectionString %>"
SelectCommand="SELECT [CategoryID], [CategoryName] FROM [Categories]">           
</asp:SqlDataSource>
If you check your web.config, the connection string is added as shown below:
<connectionStrings>
      <add name="NorthwindConnectionString" connectionString="Data Source=(local);Initial Catalog=Northwind;Integrated Security=True" providerName="System.Data.SqlClient"/>
</connectionStrings>
Step 5: Now add a GridView control to the page. We will add a BoundField and a TemplateField to display the CategoryID and CategoryName’s respectively. The TemplateField will contain our first dropdownlist displaying CategoryNames.
<form id="form1" runat="server">
<div>
 
<asp:SqlDataSource ID="SqlDataSource1" runat="server"
ConnectionString="<%$ ConnectionStrings:NorthwindConnectionString %>"
SelectCommand="SELECT [CategoryID], [CategoryName] FROM [Categories]">           
</asp:SqlDataSource>
 
<asp:GridView ID="GridView1" runat="server" AutoGenerateColumns="False"
DataKeyNames="CategoryID" DataSourceID="SqlDataSource1">          
<Columns>             
    <asp:BoundField DataField="CategoryID" HeaderText="CategoryID"
        InsertVisible="False" ReadOnly="True" SortExpression="CategoryID" />  
        
    <asp:TemplateField HeaderText="Categories">       
        <ItemTemplate>                  
            <asp:DropDownList ID="ddlCategories" AutoPostBack="true"
            DataTextField="CategoryName" DataValueField="CategoryID"
            DataSourceID="SqlDataSource1" runat="server" AppendDataBoundItems="true"
            SelectedValue='<%# Bind("CategoryID") %>' />
       </ItemTemplate>
    </asp:TemplateField>
 
 
</Columns>
</asp:GridView>
 
</div>
</form>
Note: The SelectedValue='<%# Bind("CategoryID") %>' helps us select the CategoryName in the dropdownlist in accordance with the CategoryID, when the page is first loaded.
Step 6: So far so good. We now have to add the second dropdownlist whose values will be determined at runtime depending on the value selected in the first dropdownlist. In our case, when the user will select CategoryName in the first dropdown, corresponding Products will be displayed in the second dropdown.
Add another Template Field (with a second dropdownlist) in the GridView as well as one more SqlDataSource. This time the SqlDataSource2 will be bound to the ‘Products’ table. Moreover, the ‘SelectCommand’ of the SqlDataSource will accept a parameter, which will be the selected category. Let us see the markup for the same:
<asp:TemplateField HeaderText="Products">       
        <ItemTemplate> 
            <asp:DropDownList ID="ddlProducts"
            DataTextField="ProductName" DataValueField="ProductID"
            DataSourceID="SqlDataSource2" runat="server" />
            <asp:SqlDataSource runat="server" ID="sqlDataSource2"
               ConnectionString="<%$ ConnectionStrings:NorthwindConnectionString %>"
                SelectCommand="SELECT [ProductID], [ProductName], CategoryID FROM [Products]" FilterExpression="CategoryID = '{0}'">
                <FilterParameters>
                <asp:ControlParameter Name="categoryParam" ControlID="ddlCategories"
                     PropertyName="SelectedValue" />
                </FilterParameters>                       
            </asp:SqlDataSource>
         </ItemTemplate>
    </asp:TemplateField>     
Notice the <FilterParameters> element used as a child of the SqlDataSource2. This element is worth observing over here. The <FilterParameters> is a very handy feature of the SqlDataSource control especially when you have a requirement of filtering the results of a query based on a value that is known only at run time. So without making another roundtrip to the server, you can filter out the data that is made available by the SqlDataSource. All you have to do is to create filter expressions that contains parameter placeholders. So for each filter parameter placeholder, you use a parameter element.
In our case, we have created a filter parameter that gets its value from a DropDownList control.
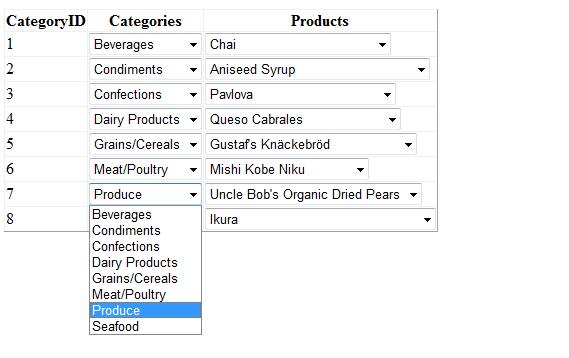
Well that’s all the markup that is required to create cascading dropdownlist in a gridview. Run the application and you can now test the functionality of populating the second dropdownlist based on the selected value of the first dropdownlist. The application will look similar to the image below:
Cascading DDL
The entire markup is as shown below:
<%@ Page Language="C#" AutoEventWireup="true" CodeFile="Default.aspx.cs" Inherits="_Default" %>
 
<!DOCTYPE html PUBLIC "-//W3C//DTD XHTML 1.0 Transitional//EN" "http://www.w3.org/TR/xhtml1/DTD/xhtml1-transitional.dtd">
 
<html xmlns="http://www.w3.org/1999/xhtml">
<head runat="server">
    <title>Cascading DropDownList In GridView</title>
</head>
<body>
<form id="form1" runat="server">
<div>
 
<asp:SqlDataSource ID="SqlDataSource1" runat="server"
ConnectionString="<%$ ConnectionStrings:NorthwindConnectionString %>"
SelectCommand="SELECT [CategoryID], [CategoryName] FROM [Categories]">           
</asp:SqlDataSource>
 
<asp:GridView ID="GridView1" runat="server" AutoGenerateColumns="False"
DataKeyNames="CategoryID" DataSourceID="SqlDataSource1">          
<Columns>             
    <asp:BoundField DataField="CategoryID" HeaderText="CategoryID"
        InsertVisible="False" ReadOnly="True" SortExpression="CategoryID" />  
        
    <asp:TemplateField HeaderText="Categories">       
        <ItemTemplate>                  
            <asp:DropDownList ID="ddlCategories" AutoPostBack="true"
            DataTextField="CategoryName" DataValueField="CategoryID"
            DataSourceID="SqlDataSource1" runat="server" AppendDataBoundItems="true"
            SelectedValue='<%# Bind("CategoryID") %>' />
       </ItemTemplate>
    </asp:TemplateField>
       
    <asp:TemplateField HeaderText="Products">       
        <ItemTemplate> 
            <asp:DropDownList ID="ddlProducts"
            DataTextField="ProductName" DataValueField="ProductID"
            DataSourceID="SqlDataSource2" runat="server" />
            <asp:SqlDataSource runat="server" ID="sqlDataSource2"
               ConnectionString="<%$ ConnectionStrings:NorthwindConnectionString %>"
                SelectCommand="SELECT [ProductID], [ProductName], CategoryID FROM [Products]"
                FilterExpression="CategoryID = '{0}'">
                <FilterParameters>
                <asp:ControlParameter Name="categoryParam" ControlID="ddlCategories"
                     PropertyName="SelectedValue" />
                </FilterParameters>                       
            </asp:SqlDataSource>
         </ItemTemplate>
    </asp:TemplateField>     
 
</Columns>
</asp:GridView>
 
</div>
</form>
</body>
</html>
 
 
I hope this article was useful and I thank you for viewing it.

Dynamically Add New Row in GridView Using Asp.Net

Introduction:
I decided to write this article because this has been asked so many times before at the forums(http://forums.asp.net) . Basically, this example shows on how to generate a Row in GridView with TextBoxes when clicking a Button that is residing inside a GridView Footer.

To get started, let’s grab a GridView control from the Visual Studio Toolbox and put it in the WebForm. The mark up would look something like this:

<asp:gridview ID="Gridview1" runat="server" ShowFooter="true" AutoGenerateColumns="false">
        <Columns>
        <asp:BoundField DataField="RowNumber" HeaderText="Row Number" />
        <asp:TemplateField HeaderText="Header 1">
            <ItemTemplate>
                <asp:TextBox ID="TextBox1" runat="server"></asp:TextBox>
            </ItemTemplate>
        </asp:TemplateField>
        <asp:TemplateField HeaderText="Header 2">
            <ItemTemplate>
                <asp:TextBox ID="TextBox2" runat="server"></asp:TextBox>
            </ItemTemplate>
        </asp:TemplateField>
        <asp:TemplateField HeaderText="Header 3">
            <ItemTemplate>
                 <asp:TextBox ID="TextBox3" runat="server"></asp:TextBox>
            </ItemTemplate>
            <FooterStyle HorizontalAlign="Right" />
            <FooterTemplate>
             <asp:Button ID="ButtonAdd" runat="server" Text="Add New Row" />
            </FooterTemplate>
        </asp:TemplateField>
        </Columns>
</asp:gridview>

Since this demo is intended to generate rows of TextBoxes in GridView, then we set up some TemplateFields columns so that GridView will automatically generates TextBoxes when a new row is being added.

As you can see I have set up a BoundField Column for displaying the RowNumber and sep up three TemplateField Columns in the Grid and added each columns a TextBox Control. You would also noticed that I have added a Button Control under the FooterTemplate at the last column in the GridView.

Note: Since we are added a Control in the GridView footer, then be sure to set ShowFooter to TRUE in the GridView.

Now let’s switch to the Code behind part of the webform.

As you may know, the GridView control will not show in the page once there is no data associated on it. So the first thing we need here is to set an initial data in the  GridView  Control. To do this, we can use a DataTable for binding our GridView.

Here’s the code block below:

    private void SetInitialRow()
    {
        DataTable dt = new DataTable();
        DataRow dr = null;
        dt.Columns.Add(new DataColumn("RowNumber", typeof(string)));
        dt.Columns.Add(new DataColumn("Column1", typeof(string)));
        dt.Columns.Add(new DataColumn("Column2", typeof(string)));
        dt.Columns.Add(new DataColumn("Column3", typeof(string)));
        dr = dt.NewRow();
        dr["RowNumber"] = 1;
        dr["Column1"] = string.Empty;
        dr["Column2"] = string.Empty;
        dr["Column3"] = string.Empty;
        dt.Rows.Add(dr);
        //dr = dt.NewRow();

        //Store the DataTable in ViewState
        ViewState["CurrentTable"] = dt;

        Gridview1.DataSource = dt;
        Gridview1.DataBind();
    }

As you can see, we defined four Columns in the DataTable called RowNumber, Column1, Column2 and Column3. The RowNumber column  will serve as the key for generating the rows in the GridView. Noticed that for Columns  1,2 and 3, I assigned an empty value for that columns since the GridView will be generated for the first time. You also noticed that I store the DataTable in ViewState so that we can reference the current data associated within the DataTable when it postbacks.

Now lets call the method above in Page_Load event:

    protected void Page_Load(object sender, EventArgs e)
    {
        if (!Page.IsPostBack)
        {
            SetInitialRow(); 
        }
    }

Running the codes above will give us this output below:


Now let’s create the method for generating the rows when clicking the Button. Here are the code blocks below:

    private void AddNewRowToGrid()
    {
        int rowIndex =0;

        if (ViewState["CurrentTable"] != null)
        {
            DataTable dtCurrentTable = (DataTable)ViewState["CurrentTable"];
            DataRow drCurrentRow = null;
            if (dtCurrentTable.Rows.Count > 0)
            {
                for (int i = 1; i <= dtCurrentTable.Rows.Count; i++)
                {
                    //extract the TextBox values
                    TextBox box1 = (TextBox)Gridview1.Rows[rowIndex].Cells[1].FindControl("TextBox1");
                    TextBox box2 = (TextBox)Gridview1.Rows[rowIndex].Cells[2].FindControl("TextBox2");
                    TextBox box3 = (TextBox)Gridview1.Rows[rowIndex].Cells[3].FindControl("TextBox3");

                    drCurrentRow = dtCurrentTable.NewRow();
                    drCurrentRow["RowNumber"] = i + 1;
                    drCurrentRow["Column1"] = box1.Text;
                    drCurrentRow["Column2"] = box2.Text;
                    drCurrentRow["Column3"] = box3.Text;

                    rowIndex++;
                }
                //add new row to DataTable
                dtCurrentTable.Rows.Add(drCurrentRow);
                //Store the current data to ViewState
                ViewState["CurrentTable"] = dtCurrentTable;

                //Rebind the Grid with the current data
                Gridview1.DataSource = dtCurrentTable;
                Gridview1.DataBind();
            }
        }
        else
        {
            Response.Write("ViewState is null");
        }

        //Set Previous Data on Postbacks
        SetPreviousData();
    }

As a summary, the code above gets the previous data stored from the viewstate and set the data stored from it into a DataTable so that we can add a new row based from the value entered from the TextBox.

You will also noticed that we call the method SetPreviousData() at the bottom part of the codes above. Now where is that method?  Below are the code blocks for that method:

    private void SetPreviousData()
    {
        int rowIndex = 0;
        if (ViewState["CurrentTable"] != null)
        {
            DataTable dt = (DataTable)ViewState["CurrentTable"];
            if (dt.Rows.Count > 0)
            {
                for (int i = 1; i < dt.Rows.Count; i++)
                {
                    TextBox box1 = (TextBox)Gridview1.Rows[rowIndex].Cells[1].FindControl("TextBox1");
                    TextBox box2 = (TextBox)Gridview1.Rows[rowIndex].Cells[2].FindControl("TextBox2");
                    TextBox box3 = (TextBox)Gridview1.Rows[rowIndex].Cells[3].FindControl("TextBox3");

                    box1.Text = dt.Rows[i]["Column1"].ToString();
                    box2.Text = dt.Rows[i]["Column2"].ToString();
                    box3.Text = dt.Rows[i]["Column3"].ToString();
                  
                    rowIndex++;

                }
            }
        }
    }

Now, since the methods are all set then we can call this at Button Click event of the Button.

  protected void ButtonAdd_Click(object sender, EventArgs e)
  {
        AddNewRowToGrid();
  }


As you can see the code above is very straight forward and self explanatory.  Running the code above will give us this output below: